Shed Moisture Control - A Complete Guide to Keeping the Atmosphere in Your Shed Dry
Introduction - Why Moisture Control Matters (Beyond Just Condensation)
I once visited a customer who proudly told me his shed was 'bone dry.'
No leaks, no puddles, no visible condensation. He kept all his tools neatly on French cleats along the back wall, each one oiled and hung like jewellery. But when he handed me a spanner, the jaws were brown with rust. The air felt dry, yet every steel tool in that shed was quietly corroding.
What he had wasn't condensation - it was atmospheric moisture. The kind you can't see... but which slowly eats through metal, softens timber, and causes paint blisters, swollen doors, and furry mould on anything made of leather or cardboard.
Most shed owners only start thinking about damp when the roof 'sweats' on a cold morning. But by the time you see droplets, the real problem has been building for weeks or even months. True shed moisture control starts long before condensation appears.
This article is about that bigger picture - how moisture gets into a shed, how it behaves once inside, and the practical steps you can take to keep the atmosphere in your shed dry all year round. Not just by heating or ventilating, but by understanding the system behind the damp.
You don't need guesswork. You just need the right sequence.
 Condensation on the inside of windows is an indicator of high internal humidity
Moisture in Sheds - Understanding the Enemy
Most shed owners first notice damp when their tools start rusting, a cardboard box on the floor goes soft, or a faint musty smell appears after a cold night. In a timber shed, you rarely see obvious droplets forming - the roof boards absorb moisture long before it ever becomes visible. But even when you can't see condensation, the atmosphere inside may already be drifting into the danger zone.
This is because a shed runs through a daily moisture cycle - warming up, cooling down, absorbing water, releasing water. It can look perfectly dry one day and feel clammy the next, even when nothing has changed outside.
These swings are driven by temperature-dependent humidity changes. Warm air holds more moisture; cold air holds less. As the shed cools overnight, the same amount of moisture suddenly accounts for a far higher percentage of the air's capacity - relative humidity jumps, often into the 80-90% range.
Why a Shed Can Feel Dry at Lunchtime... and Be Damp by Teatime
Here's the twist: the amount of moisture may not change at all. It's simply the temperature that makes the shed feel dry one hour and damp the next. Small timber buildings exaggerate this effect - their thin walls cool rapidly at night and warm quickly during the day, sending RH on a rollercoaster.
The danger is that high RH doesn't always look wet. It quietly corrodes tools, dulls plane irons, softens plywood, and encourages fungal growth on anything organic.
What the Dew Point Really Means (In Plain English)
The dew point is the temperature at which the water vapour in the shed becomes saturated - the point where invisible moisture turns visible. Most people think of it only as 'the point where condensation appears,' but it also tells you how close the shed atmosphere is to damaging your tools, timber and finishes.
If the shed air is 10°C with 80% RH, the dew point is around 6.5°C. Any surface colder than that - steel toolboxes, concrete slabs, metal shelving, even screw heads - will absorb moisture.
The Silent Moisture Tank: How Sheds 'Store' Water
Timber sheds buffer moisture. OSB, cladding, and framing absorb moisture when RH is high and release it when RH falls. This slows drying and speeds re-wetting. Once a wooden shed becomes damp, the structure itself behaves like a slow-release moisture reservoir.
This is why treating symptoms never solves the deeper issue. You must understand where the moisture is coming from and how it behaves inside the building.
The Five Moisture Pathways (Fix These First)
Before you think about ventilation, insulation, or heaters, it helps to understand how moisture actually gets into a shed. Most people focus on cold surfaces or air temperature, but those are symptoms. The real causes are the moisture pathways that feed the problem quietly and continuously.
Fix these, and the rest becomes easy. Ignore them, and you'll be fighting damp forever.
The Hidden Moisture Source Most Shed Owners Miss
Most sheds don't get damp because of the weather - they get damp because of what's happening underneath or inside them. A shed can be perfectly leak-free and still run at 80-90% RH simply because it's breathing moisture from the ground or from items stored inside.
- Ground Vapour: The most common cause. Damp soil, unsealed concrete, or a wet patch beneath the floor constantly release moisture upward. Even slightly damp ground can raise RH significantly.
- Rainwater and Roof Failures: Small leaks often don't drip; they raise humidity. Felt laps and end-grain joints wick moisture that later evaporates inside.
- Stored Moisture: Wet tools, mowers, plant pots, or fresh timber can release litres of water as they dry.
- Air Leakage: Gaps under doors or unsealed eaves let in warm moist air during the day, which then cools at night and condenses invisibly.
- Trapped Internal Humidity: Without crossflow, stale moist air becomes trapped. One vent alone rarely fixes the issue.
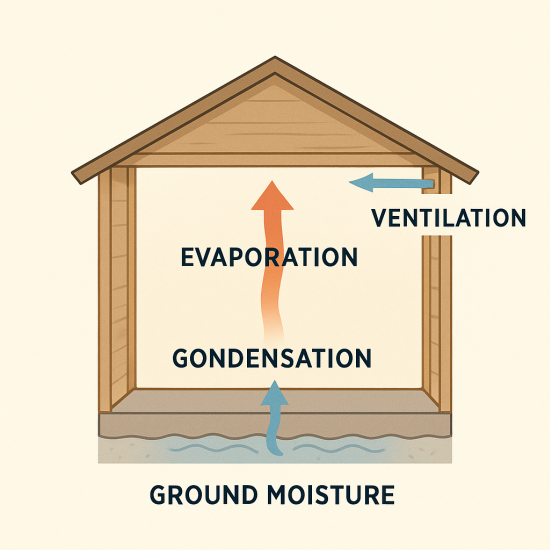 The main sources of moisture in a shed
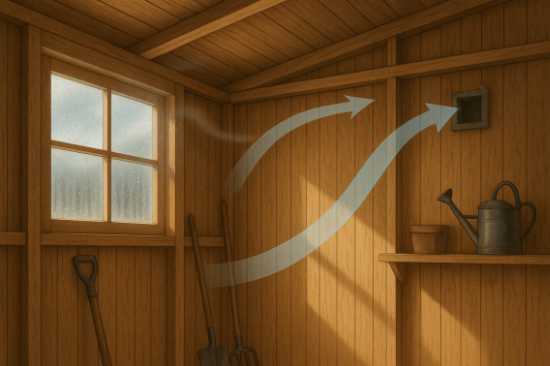
Smart Ventilation (Without Losing All Your Heat)
Once the moisture pathways are under control, the next step is controlled ventilation. Many assume more gaps equal better airflow, but in small timber sheds, that can make things worse. Ventilation works best when air moves in the right direction at the right time.
Crossflow ventilation - a low vent on one side and a high vent on the other - creates steady air movement. A single vent does almost nothing.
When Ventilation Makes Your Shed Wetter
Ventilation only helps when outside air contains less moisture than inside air. Cold, dry air is good. Mild, wet air is not. Bringing in moisture-heavy air that then cools overnight pushes RH upward.
Why a Humidistat Fan Helps
A humidistat fan only measures internal RH - not external conditions. But it acts like a safety valve, switching on when the shed atmosphere rises above a set point. It prevents stale, saturated air from lingering, even if it can't guarantee perfect drying in every weather pattern.
Controlled ventilation beats random air leaks every time.
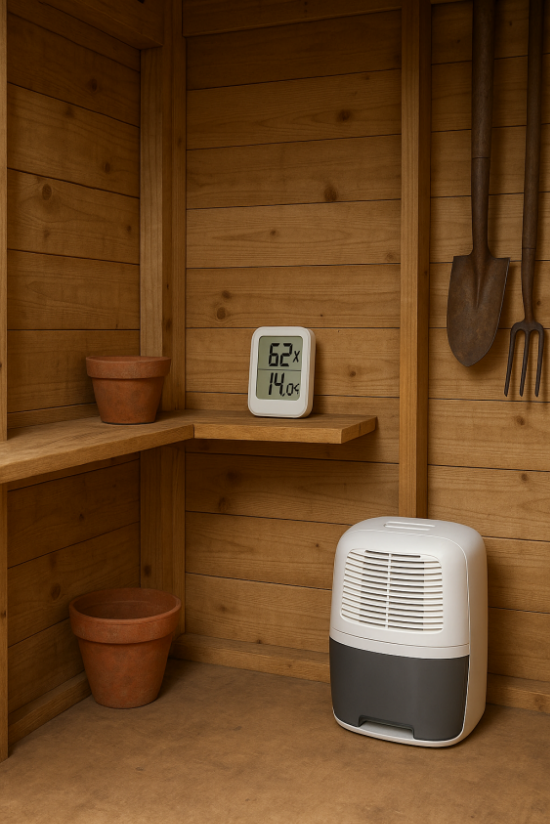
Moisture Removal - When and How to Use a Dehumidifier
Ventilation can stabilise a shed, but it cannot remove moisture if outside air carries just as much. A dehumidifier lowers the dew point - the real key to a dry shed.
Dehumidifiers don't replace fixing pathways or improving airflow. They come afterwards. Used correctly, they can turn a shed that sits at 80% RH into one that holds steady at 60-65%.
The Dehumidifier Trap
In a very leaky shed, or one with a damp base, a dehumidifier ends up drying the outdoors. It runs constantly and achieves little. But once pathways are controlled, even small units can quietly pull significant moisture out overnight.
Set a dehumidifier to hold around 60-65% RH. Below this, rust slows, timber stabilises, and mould struggles to grow.
Where electricity isn't available, moisture control relies on drying the base, airflow, raising items off the floor, and avoiding trapped dampness.
Where power is available, a dehumidifier is one of the few tools that removes moisture - rather than just shuffling it around.
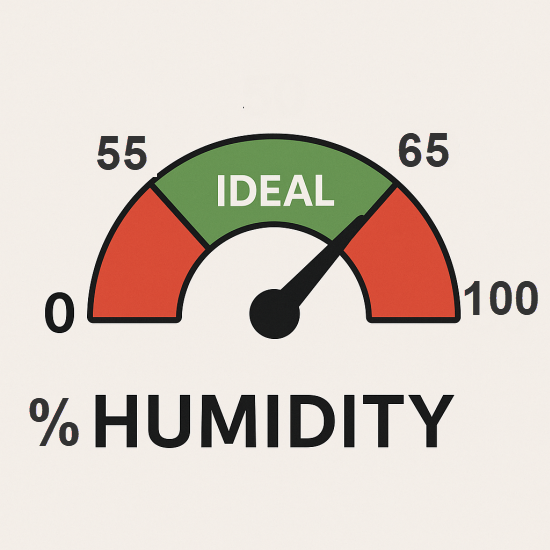 Aim to get the Relative Humidity below 65%
Insulation and Thermal Stability
Insulation's moisture role is simple: it slows down temperature swings. Because humidity rises when temperature drops, anything that prevents rapid overnight cooling helps stabilise the atmosphere.
Timber sheds often swing from warm to cold quickly. Insulation doesn't stop cooling, but it reduces the size of the RH spike.
Why Insulating a Shed Can Make It Wetter
Without a vapour control layer, warm moist air penetrates insulation, cools, and becomes trapped. This creates hidden damp pockets.
The roof should be insulated first. It sees the biggest temperature swing. Walls can follow - but only after moisture pathways and ventilation are under control. Insulating a wet shed locks moisture inside.
Insulation doesn't dry a shed. It creates a calmer thermal environment that makes every other measure more effective.
Heating - When It Helps (and When It Doesn't)
Heating is often misunderstood. It doesn't remove moisture - it just changes how much moisture the air can hold. Turn off the heater, and RH rises again.
Heating Alone Won't Fix Damp
If the shed has a damp floor or leaks moisture during the day, heating masks the issue rather than fixes it.
Where heating helps is in stabilising temperature and preventing cold traps on metal tools. A small oil-filled radiator set to 8-10°C can keep tools above dew point.
But heat only works after pathways, ventilation, and humidity control are established. Used alone, it hides the problem.
 Dehumidifier working to reduce humidity
Protecting Tools and Materials
Some items are more vulnerable to moisture - steel tools, machinery beds, sharpening stones, leather goods, and cardboard.
Tools rust because they sit against cold surfaces. A chisel resting on a cold shelf can fall below dew point even if the shed feels dry.
Why Tools Rust Even When the Shed 'Feels' Dry
They rust because the tool surface becomes colder than the air. Microscopic droplets form long before visible condensation.
Simple changes help: keep tools off the floor, allow air behind machinery, avoid storing steel against external walls, and use slatted shelving.
Timber also benefits from stable humidity. Kiln-dried boards can warp; green boards can release litres of water as they dry.
Protecting tools means creating a stable microclimate - not just drying the air.
The Correct Order of Moisture Control (Checklist)
Moisture control works only in the right sequence.
Most People Start at Step 4... But You Should Start at Step 1
- Fix moisture pathways
- Ventilate smartly
- Control humidity
- Add insulation
- Add gentle background heat
Follow this order to create a predictable, dry shed environment.
 Controlling moisture in your shed will make it a much nicer place to be
Final Summary
Moisture control isn't about one gadget or quick fix. It's a system of steps that work together to keep the atmosphere in your shed dry.
Fix pathways - ventilate - control humidity - stabilise temperature - add heat only if needed.
If you want to explore specific topics further, see the guides on stopping shed condensation or choosing between a heater and a dehumidifier. This guide sits above both - the bigger picture that makes everything else work.
Moisture Resources
- Stop Shed Condensation - why sheds drip and how to prevent it
- How to Measure Humidity in a Shed - the simple, accurate way to track moisture levels
- Shed Dehumidifier vs Heater - which works best in cold sheds?
- Ventilating a Shed - airflow methods that actually make a difference
- Why Metal Roofs Sweat - when the roof is the coldest surface
- Is Bubble Wrap Insulation Making Your Shed Damp?


Keep in touch with our monthly newsletter
Shed Building Monthly