Framing a Shed Wall: The Most Common Mistake (And How to Avoid It)
Introduction: The Mistake I Made With My First Shed Wall
My first time framing a shed wall, I thought I was being clever. I eyeballed the stud spacing, cut everything to 'about right,' and figured it didn't matter if things were a bit off - it was just a shed, after all.
Two weeks later, I had a warped back wall, a window that didn't fit, and enough frustration to last me the rest of the summer.
Since then, I've built and designed dozens of sheds. And I've learned that framing a shed wall properly is one of the most satisfying jobs in the whole process - if you get the basics right: timber size, stud spacing, door and window placement, and layout.
This guide walks you through all of it - step by step. By the end, you'll know exactly how to sketch your wall frame, choose the right materials, and avoid the classic 'what was I thinking?' mistakes.
Choosing the Right Shed Wall Height (and Why It Matters More Than You Think)
Wall height isn't just about headroom - it's about how the shed feels, functions, and fits within planning limits.
If you're building a garden office or workspace, you'll want full standing height across the entire floor. In that case, a low-slope pent roof with walls around 2.1m high is ideal. It gives maximum usable space while staying within UK planning rules (typically 2.5m total height near boundaries). The gentle pitch allows water runoff without forcing you to stoop at the back.
For a storage shed, you can go lower. A steeper apex or gable roof creates central height, meaning walls at 1.8-2.0m are often plenty. You only need full height in the middle; garden tools hang neatly on the sides, and you save on materials.
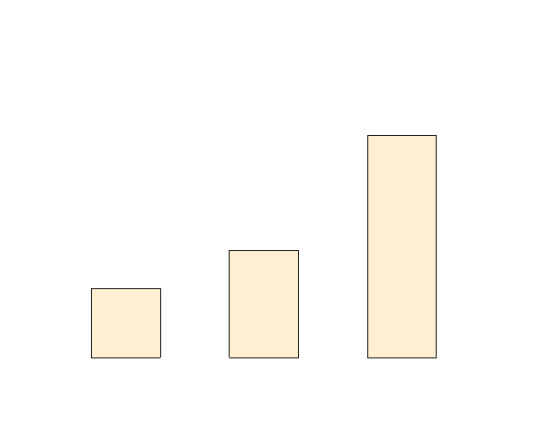 Different timber sizes for framing a shed wall - 2x2, 3x2 and 6x2
Still unsure? Measure your existing shed, ask a neighbour if you can check theirs, or visit a local shed showsite. Stand inside. Take a tape measure. You'll quickly get a feel for what works - and what feels cramped.
Let your shed's purpose and roof shape drive the decision. It's easier to adjust now than regret it later.
Timber Selection - Get the Shed Frame Sizes Wrong, and Everything Else Wobbles
The timber you choose is the backbone of your shed wall - get it right, and the rest of the job flows. Get it wrong, and everything from cladding to doors becomes a battle.
For small garden sheds, you can often use 45x47mm pressure-treated timber - especially for wall spans up to 1.8m. It's lightweight, cost-effective, and easy to handle. But if you're building anything bigger, or framing a wall over 1.8m wide, step up to 3x2" (45x70mm or 45x95mm). It keeps the wall stiff, gives better fixing for cladding, and stays straighter over time.
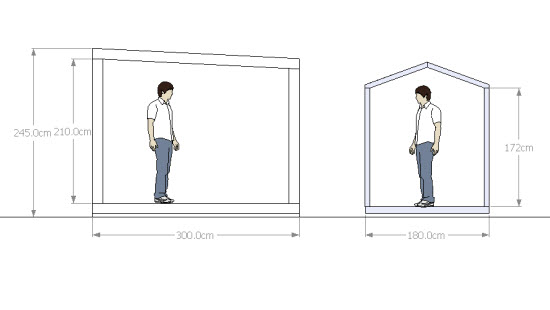 A couple of different examples of shed wall height requirements
Garden offices or insulated workshops often use 6x2" (47x145mm) timber. Not because they need the strength - but because they offer space for insulation, cabling, and interior boarding.
Always use pressure-treated timber for the entire frame, not just the base plate. It's exposed to swings in humidity and condensation inside the shed - treatment gives you insurance.
When designing, check what stock lengths are readily available - like 4.2m or 4.8m - and plan your cuts to make the most of them. If your wall is 2.1m tall, you'll get two vertical studs from each 4.2m length with minimal waste.
Framing isn't where you want to skimp. If the structure's solid, the rest becomes simpler - and faster.
How Far Apart Should Shed Wall Studs Be?
Stud spacing is one of those details that seems small - right up until your cladding doesn't land on a stud, or your insulation batts don't fit, or your window ends up half-supported.
For most shed walls, 600mm centres is standard. It's quick to lay out, efficient for timber use, and offers enough rigidity for external timber cladding, which is most common on UK sheds. But if you're planning to line the inside with OSB, panelling, or insulation boards, 400mm centres will give you much better fixing options and less flex.
There's a subtle but important difference between marking centres and spacing between studs. For typical wall layouts, we mark from the end of the wall in 600mm or 400mm centres - that way your cladding or internal lining lands properly. But when you're framing around a window or door, what matters is the clear opening size between studs - not just the centres. That's what determines whether your window fits... or wedges.
Find out more about the nuances of Shed wall stud spacing hereAlways double-check these measurements at the design stage. Even a 20mm misalignment in a door opening will cost you hours of adjustment later.
Get your spacing right, and your wall won't just stand straight - it'll work with you every step of the build.
Framing Around Shed Doors and Windows - Get It Right Before You Cut Anything
It's easy to think of door and window openings as gaps - but they need framing just as much as the wall around them. If you get the opening size wrong, the whole job grinds to a halt.
Let's start with doors. For most sheds, the door opening should be 20-25mm wider and taller than the actual door. That gives room for hinges, adjustments, and a bit of wiggle for swelling. Frame it with double studs on both sides, and always add a lintel across the top - even if it's not carrying a heavy load. The lintel spreads weight and prevents sag over time.
Windows follow the same rules: frame the opening slightly larger than the window unit - 10-20mm clearance all round is typical. Include a sill plate under the window and a header/lintel above. This not only strengthens the frame but gives you proper fixing points.
One key tip: plan your stud layout around your windows and doors, not the other way around. It's much easier to shift a stud 100mm in your drawing than to trim 100mm off a ready-made window when you're on-site.
And measure everything before you cut. Even if your drawings are perfect, the real world sometimes isn't. Double-check. Adjust once. Build once.
Drawing Your Shed Wall Layout - Pencil + Paper or SketchUp?
At some point, you need to stop visualising and start drawing. That's when your wall framing plan stops being an idea and becomes something you can actually build.
Option 1: Pencil and Paper
The simplest and fastest method. Use graph paper, ideally at 1:10 or 1:20 scale. Draw each wall as an elevation view. Mark your wall height,
stud spacing, door and window openings, and note any double studs, lintels, or blocking. It doesn't have to be pretty - just clear and accurate.
You'll use this to create your cutting list, check stud positions, and spot potential conflicts.
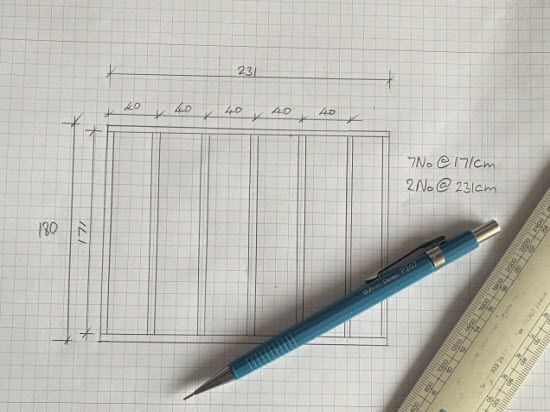 Framing a shed wall using a pencil and paper
Option 2: SketchUp
If you're building a more complex shed - or just like working digitally - SketchUp gives you 3D control. You can model the entire wall frame,
check how cladding aligns, position windows precisely, and see how your studs interact with roof overhangs or floor joists. It takes a bit of
learning, but it's powerful.
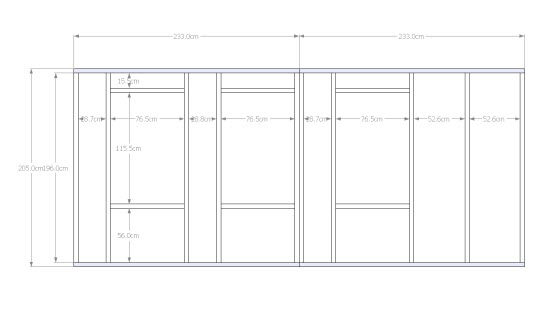 Framing a shed wall using Sketchup - It allows detailed and comprehensive dimensioning.
Whichever route you choose, the goal is the same: a plan that lets you build with confidence. One glance should tell you what length goes where, what's doubled, what's cut to fit. If you're not sure whether a detail is worth drawing - draw it. It's far easier to adjust a line on paper than a wall you've already nailed together.
Creating Your Timber Cutting List - Count It, Don't Guess It
There's a moment - once your shed wall drawing is done - when it's tempting to think, 'I'll just order a few extra lengths and figure it out as I go.' Don't. Guesswork at this stage leads to offcuts, second trips to the timber yard, and wasted time.
Instead, use your wall plan to create a proper cutting list. Count every vertical stud, top and bottom plate, lintel, sill, and noggin. If your walls are symmetrical, you can multiply quantities across panels. If not, do each wall separately. Label each part in your drawing, then list the quantity and length needed beside it.
Factor in your stock timber lengths - typically 2.4m, 3.6m, 4.2m or 4.8m. Try to get two components out of one length wherever possible. For example, two 2.1m studs from a 4.2m piece gives you zero waste.
And yes - buy 5-10% extra. Not because you planned badly, but because timber can arrive twisted, bowed, or full of knots. That little bit of overage will save your weekend. Offcuts always find a use: as noggins, bracing, temporary props, or even future repairs.
Don't forget your fixings, either. Nails are quick, especially with a gun, but screws give you the freedom to adjust - ideal if you're working solo or refining as you go.
The real goal? To walk into your build with everything counted, sketched, and stacked. Then, framing becomes a rhythm - not a rush.
Conclusion: What Framing a Shed Wall Teaches You
The first shed wall I ever built was wobbly, under-braced, and 12mm out of square. I still remember it - mostly because I had to redo half of it.
But once you get your head around stud spacing, timber lengths, and openings, something clicks. Framing a shed wall isn't just about putting timber together - it's about seeing the structure before it exists, then bringing it to life piece by piece.
It teaches patience. Planning. Precision. And the quiet satisfaction of things fitting together because you took the time to get it right.
By now, you've got the tools to do just that - a solid grasp of height, spacing, layout, and how to plan what you'll need. All that's left is to mark your cuts, drill your pilot holes, and make that first satisfying screw bite into timber.
Find out more about How to Build a Shed Wall
That's when the shed stops being an idea. And starts being yours.


Keep in touch with our monthly newsletter
Shed Building Monthly