Why Shed Wall Stud Spacing Isn't Always 600mm (And When It Should Be)
'Do We Measure to the Side or the Centre?'
Shed wall stud spacing seems like a straightforward concept - until someone asks whether you measure to the side of the stud or the centre.
That's what happened while we were laying out a wall plate on site. My colleague, new to framing, paused mid-mark and asked the question. It stopped me in my tracks - not because I didn't know the answer, but because the answer isn't as fixed as you'd think.
Shed walls are compact, often filled with openings, and don't always follow the neat 600mm grid used in house building. If you get the layout wrong, you'll run into problems: sheet materials that don't land on studs, window openings that don't fit, and time lost adjusting cuts.
 You'll soon find out which of these two works best and why
This article explains how on-centre shed wall stud spacing works, when to use it, and where it breaks down - so your shed wall layout starts right, and stays right.
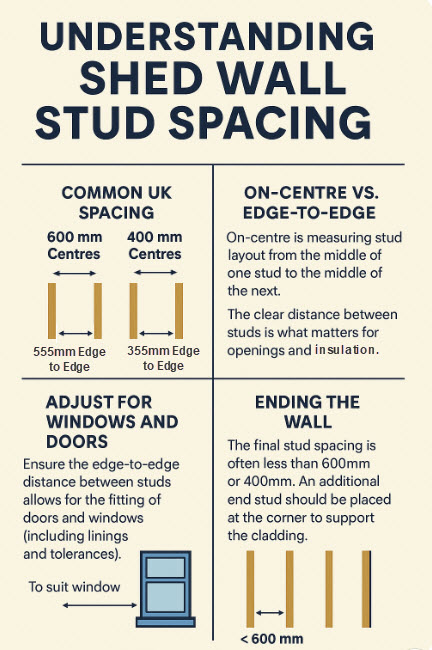
Why use 600mm (or 400mm) Centres for Shed Wall Stud Spacing
There's a reason shed wall stud spacing often follows a 600mm or 400mm grid - and it has everything to do with sheet materials.
Most timber-framed construction is designed around modular widths. In the UK, standard panel sizes are 1200mm or 1220mm wide, whether you're using OSB, plywood, insulation boards, or plasterboard. If you space your studs at 600mm centres, those panels break cleanly across studs every 600mm. That gives you solid fixing points at both ends of each sheet - no cutting, no floating edges.
The same logic applies at 400mm centres - typically used where more strength or support is needed, like in floors, ceilings, or walls with heavy internal lining.
It's fast, repeatable, and efficient. And that's why the on-centre layout method - measuring from one stud's centre to the next - became the standard for house building and large-scale framing.
But shed walls are a different beast. You're often dealing with shorter lengths, fewer studs, and real-world complications like windows, doors, and uneven runs. That's where the 600mm rule starts to stretch - and sometimes break.
Centre vs Face - The Most Common Source of Confusion on Shed Wall Joist Spacing
Once you understand that shed wall stud spacing is measured on-centre, the next question is: how far apart are the actual studs?
That's where confusion creeps in. Because if you're working with 400mm centres, as many shed walls do, the physical gap between the studs is not 400mm.
Here's what's actually happening:
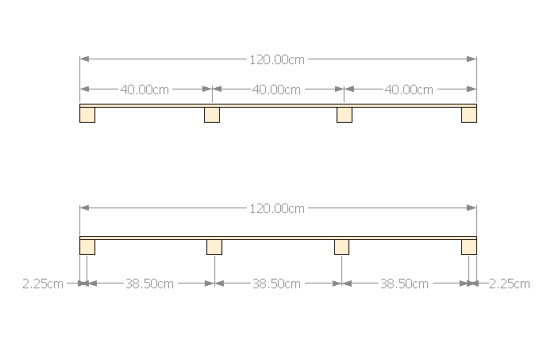
- You start with your first stud flush to the edge of the wall plate. Its centre is 22.5mm in from the edge (assuming 45mm-wide timber).
- Your next stud is marked 400mm on-centre - so the centre-to-centre spacing between the first and second stud is 377.5mm.
- The clear face-to-face spacing between those two = 400 - 45 - 22.5 = 332.5mm.
From the second to third stud, things settle into a pattern:
- Stud centres are 400mm apart.
- Each stud is 45mm wide, so the face-to-face gap = 400 - 22.5 - 22.5 = 355mm.
It's only from the second spacing onward that your layout settles into a consistent rhythm - because every stud is now placed by its centre line.
 This shows how setting out a 2.4m long wall panel with studs at 400mm centres gives a slightly different face to face spacing at each end of the panel.
This matters more than most people realise. If you're planning insulation or lining boards to fit between studs, it's that face-to-face spacing you'll be working with - and if you assume it's 400mm, you'll be trimming every piece.
Understanding this small detail means better-fitting components and fewer surprises when the cladding or boards go up.
Where the Grid Breaks Down - Framing around Shed Windows, Doors, and Openings
The theory of shed wall stud spacing is neat. Reality isn't.
As soon as you introduce windows or doors, the on-centre layout often stops working. Let's say you've laid out your studs at perfect 400mm centres - then you need to fit a 900mm-wide window. You can't just 'cut it out' of the existing grid. If you do, you'll likely end up with half a stud on each side, no proper fixing point, and poor support.
This is where you shift gears and prioritise edge-to-edge spacing instead of centres.
You want the clear face-to-face opening between studs to match your window or door size - plus any allowances for fitting tolerance, shims, and internal linings. For example, if your window is 900mm wide, you might frame the opening at 920mm to allow a comfortable fit and adjustment space.
Frame with full-height studs on both sides of the opening. Add a sill below and a lintel above. Once the opening is set, adjust the stud positions on either side to reconnect to your on-centre grid.
This is how real shed walls are built - by combining structural logic with practical layout choices. The rule of centres gives way to what actually fits.
Internal Lining vs External Cladding - Choose Your Priority
When planning shed wall stud spacing, one of the key decisions is whether to prioritise external cladding or internal lining. And that choice can affect where you place your studs.
If you're building a simple garden shed with timber cladding on the outside and no internal finish, you'll usually want to align studs so that the edges of your cladding boards land neatly on them. That might mean adjusting the stud layout slightly - perhaps spacing the last two studs unevenly to accommodate cladding widths.
But if you're lining the inside of the shed - say with OSB, ply, or insulation boards - you might do the opposite: keep a rigid 400mm or 600mm centre pattern so that your internal sheets fit snugly and screw neatly along stud lines. The outside may need a bit of trimming or clever board joins, but the inside will be smooth and solid.
There's no right answer - but choosing your priority early lets you shift stud positions intentionally, instead of finding out too late that nothing quite lines up.
What to Do at the Shed Stud Spacing at the End of a Wall?
In a perfect world, your final stud would land exactly at the end of the wall. But with shed wall stud spacing, that rarely happens.
If you're working to a 400mm or 600mm grid, and your wall is, say, 3.8 metres long, the last stud in the sequence will probably fall short of the edge. So what do you do?
You've got two options - and both are valid:
- Stick to the grid: place your last full stud at 3600mm (or whatever the final module is), then add a separate end stud flush to the wall's edge. This keeps your internal linings or insulation aligned to the grid, and gives you a full stud at the corner for cladding or joining another wall.
- Shift the last couple of studs slightly: to even out the spacing and land neatly on the edge. This works best when external appearance or cladding layout is more important than internal grid alignment.
Whichever you choose, don't leave the end floating. Always add a stud at the edge - it's your fixing point, your structural anchor, and the part you'll kick yourself for forgetting later.
Marking a Shed Stud Wall Accurately - Before You Cut Anything
Once you've finalised your shed wall stud spacing - and accounted for any windows, doors, or layout adjustments - it's time to lay out your wall plates. This step takes just a few minutes, but it's where accuracy pays off.
Lay your top and bottom plates side by side on a flat surface. Measure from one consistent end (usually the same end you'll start framing from) and mark every stud centre at 400mm or 600mm intervals - depending on your layout.
At each mark, use a square to draw a single vertical line across both plates. This line represents the centre of the stud. To make the layout unambiguous, place an 'X' on the side of the line where the stud will actually go. That way, when you're assembling the frame, you know which side of the line to align the stud face to.
For door and window openings, you won't be marking centres - instead, mark the edges of the opening, and note any sill plates, lintels, or double-stud positions. Label these clearly.
Marking every position ahead of time keeps your layout tight and your assembly smooth. The plate becomes a full-scale plan - and the studs go exactly where they should.
 Key points to remember when working out your shed wall stud spacing
Why My Colleague Asked the Right Question
That moment on site - standing there with a pencil and tape measure, and a colleague asking 'Do we measure to the side or the centre?' - stuck with me.
It wasn't just a good question. It was the right question.
Because once you understand what shed wall stud spacing really means - centre vs. face, when to follow the grid and when to break it - you stop guessing. You stop trimming boards that don't fit. You stop hoping everything will line up.
You start designing with confidence. Measuring once. Cutting once. And building walls that go together straight, square, and strong - no matter how many windows or what cladding you're using.
It's not about memorising a rule to get the shed wall stud spacing right. It's about understanding why the rule exists - and when you're better off adjusting it.


Keep in touch with our monthly newsletter
Shed Building Monthly