How to Build a Shed Wall Like a Pro - Even If You've Never Framed One Before
After years of building shed walls in my workshop on a flat 'framing bed', I've learned this much: your wall is only as good as the surface it's built on. For a long time, I pre-built panels in the workshop and hauled them to site on a flatbed truck. Recently, I've shifted to building them on-site - right on the new shed floor - using pre-cut parts.
What changed? The weather. And my thinking. You don't need a perfect workshop - you just need a flat, true surface. That's what makes shed wall construction accurate, repeatable, and square.
This article builds on earlier guides about framing and stud spacing. Now we get hands-on. I'll show you how to go from raw timber and a plan to a complete wall panel - flat, strong, and ready to raise.
 This article will help you get from the paper plan to all of the walls in place ;-)
Materials and Tools Checklist to Build a Shed Wall
Before anything else, the most important thing is this: have a plan in your hand. It can be a sketch, a cutting list, or a printed drawing - but if you don't know exactly what you're building, everything else becomes guesswork.
Once the plan's sorted, the rest falls into place.
Timber:
- Studs (and plates): 45x45mm or 45x70mm treated timber is typical for garden sheds
- Use the same section throughout - for studs, top plate, and bottom plate
- Larger sheds may use 45x95mm, but most domestic sheds don't need it
- Lintels over doors or windows can be doubled-up from the same timber
Fixings:
- Screws:5.0x100mm for plates and major joins; 5.0x80mm for bracing
- Nails: Faster, but harder to adjust - choose based on your comfort
- Brackets or angle fixings for floor/base anchoring
Tools:
- Tape measure, pencil, framing square
- Drill/driver and saw (circular or hand)
- Workbench or trestles for cutting and clamping
- Optional extras: breathable membrane, sheathing, or lining if you're insulating.
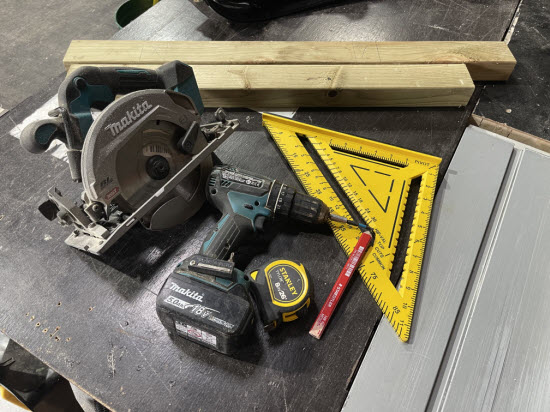 Get these ready before you start to build
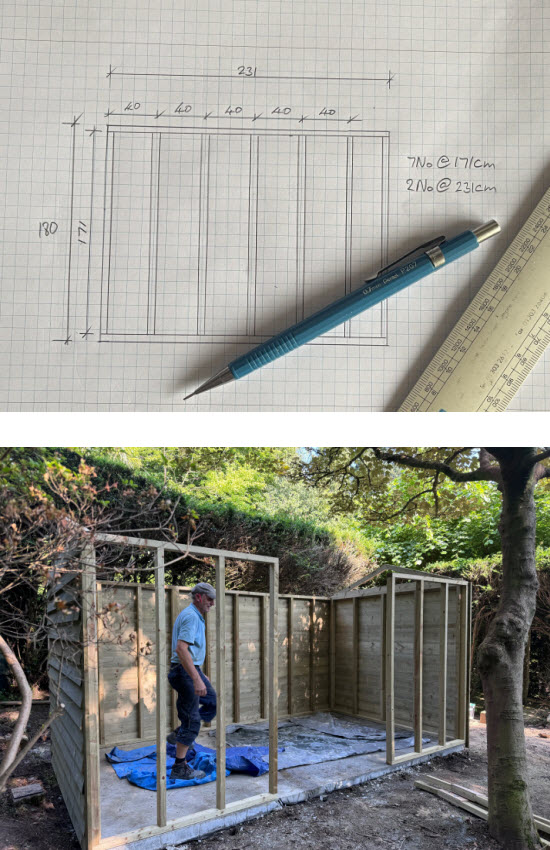
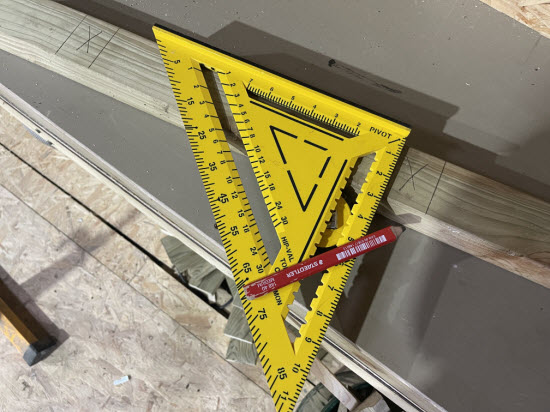
Cutting and Marking Your Shed Wall Plates
Building a shed wall doesn't start with a saw - it starts with a pencil.
Once you've cut your top and bottom plates to length, lay them out side by side, face up, on a flat surface. This lets you mark both at once and ensure everything lines up. Use your plan and start from one end - consistently from the same side.
Mark your stud centres at 400mm or 600mm intervals, depending on your layout. Use a square to draw a straight vertical line across both plates at each mark. Then - and this is key - draw a small 'X' on the side of the line where the stud will actually go. That tells you which side to fix the timber on.
For windows and doors, don't mark centres - instead, mark the edges of the opening. Include extra studs if needed to support headers or add strength beside doors.
This is the moment to think through what you're building. Every stud, plate, and opening gets marked before you pick up the drill. That's what makes the wall frame come together cleanly, without head-scratching halfway through.
 Mark your shed wall plate accurately.
Framing the Shed Wall - Studs, Openings, and Assembly
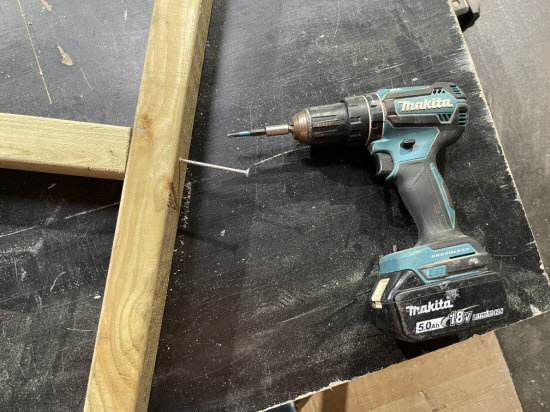
Lay your bottom and top plates flat and parallel on a clean surface - usually your shed floor or another level base. Start by fixing the end studs first. This gives you a solid rectangle - like a picture frame - that holds everything in place.
With that frame built, drop in the remaining studs. If they're cut accurately, they'll fit snugly - tight enough not to fall out, but easy to nudge into position. Align each one with your pencil lines and Xs from the layout stage.
Before fixing everything down, take a minute to check the frame is square: measure the diagonals from corner to corner. If both measurements match, you're square. If not, adjust gently before you fix anything.
 Fixing a shed wall stud in place - I highly recommend a cordless drill for your shed project!
How to build a shed wall with a window or other opening:
- Add vertical studs either side
- Fit a sill under windows, a lintel above doors
- Double up studs beside wide openings
- Leave tolerance for linings and fitting
Once everything's where it should be, screw through the plates into each stud. Reinforce corners and lintels if needed - and make sure the frame stays flat.
A shed wall built square on the ground is easier to raise, easier to join, and more satisfying to work with.
Cladding, Sheathing, and Weather Protection for Your Shed Wall
Before you lift the wall upright, stop and ask: can I install some of the outer layers now, while it's still flat?
For many sheds, it's easier to fix cladding or sheathing panels while the wall is still on the ground. You're working at waist height, the frame won't move around, and everything's easier to align. This works especially well with:
- OSB or ply sheathing
- Feather edge, T&G, or shiplap cladding
- Breathable membranes or vapour barriers
If your plan allows, fit these now. Just be careful to leave the corners clean - especially if cladding will overlap adjoining walls. Trim later, or allow for a slight overhang if needed.
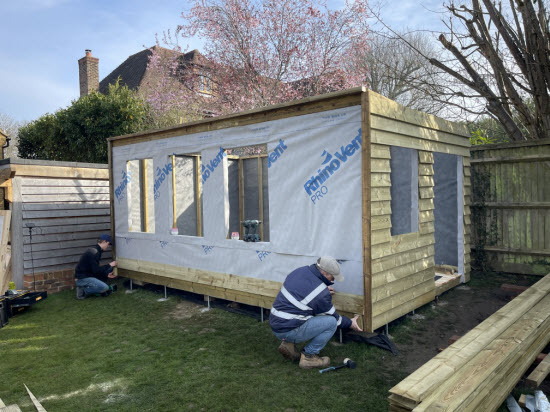 For this project I lifted the wall frames into place before installing the breathable membrane and featheredge cladding
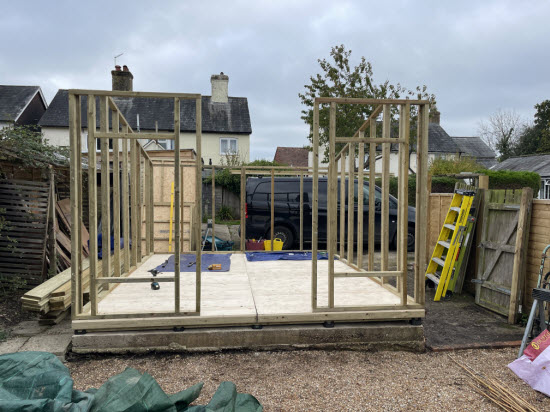
It's also worth noting: I prefer to complete all four shed wall panels first, then move on to assembly of the whole shed. Once framed and checked for square, the panels are put to one side, ready to be raised and fixed. This method keeps your workflow smooth, and means you're not stopping halfway to cut more timber.
Whether you clad your shed walls now or later depends on your space, your cladding method, and how many hands you have on-site. But if the setup suits, cladding flat makes for faster, cleaner work.
Raising and Fixing the Shed Wall Frame in Place
Once your wall panels are framed - and possibly clad or sheathed - it's time to raise them into position.
Start with one of the long walls if possible. It provides a strong base reference and makes it easier to align the shorter ends. Lift the panel into place and position it carefully on your shed base or floor.
Check the following before fixing:
- The bottom plate aligns correctly with the floor or bearer system
- You've prepared the appropriate fixings - screws for timber, brackets for concrete
- The wall is standing plumb using a spirit level
- It's sitting flush at the corners, with any cladding or sheathing accounted for
Fix the bottom plate securely first. Then anchor the ends using brackets, long screws, or corner joints depending on your shed design.
Continue with the remaining walls. Use temporary bracing as needed to hold everything true while each panel is fixed. Check for plumb and square alignment as you go. The final wall may need a slight adjustment to slot in cleanly - especially if cladding overhangs are involved.
With the walls upright and fixed, your shed starts feeling real - and the roof isn't far behind.
 For this project I clad the walls first whilst horizontal before lifting them into place
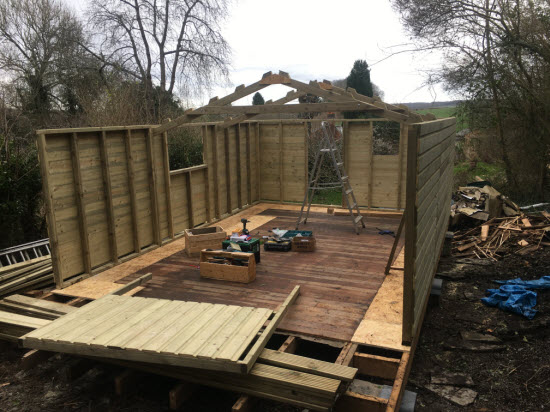
 I erected all of the shed walls for this project before starting cladding
Common Mistakes to Avoid
Even experienced builders hit snags when framing shed walls. These are the most common mistakes - and how to avoid them from the start:
1. Misaligned shed wall stud spacing: Studs marked in the wrong place result in sheeting that doesn't land properly. Double-check spacing before cutting, and always mark centres with clear 'X' placement.
2. Forgetting to allow for openings: Frame a perfect shed wall - and then realise you forgot to leave room for the door. Mark window and door openings early.
3. No stud at the wall end: Add an extra stud at the edge so there's something to fix cladding or adjoining walls to.
4. Skipping the diagonal check: Measure corner-to-corner diagonals before screwing anything down.
5. Working without a shed plan: Guessing wastes more time than measuring ever will. Start with a clear plan.
Conclusion - Build a Shed Wall That Sets the Tone for the Whole Shed
Building a shed wall isn't about getting it done - it's about getting it right.
From laying out the plates to checking diagonals, every small decision you make here will echo through the rest of the build. A straight, square wall makes every corner cleaner, every board easier to fix, and every screw land where it should.
That's why this part matters so much. Once your walls are up and locked in place, the shape of the shed is already set. If the base was level and the frame is square, the rest of the job starts to flow.
And the best part? You've just done the heaviest lifting - quite literally. Now it's on to corners, roof framing, and watching the structure take full shape.
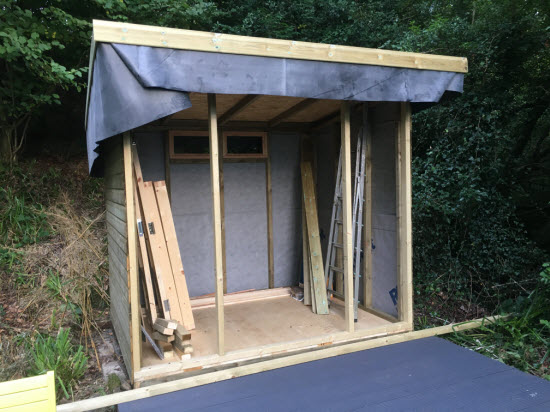 I pre-made and clad three walls of this shed. I could then quickly get the roof on to keep the materials and floor dry
Next Steps - What Comes After the Shed Walls Are Up
Once the walls are up, the next step is to get the roof on as soon as you can. This gives the shed some measure of weather protection, so you can carry on working in the dry. For help, see:
If you plan to insulate or line the walls, now's the time. Mark fixing points for shelves or hooks while the studs are still visible.
For more detail, see:
With the roof on and the walls secure, the structure's done - the rest is refinement.


Keep in touch with our monthly newsletter
Shed Building Monthly