Why Shed Wall Insulation Fails (And How to Get It Right)
The simple layering mistake that turns warm sheds into soggy ones
Ever Put Lettuce on Hot Toast?
It was the most disappointing sandwich I ever made.
Fresh bread. Thick-cut ham. Warm toast straight from the grill. And then-because I wasn't thinking-crisp lettuce placed directly on that steaming surface. The result? Soggy lettuce. Limp toast. A sandwich that looked great on the outside but quickly fell apart.
Strangely, this is exactly what I see when people insulate their sheds.
They get excited, buy insulation, staple it between the studs..... and think the job's done.
But just like building a sandwich, shed wall insulation only works when the layers are in the right order. And if you get it wrong, it goes soggy-literally. Moisture builds up in the walls, condensation takes hold, and soon your shed smells more like compost than carpentry.
Let's fix that.
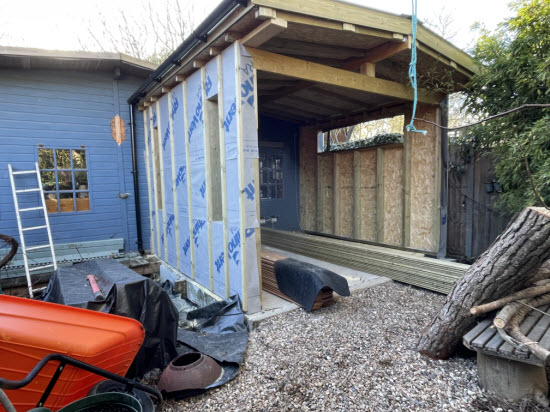 Shed wall under construction. OSB Sheathing with breathable layer on outside. Battens ready for installation of cladding on the outside. Insulation to be installed between the
wall studs on the inside. Followed by a Vapour Control Layer and then the internal lining.
Shed wall under construction. OSB Sheathing with breathable layer on outside. Battens ready for installation of cladding on the outside. Insulation to be installed between the
wall studs on the inside. Followed by a Vapour Control Layer and then the internal lining.
The Big Mistake Most Shed Insulation Projects Make
It's Not Just About Insulation - It's About the System
Here's the most common story I hear:
'We filled the spaces between the studs with fibreglass insulation and lined it with plywood. It's definitely warmer now!'
And it probably is-because they also sealed up draughts and slowed down airflow. But warmth alone isn't the goal. Controlling moisture is just as important. Without that, you're storing up a hidden damp problem inside your walls.
Moisture in sheds typically comes from inside - warm, moist air from your breath, a kettle, a heater, or even damp tools. If it finds a cold surface (like the back of insulation or inside the wall), it condenses. That leads to:
- Black mould
- Rotting studs
- Wet insulation that stops working
This happens out of sight - until it's too late.
The Layers That Actually Work
Think Like a Wall Builder, Not Just a Shed Owner
To properly insulate a shed, you need to treat it like a mini-building. That means each layer has a job to do - and they work best in sequence.
Here's what a full shed wall insulation system looks like:
- 1. Outer Layer - Cladding: Weather-facing surface like shiplap, matchboard, or featheredge. First defence against rain and wind.
- 2. Breathable Membrane: Sits behind cladding and outside OSB. Lets moisture escape while keeping water out - think Gore-Tex for your shed.
- 3. OSB Sheathing: Adds strength, braces the shed, and gives insulation something to sit against.
- 4. Insulation: PIR boards or mineral wool, fitted snugly between studs. Gaps = heat loss.
- 5. Vapour Control Layer: Impermeable plastic that stops moist indoor air reaching cold walls. Must be sealed tight.
- 6. Internal Lining: Plywood, OSB, or plasterboard. Protects the vapour barrier and gives a clean finish.
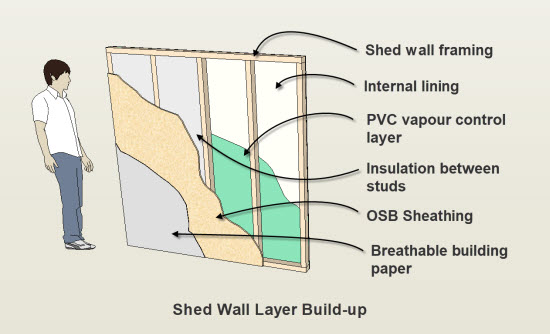 The layers required for an effectively insulated shed wall
But What If I Don't Want to Do All That?
You don't always need the full sandwich.
If your shed is mostly used for storage, and you're not spending long periods inside, a simpler approach can still help:
- Add a lining (e.g., thin ply) to block draughts
- Use temporary insulation like roll-up blankets or foam sheets during winter
- Add a plug-in heater with a timer to warm the space before you use it
- Leave small ventilation gaps to prevent stale, damp air building up
This isn't perfect, but it's low cost and avoids the worst-case scenario - walls that look good but are rotting from within.
Common Shed Insulation Myths (That Cost You in the Long Run)
- 'Any insulation is better than none.'
Yes - but only if the rest of the wall is designed to let that insulation work. Otherwise, you're just trapping moisture. - 'You can add insulation to any shed.'
Technically true. But if your cladding leaks, there’s no breathable layer, or you don't install a vapour barrier, it won't be effective long-term. - 'I'll just stuff in some glass fibre and line it with MDF.'
That's a recipe for soggy insulation and swelling boards within the year.
Ready to Upgrade Your Shed?
Here's what to do:
- Inspect your current shed walls. Do they have breathable membranes? Any damp smells?
- Decide on your end goal. Is this an office? A workshop? A chill-out space?
- Plan your layers. Don't just buy insulation - sketch your wall from outside to inside.
- Start small. Even lining your shed can reduce draughts and make heating more effective.
- Consider your future needs. If you're investing time and money, you may as well do it once and do it right.
Check out our detailed guides on:
- The best materials for lining a shed
- Choosing insulation for shed walls
Back to the Sandwich
Remember that soggy sandwich I made?
It had all the right ingredients - but in the wrong order. And what should've been satisfying ended up as a disappointment.
That's what happens with shed wall insulation when you don't think in layers. Even the best materials fail if they're put together badly.
Want a shed that's warm, dry, and lasts for years? Build it like a sandwich. In the right order. With the right layers. And it'll stay fresh for years to come.


Keep in touch with our monthly newsletter
Shed Building Monthly