How To Make your Shed Roof Construction Look Easy And Professional
Why wait until you start your shed roof construction to find out the mistakes that can be made? Here is a sequence of how to build your roof and some of the common mistakes you can easily avoid.
This means that you will hopefully learn from them and that your project will take less time and be more enjoyable.
So where is the best place to start with building a shed roof?
Funnily enough the best place to start shed roof construction is when you have completed the shed floor.
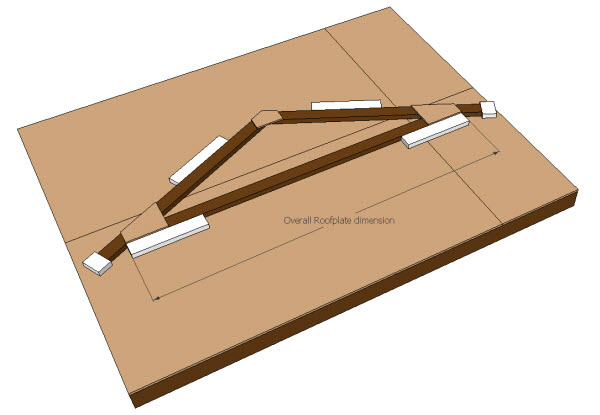
I recommend building your own shed trusses using a jig. The reason for this is that all woodworking is done on the ground and the jig ensures that each truss is identical to the next. Your shed plans will identify the size of each member of the truss and how to set out the roof truss jig shown in the image below. Then the roof truss members are simply inserted in the jig and the plywood gussets nailed into place. Once the trusses are complete they are set aside until the wall panels have been constructed.
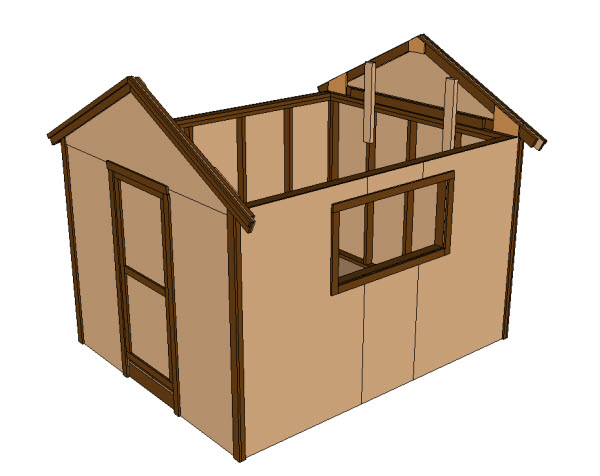
The shed roof building process can re-start once you have erected the wall panels and you have a level surface at the top of the wall to support the roof.
The first trusses to erect are at the gable ends, with the siding fixed. With these in place you have an enclosed space at each end of the roof.
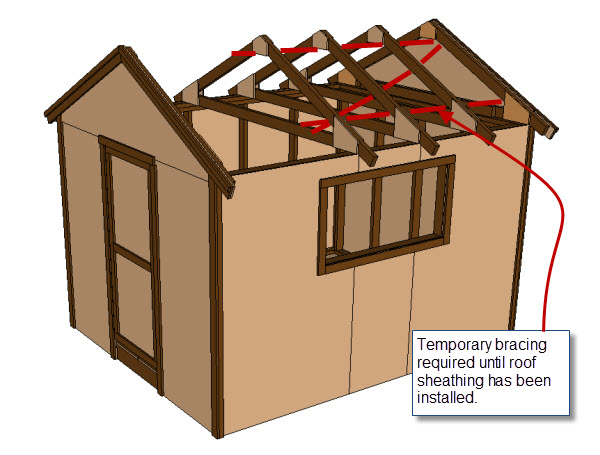
From here the roof trusses are lifted in to position. One point to note is that the trusses won't stay in position exactly as you place them without you giving them a little help. If you screw a horizontal batten and brace as shown on the sequence diagram below this will keep the trusses in place and upright until you are ready to fix the roof sheathing.
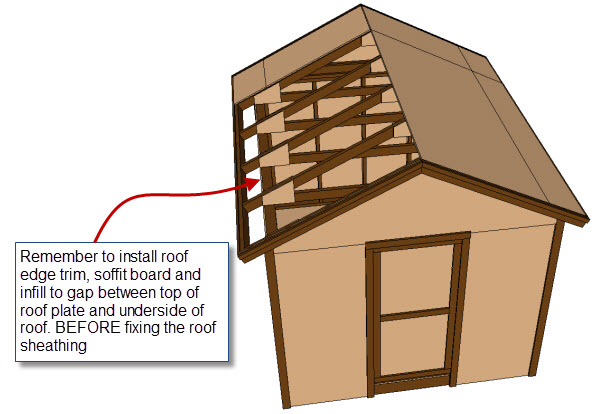
The final step is to fix the roof sheeting. But before you do this. Fix the soffit boards, rafter end trim and filler pieces between the top of the roof plate and underside of the roof deck. This is the first of the 5 mistakes that you can easily avoid during your roof build outlined below...
In addition to the above simple steps to assemble the shed roof, what could go wrong?
Well....Here are 5 shed roof construction mistakes that you can easily avoid
Once you are aware of them it will make the construction of your shed roof easier and of better quality in the long and short term.
1. Construction sequence
The first mistake relates to the sequence above. It might seem logical to build the walls, then add the roof trusses and the roof decking and only finally to add the trim and soffit boards. However experience shows that adding the soffit boards and some of the trim pieces before fixing the roof decking makes the job much easier. It is much easier to get your hands in and to get access to the soffit boards before the roof panels are fixed. Bear this in mind as you reach this stage in the project.
2. Understanding accuracy
The second mistake relates to the accuracy of angles. You will use a roofing square as part of your shed building tool kit. But making a marking or cutting error of just half or one degree in either and fixing the ends together can lead to variations in the length of your trusses and an irregular shaped roof. I recommend that you create an easily constructed, ‘truss jig/template’ on the flat surface of the floor of your shed. This means that you have good dimensional control of the overall span and each of the trusses will turn out dimensionally the same.
3. Missing out components
The third shed roof construction mistake relates to not doing your homework first and missing out components. Two items that are commonly omitted are drip edge and roof tie downs. The drip edge is a folded metal profile that fixes to the bottom edge of the roof slope. The roof covering laps over the drip edge and protects the bottom edge of the roof board from water damage. Not such a big problem in the short term but over time the boards can swell, delaminate and rot. So when it comes time to re-cover the roof the deck may need replacing too. The second item that is easy to omit is hurricane ties to connect the roof trusses to the wall plate. In high winds the greatest problem faced by a shed roof is not supporting the dead weight of the roof, but uplift created by the wind, a bit like an aeroplane wing. Using these small metal clips to fix the roof trusses to the wall plate with nails ensures the roof stays attached to the shed. In some particularly hurricane prone areas, local building codes require that small structures such as sheds are anchored to the ground with ground anchors too.
4. Power tools
The fourth mistake relates to not making the most of power tools. Building your shed takes an enormous amount of physical and mental energy. It could be the first time that you have taken on a project of this size and so to give you a ‘leg-up’ why not make the most of modern power tools to save some of the physical work and give you some time to think about what you are doing. Most folks will have an electric drill that can double as a power screwdriver. Having a rotary saw to help you to quickly and accurately cut sheets of ply to size will save you hours and give a much straighter cut than most can achieve using a hand-saw. A chop-saw or nail gun might also help. The chop saw for cutting timbers to length and the angles required for the rafters. The nail-gun for saving your arm when it comes to fixing ply and boards to the framing. One useful tip to consider if you think that buying an expensive tool for just one job is to buy the tool for the project and then to resell on eBay afterwards. This generally works out cheaper than hiring the tool from a hire shop.
5. Don't work alone
The final tip to help make the shed roof construction process enjoyable, is that I recommend getting someone else involved in your project to give you help with the heavier work such as lifting panels and trusses into position. And also to discuss the finer points of the job and make suggestions. This could be another family member or a friend who might want to undertake a similar project himself. So would be keen to learn from all of the mistakes that you are avoiding.
In summary the 5 shed roof construction mistakes that you can easily avoid are:
- 1. Getting the construction sequence right and installing soffits and trim before the roof deck
- 2. Using a jig to construct the roof trusses for accuracy and consistency.
- 3. Do your research to make sure you include all of the required roof components
- 4. Using power tools to conserve your mental and physical energy.
- 5. Get someone else involved to help you with the heavier loads. And also to offer helpful suggestions and observations.
Whilst on the subject of doing your homework, the following article gives a good overview on all of the componenets needed in a shed roof. Whilst these two articles might prompt some thoughts on whether you should incoroporate a loft or skylight in to your project.
Finally I want you to finish your project in better shape than you started to please give this article on aspects of safety to consider when building your shed roof.


Keep in touch with our monthly newsletter
Shed Building Monthly