Adjusting Bifold Log Cabin Doors: How We Get Them Closing Again
When a sunny day means trouble later
Andy used to dread sunny days. His wife would open all the glazed bifold doors on their summerhouse to enjoy the garden. Andy knew what was coming later: a struggle to get the doors shut again.
I had installed the cabin for a neighbour, and it had worked well for several years. The problem was not obvious at first. The door opening was square, but the individual door leaves had gradually moved out of shape. The small knuckle hinges were also difficult to adjust, and the three-hinge arrangement made fine corrections fiddly.
This is how we got the doors working again. It is a two-stage repair: first bring each door leaf back towards square with an adjustable brace, then replace the awkward hinges with adjustable gate hinges so the doors can be aligned with each other and the lock.
The method can help with other framed timber doors that have moved out of shape. This example uses hinged timber bifold doors, a style used on many Scandinavian-style log cabins. This cabin was made by Dunster House.
 This was the cabin when just completed with the doors opening smoothly
Check the opening and the doors before adjusting anything
Start by checking whether the problem lies with the opening or with the door leaves. If the opening has moved, adjusting the doors alone will not correct the cause.
Measure diagonally across the opening from corner to corner, then take the measurement across the other diagonal. If the opening is square, the two measurements should be equal. Then measure the diagonals of each door leaf in the same way.
On Andy's doors, the opening was square, but the leaves were around 10-15 mm out of square. The weight of the glazing had gradually pulled the timber frames out of shape. This gave us a clear first step: correct the shape of the leaves before trying to adjust where they sat in the opening.
Stage one: pull each leaf back towards square
We used the lashing-strap version of my adjustable shed door brace. Each brace has two lashing points and a length of wire rope with a turnbuckle. The turnbuckle shortens or lengthens the rope, allowing you to draw a door frame back into shape.
The wire is visible through the glass, but it is relatively fine. On this set of doors, that was a small visual compromise compared with replacing four glazed leaves.
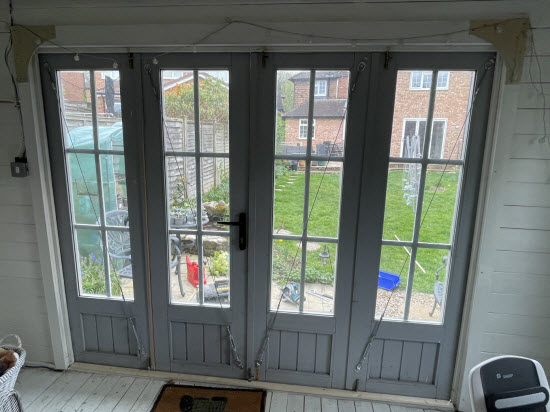 Internal view of the doors with each door leaf braced
1. Position the lashing points
For each leaf, position one lashing point near the top of the stile on the hinge side. Position the other towards the bottom of the opposite, outer stile, so the brace will run diagonally across the door.
Check that the points will be fixed into sound timber and that the wire will clear the glass and door furniture. Mark the screw positions. Each lashing plate is fixed with two 6 mm hex-head coach screws. Pre-drill with a 4 mm drill bit to reduce the risk of splitting the stile and help the screws grip well.
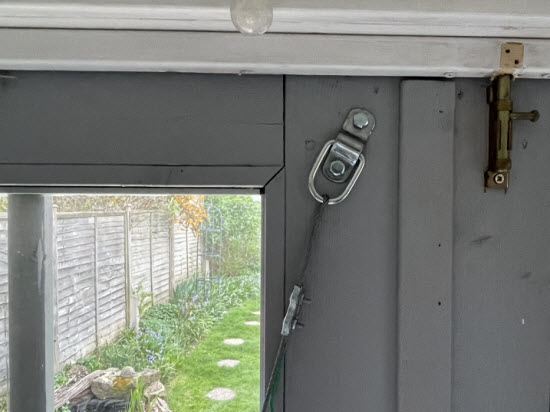 View of top fixing point with lashing point in place and wire looped through it
2. Fit the wire rope and turnbuckle
Secure the fixed end of the wire rope, then thread the rope through the higher lashing point and secure it with a wire-rope grip. Set the turnbuckle towards the longer end of its adjustment range. This leaves room to shorten the brace as you take up the slack.
Hook the turnbuckle over the lower lashing point and thread the rope through its eye. Pull the rope reasonably taut and secure it with the second grip. Keep the rope grips and turnbuckle ends correctly positioned, and make sure the turnbuckle does not twist as you adjust it.
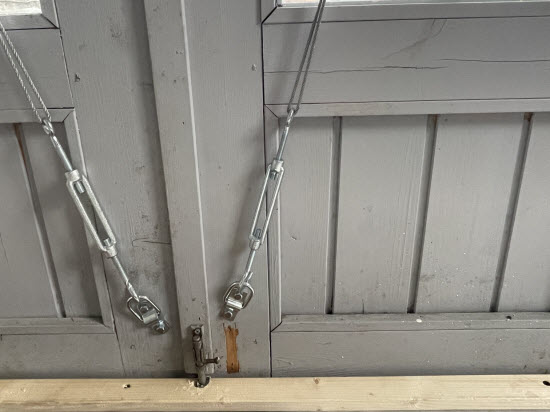 View of bottom end of brace with turnbuckle hooked to lashing point and wire looped to turnbuckle
3. Tighten gradually and recheck the diagonals
Turn the body of the turnbuckle to take up the slack. Once the rope is tight, measure the door's diagonals again. Continue tightening in small increments, checking the measurements as you go, until they are equal and the leaf is square.
The brace may become quite tight because it is carrying part of the door's weight. Work gradually and watch how the timber frame responds. The aim is to bring the leaf back into square, not to force it past square or put unnecessary strain on the glazing.
Repeat the process for all four leaves. Then measure across the diagonals of each joined pair as a further check. Each leaf may be square on its own, but it is useful to confirm that the two leaves together also form a square pair.
The lashing-strap brace used here is a product I supply. You can buy it through my adjustable shed door brace guide, which explains how the brace works on a conventional shed door. The same brace can also be used on framed glazed doors.
Stage two: replace the difficult-to-adjust hinges
With the leaves brought back towards square, we turned to the hinges. The original small knuckle hinges were awkward to adjust and did not give us the control needed to position the doors accurately.
We used adjustable gate hinges, which are available from general hardware suppliers. One hinge was fitted at the top and one at the bottom of each outer door leaf. This gives you adjustment at both ends, so you can set the height and angle of the door and alter the gap between the pairs.
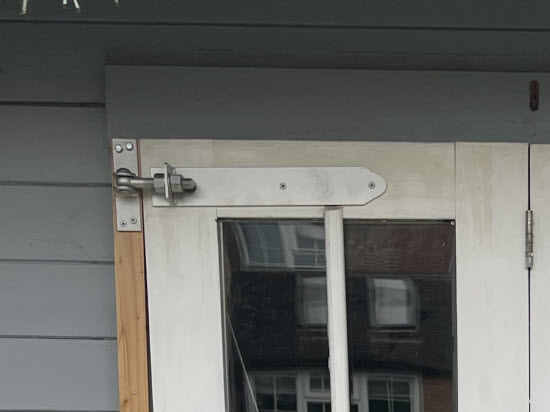 Adjustable gate hinge in place with timber strip behind to align the back of the hinge with the face of the door
1. Create a flat fixing face
The front of the door frame did not provide a flat surface across the area where the new hinge needed to sit. We fixed a timber strip, typically around 20 mm thick, to the door frame to provide a flat fixing face.
On a log cabin, make sure the screws fixing this strip go into the door frame, not into the wall logs. The logs need to move as their moisture content changes. Fixing the door frame to the logs can interfere with that movement and cause problems elsewhere in the cabin.
2. Replace the hinges one at a time
The glazed leaves are heavy, so support them securely before removing any hinges. We replaced the old hinges in sequence, fitting a new adjustable hinge at the bottom first, then at the top. Once those were in place, we removed the old middle hinge. We repeated the process on the other side.
This leaves an adjustable hinge at the top and bottom of each outer door leaf, while allowing the bifold pairs to fold together as before.
3. Set the height, level and gap
First adjust the hinges so the doors sit horizontally and the tops of the two sides are level. Keep one hinge at its current setting and adjust the other to push or pull the door into position. Make small changes, checking the level and operation as you go.
Once both sides are level, look at the gap between the doors and see how the lock and interlocking parts meet. Decide which side needs to move - or whether both do. To move a door while keeping it level, adjust its top and bottom hinges by the same amount. This lets you bring the doors closer together or further apart without tipping them out of level.
Keep making small adjustments until the doors meet neatly and the lock engages without lifting, pushing or forcing the leaves. Then open and fold the doors several times to check that they move freely and close smoothly.
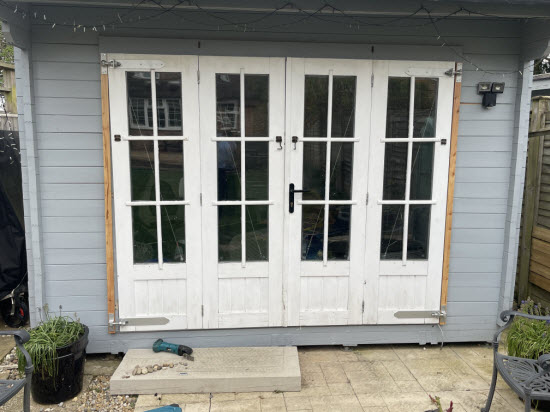 Log cabin bifold doors with adjustable hinges and 'invisible' braces. Doors closing nicely again
The result: doors that close - and can be adjusted again
The repair worked because we dealt with the two problems in the right order. The braces corrected the shape of the individual leaves. The adjustable hinges then let us position the doors so their edges and locking parts lined up.
That adjustability matters. Timber doors can move again, and the original hinges made even a small correction difficult. With the braces and gate hinges in place, future fine-tuning is much more straightforward.
If your summerhouse doors are difficult to open, close or lock, start by checking whether the opening is square and whether the door leaves are square. My guide to four reasons glazed summerhouse doors won't close properly covers those checks. If the leaves are out of square but the timber is sound, a brace may help bring them back into shape. If the frame or opening has moved, you may need a different repair.




Keep in touch with our monthly newsletter
Shed Building Monthly