Building a shed base for a plastic or metal shed in 8 easy steps
You may need to build a shed base for your factory supplied shed as it is common for plastic and metal sheds to be supplied either without a floor or with a floor that needs to be built on a perfectly level surface.
This need for a level surface can give rise to problems
If you want to build the shed on grass as it will likely be too soft and sloping, if you intend to build the shed on paving slabs they can be too uneven and not perfectly level. A common solution is to build a concrete base but these are heavy and expensive to construct.An alternative is to build a lighter weight platform
A timber base that sits lightly on the site and is a breeze to build compared to a full blown concrete base could be your solution. The timber base can be easily built and easily levelled to form flat and level surface for your shed.A factor that I have seen is that once one of these factory made sheds are built is that if they are out of level or square from some slight movement then the door may refuse to open, the window will jam shut or the shed begins to leak through a panel joint that has started to open up.
In short the shed base that you build needs to be level when you build it and have a facility to be kept level if for some reason the base moves (which is more common than you think)
The construction of the shed base is straightforward and is covered in the 8 simple steps laid out below.
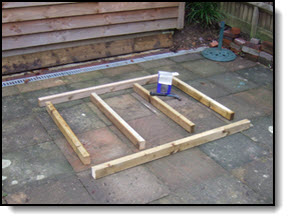 The cut timbers laid out ready to form into the sub-frame
1.
Cut the timbers to length. I used 3x2 timbers for this small base, you might want to use 4x2
for a bigger more robust base. Make sure that the timber that you use is treated for continual
use outdoors. The timber will be relatively dry in that you are keeping it separate from the ground
with some 'whizzy' bases (I will show you these later on) and it is protected from damp from above by
the shed itself. The size and detail of the base will depend on the model that you have. The Asgard
shed that this was built for was a plain flat base that just had four holes to fix the shed down through.
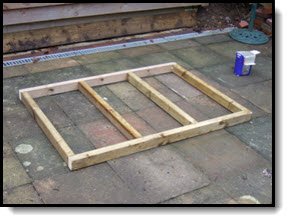 Timbers nailed together.
2.
With the timbers cut as in the photograph nail them together to form the basic framework.
The spacing of the timbers should be about 400mm, but once again this depends on the thickness of
the timber used for the floor or the detail of the shed floor.
 Close up of nailed connection - showing nails
hammered in at an angle for extra strength
3.
Nail the timbers with two ring shank nails 100mm long. The nails should be hammered in
at an angle to form a sort of a dovetail joint. By having the two nails at an angle like this it
increases the strength.
 Just before nailing on the decking
4.
With the framework nailed together check that is square by measuring across the diagonals.
You know that it is square when the two measurements are the same.
 The finished top section of the base -
read on to see how it can be adjusted for level
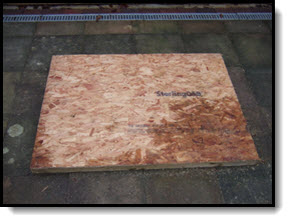
5.
Cut a piece of plywood or OSB and nail it securely to the frame work with 50mm long ring shank nails.
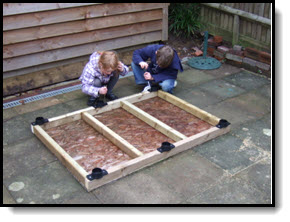 Fixing on the adjustable shed feet
6.
The shed base is being built on a relatively flat surface. The final shed (as you will
see on the last photograph) is to be built in an area that is anything but flat. So I have utilised
some shed feet that I found on e-bay and as you can see I had a little help in securing them to the
shed base timbers!!
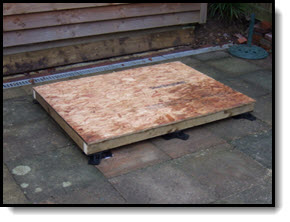 The finished item ready for installation
7.
The completed shed base ready to be transported to site.
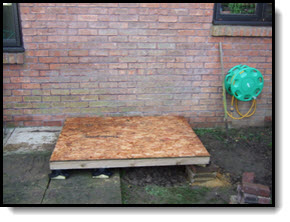 The shed base in-situ, ready for
the commencement of shed building
8.
The shed base in location. The right hand screw jacks are located on some 'pier foundations'
built on crushed concrete and a pier made from some old flag stones laid on mortar. The existing patio slopes from
front to back so some treated timber packs were needed beneath the feet to give a bit of extra adjustment.
To hide the feet and the gap around the base of the shed a board will be fixed in place on completion of the shed construction and re-landscaping of the area.
You are now ready to start construction of your shed
So there we have it, a simply installed shed base that can accommodate an uneven ground surface. It doesn't take several weekends of heavy + dirty construction effort - as it would to build a heavy concrete base. If the base needs to be re-levelled at any point this is easily achieved using the plastic shed feet.
Related posts:


Keep in touch with our monthly newsletter
Shed Building Monthly