Wooden Garden Bridge Construction: It Looks Simple - But There's a Lot Going On
A wooden garden bridge project pulls together all the strands of my experience - and stretches things just enough to keep them interesting. This one did exactly that. As a structural design engineer turned builder, I've spent years balancing timber, weather, and practicality. But a chance to apply that thinking to something with a bit more span - and a bit more sculptural potential - doesn't come up every day.
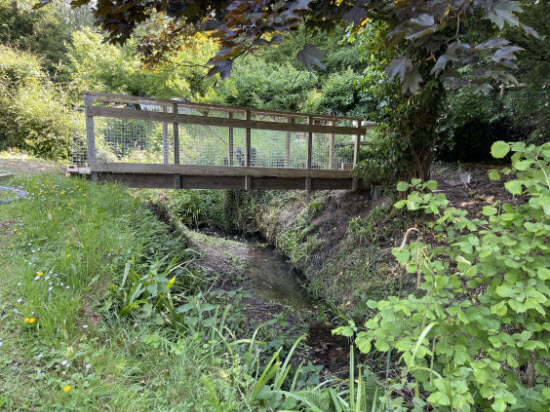
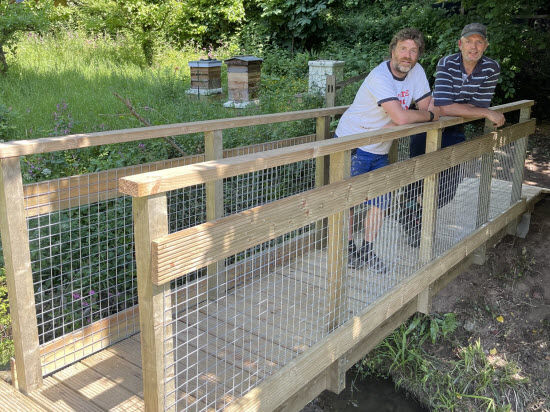 The completed garden bridge. Read on to find out more of the construction details
The brief was straightforward. The old bridge had stood for over 15 years, crossing a narrow stream at the foot of a garden. Its timbers were tired, the handrails were gone, and each winter had pushed it closer to collapse.
What the client wanted was a fresh start. A wooden garden bridge with clean lines, solid construction, and no hidden weaknesses - built to last, but light enough to feel at home in the garden.
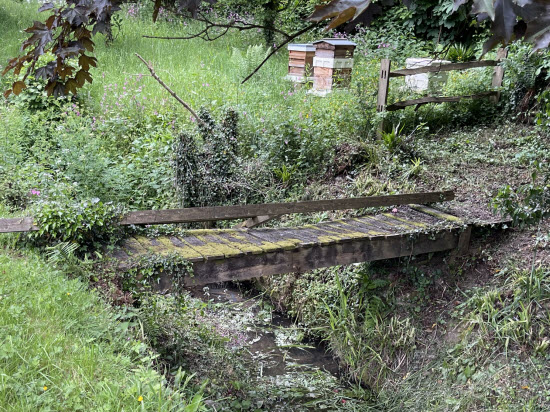 A view of the old unsafe garden bridge
Setting the Brief - Span, Strength, and Simplicity
The first thing we talked about was the span. The stream had changed shape slightly over the years, and what used to be a modest crossing now needed to stretch to almost six metres. That ruled out anything too flimsy - and set the tone for everything that followed.
Strength was next. The bridge wouldn't be used for heavy machinery, but it needed to handle regular foot traffic, a fully loaded wheelbarrow. Nothing dramatic - but it had to feel solid underfoot. No bounce. No creak.
Finally, there was the visual brief. The clients wanted clean lines, not fuss. They liked the idea of garden bridge handrails, but nothing bulky or ornate. The width had to be enough for one person with a wheelbarrow - a clear garden bridge width of just under a metre.
Function and proportion were the two big priorities. Everything else followed from that.
Wooden Garden Bridge Design Decisions - Structure, Simplicity, and Smart Timber Choices
There's something satisfying about a simple beam bridge. Two parallel timbers. Decking boards across the top. A handrail detail that feels light but purposeful. For a garden setting, it's the right level of engineering - solid, understated, and free of water traps that can cause timber bridges to rot from the inside out.
We kept the main span as a straight beam design. No arches, no suspension. Just good-quality treated timber, properly sized and detailed. This meant that everything could be built using standard tools, and the parts could be prepared in advance - which gave the project some of the flexibility of garden bridge kits, even though it was a bespoke build.
A lot of our garden bridge ideas came back to durability. We raised the main beams clear of the ground and detailed every joint so water could run off or evaporate. No tight corners, no pockets. Just clean geometry, breathable gaps, and visible fixings that could be checked in future without taking the bridge apart.
The parapets were designed in from the start - not added as an after thought. They included a wire mesh lining to make sure that the whole crossing experience was enclosed.
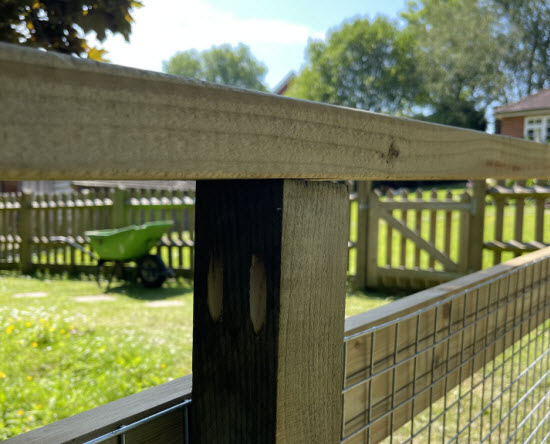
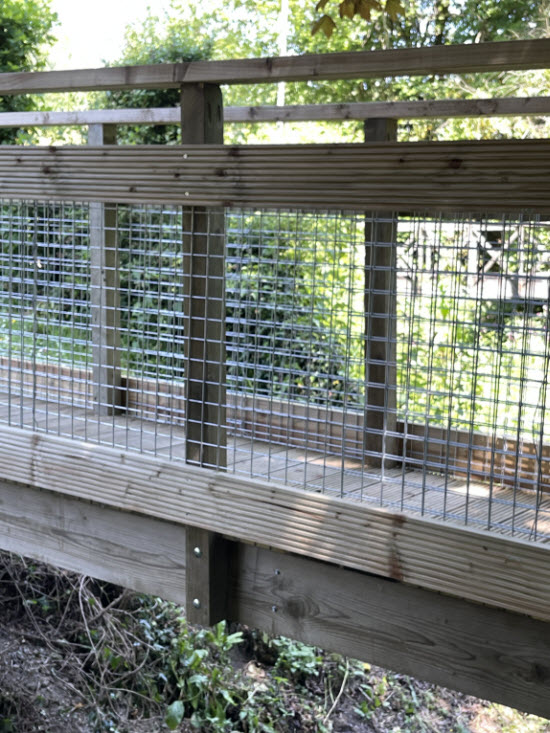 A view of garden bridge railing. With handrail post and galvanised mesh infill.
Foundation Strategy - Lessons from the Last Bridge
When we pulled out the old bridge, the problem was clear. The timber posts used for its foundations had been buried directly into the bank and concreted in place. Over time, moisture had seeped in, and the posts had decayed right at ground level.
This time, we wanted to do better. The solution was to use pre-cast concrete deck posts, bedded in fresh concrete but with the bridge beams fully above ground level. That gave us solid bearing, long-term stability, and no hidden timber below the soil line.
We also moved the foundations slightly further apart. The new span allowed us to shift the supports back from the edge of the stream bank, making them less vulnerable to erosion during high rainfall.
As far as garden bridge construction goes, this kind of forward planning makes all the difference. It's easy to focus on the deck and forget that the long-term life of a garden bridge over a stream depends on what's holding it up.
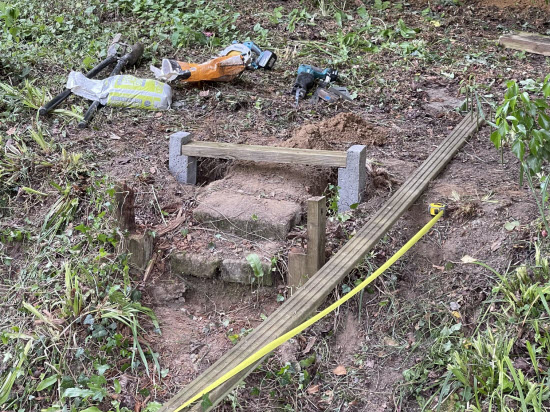 The new garden bridge foundation gave a slightly larger span than the previous bridge.
Garden Bridge Construction and Assembly - Beam by Beam, Fixing by Fixing
The main bridge beams were 225 x 75mm C24 pressure-treated timber - six metres long, and not something you manhandle casually. We brought them to site pre-cut and treated, and lifted them into position one at a time. With the foundations ready, each beam dropped neatly into its notch, then we braced them with timber diaphragms to stop any instability of the beams.
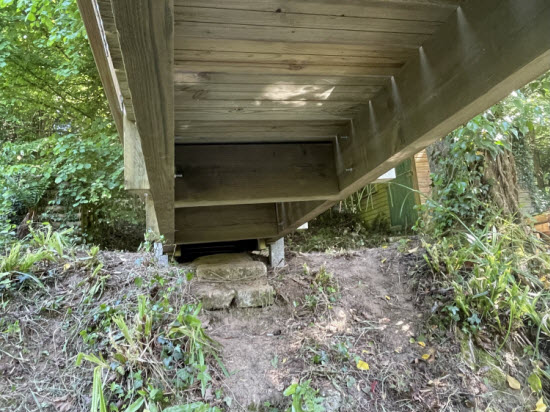 This view beneath the garden bridge shows the diaphragms used to stabilise the bridge beams.
Once the frame was in, the deck boards followed quickly. We used simple 32mm pressure-treated decking boards, gapped evenly and aligned cleanly from end to end. The goal was to create a smooth surface - not slippery, not complicated, just easy to walk across.
The final step was the handrails. These were built from square-section balusters and a continuous top rail, all fixed with pocket hole screws, which avoided areas where water could accumulate. The posts were bolted to the bridge beams at the diaphragm locations. That made the whole thing feel solid.
 The pocket holes on the garden bridge handrails avoided accumulation of damp
If someone asked me how to build a garden bridge, I'd point them to this process: pre-plan, keep it simple, and make every part visible, repairable, and replaceable.
Finishing Touches - Clean Lines and Lasting Choices
With the structure complete, the final touches were all about restraint. The clients didn't want ornate scrollwork or fancy profiles. What they wanted was clarity - a bridge that looked strong, felt intentional, and didn't try too hard.
We used square handrail posts spaced evenly along the span, each one fixed to the main bridge beams. The top rail was continuous and chamfered slightly to shed water - simple, smooth-edged, and easy on the hands. Everything had been pressure treated so was left bare to weather naturally.
The decking boards were left untreated apart from their pressure treatment. No paint. No stain. No slip coatings. The idea was that everything could breathe - and when it eventually needed care, it could be cleaned, sanded, or replaced without drama.
In terms of garden bridge details, this one was all about keeping water moving and timber drying. It looked neat on day one - and we knew it would still look good in ten years.
 A view of the completed wooden garden bridge with handrail posts and galvanised mesh infill.
Reflections and Outcome - What This Wooden Garden Bridge Got Right
The best part of this project wasn't the structure - though I'm proud of it. It was the sense of alignment. The brief was clear, the materials were right, and the thinking from design through to detailing held together.
The result is a wooden garden bridge that feels settled in its surroundings. It has enough presence to draw your eye, but it doesn't shout. It's solid underfoot, but open in form. It does its job without needing attention - which, for something that gets walked over every day, is exactly how it should be.
From a technical point of view, the lessons were clear: vent your timber, expose your fixings, avoid water traps, and detail with honesty. From a design point of view: simpler really is stronger.
The clients were delighted. So was I.
If you have a Wooden Garden Bridge project within 20 miles of Tunbridge Wells please get in touch. As I hope you have gathered from this article, I would love to help!


Keep in touch with our monthly newsletter
Shed Building Monthly