Tool Shed Shelving Ideas That Save Time and Sanity
A Place for Everything
Years ago, I worked for a very successful businessman who had a workshop in his garden. 'I've got a well stocked workshop,' he said,'if you need anything help yourselves. We didn't need anything until the final day, when we needed a cordless light to finish a job in a dark corner. Off we went to his shed.
We'd never been in there before, but within 30 seconds we'd found the light - on a labelled shelf with spare batteries and a charger. The layout was so clear it was like shopping in a well-run hardware store. Every drawer had a picture. Every bin was where you expected it to be. Nothing fancy - but every decision made sense. At first glance it looked like overkill. But the moment you used it, you realised: this shed didn't just store tools. It made you faster, calmer, and sharper.
That's the kind of storage we're aiming for.
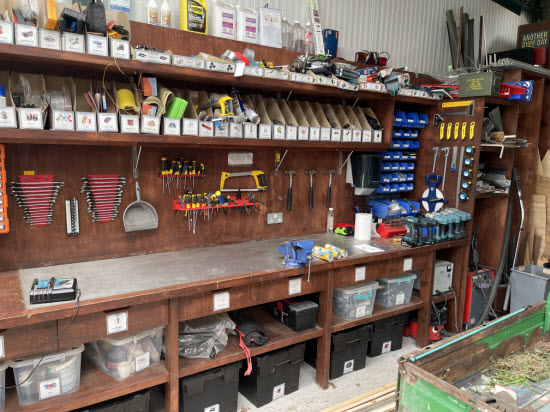 This is the workshop I found so well organised. It was regularly used by a variety of people and still stayed looking organised
What This Article Is About
This article is about tool shed shelving ideas that will make your tool shed work for you - whether you're building furniture, fixing bikes, or just trying to keep tools in check. It's not about showpieces or stylish interiors. It's about function that holds up under real use - dusty boots, rushing for a drill bit, and needing to clean up before the next job.
A well-designed tool shed saves time, headspace, and even arguments. Especially when more than one person is using the space, clear storage turns into silent communication: this is where it lives; this is how you use it.
We're aiming for what I call low-adrenaline storage - where you never have to rummage, swear, or stop mid-job to go looking for something. And it all starts with shelving.
Why Shelving Is the Backbone of a Good Tool Shed
In a tool shed, shelving does more than hold stuff. It sets the tone for how the whole space functions. With solid shelves, you stop stacking tools on the bench 'just for now.' You start thinking in terms of zones, categories, and flow. Without them, even a tidy shed slips back into chaos the moment you get busy.
Good shelving gives your tools a place to land. It also gives you the freedom to change things. Add a new drill? There's space. Build a jig? There's somewhere to store it. The best shelves don't just store - they guide behaviour. They say: this goes here, this lives there.
Think of shelving as the skeleton of your tool shed. Get that right, and the rest becomes easier - from charging stations to benches and bins.
 The basic workshop set-up is a workbench with storage below and tools above. Here we have shop vac and waste bins below. Air tools and compressor are in the underbench space to the left.
Tool shed shelving ideas for Flow, Not Just Category
Most people start organising their shed by thinking in categories: hand tools on one shelf, power tools on another, fixings in a third. But that's not how most jobs work.
Tradespeople don't reach for 'all the hand tools.' They reach for the combination of items needed for a specific task. That's why many pros group their storage by workflow instead.
Think about how you actually use your shed: if you regularly build planter boxes, for example, keep your measuring gear, pencils, mitre saw accessories, and screws in a shared zone. If you sharpen tools, group the files, guides, oil, and rags together.
When tools are stored according to how you use them - not how they're labelled in a catalogue - you move faster, stay calmer, and finish more jobs with fewer interruptions.
 Here we have a cutting station with measuring, marking and finishing tools nearby to save time. All tools grouped according to need.
Build to Fit Your Tools and Bins
A lot of tool sheds go wrong at the moment someone installs 'standard' shelves. Too shallow for a drill case, too tall for a parts bin, too wide for anything but wasted space.
The fix? Start with your gear. Lay out your toolboxes, stack your bins, measure your kits. Then build shelves around those dimensions - not the other way round.
Uniformity helps here. If you can standardise on one or two bin types (say, stacking crates for parts and flat boxes for tools), you'll use space more efficiently. Pull-out bins or open-fronted tubs make it easy to grab things without unloading an entire shelf.
Even better, when everything fits properly, it stays put. Shelves that hug your gear are quieter, cleaner, and less prone to the slow chaos of wobble, tilt, and slide.
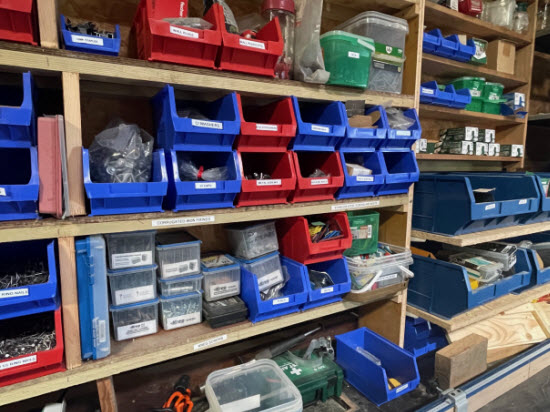 These shelves were built to accommodate two storage bins stacked on top of each other. The bins are labelled for easily locating contents.
Label Both the Shelf and the Box
In a shared tool shed - whether with family, a business partner, or just your forgetful future self - labels are the shortcut to staying sane.
Most people label the box. That's a good start. But if the box is often removed - like a drill kit or fixings tray - then it's worth labelling the shelf too. That way, it's obvious where it goes back, even if someone else is tidying up. And if the shelf is labelled and the tray isn't there, you don't waste time searching the entire shed. You know what's missing - and a quick call might reveal that it's out on a job with your colleague.
A small trick: don't rush to label shelves right away. Let your system settle through a few weeks of real use. As routines develop, you'll see where things naturally end up - and those are the zones worth formalising.
Label makers are cheap now. And if you really want to go friction-free, add a photo. Yes, it feels a bit much. Until it saves your bacon.
Create Zones for Setup and Staging
Tool sheds aren't just storage spaces - they're often small workshops, repair bays, or kit-prep stations. So shelving shouldn't just support tidiness; it should support how you work.
One of the most useful upgrades you can make is to create clear zones: a bench for active jobs, nearby shelving for go-to tools and fixings, and a dedicated spot for setting out materials. That might include a chop saw station with a stop block system, a bin for offcuts, and space for PPE. Or a charging bay with shelves for cordless tools, batteries, and leads - plus a socket strip mounted right where you need it.
Having these areas defined by shelving and habit means you don't constantly re-clear the bench or search for supplies. You set up, work, and pack down without friction. It's less about looking neat - more about moving smoothly from one task to the next.
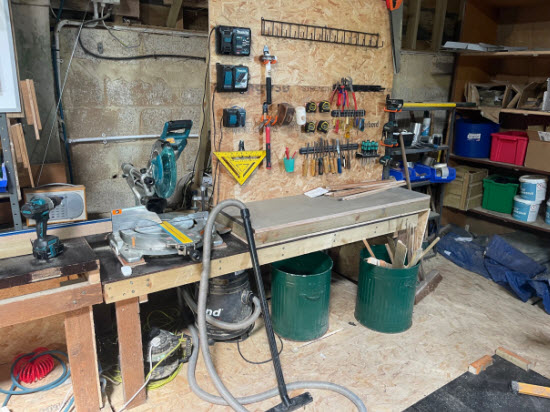
 This is the table saw with infeed/outfeed tables doubling up as a set up/staging area
Adjust as You Go
Even the best shelving plan needs tweaking. You might add a new tool, change how you work, or realise a shelf you thought would hold saws is better off storing clamps. That's not a failure - that's a system evolving.
The trick is to build for adjustment. Use cleats and brackets that let you move shelves up and down. Space uprights so you can drop in extra dividers or mount a drawer later. Leave a few blank panels to screw in custom hooks or holders as needed.
It's a mistake to treat your shed layout as final. A tool shed should be a living system - shaped by the jobs you take on, the habits you build, and the people who use it. If you've left room to adapt, your shelving won't just stay useful... it'll get better over time.
The Time-Multiplying Effect of Good tool shed Shelving
That businessman's shed I mentioned at the start? It looked like it had taken a ridiculous amount of time to set up. Pictures on drawers, labels everywhere, everything exactly in place. But here's the thing - it probably only took that time once. After that, it started paying him back every single day.
I saw the same effect in my own shed. When my son first started working with me, he couldn't find anything. He had to keep asking. It was frustrating for both of us. So he took charge - built shelves, labelled bins, sorted a chop saw station, even levelled the floor. Hundreds of small improvements added up to one big shift: now we work faster, cleaner, and calmer.
That's the power of great tool shed shelving ideas. It's not about being tidy for its own sake. It's about creating a shed that works as hard as you do - without draining your energy to use it.


Keep in touch with our monthly newsletter
Shed Building Monthly