How to Repair Shed Cladding Using Corrugated Iron
From the Fells to the Fence Line: A Fix That Works
I grew up near the Pennine fells in Cumbria. If you've spent time there, you'll know that the farmers don't waste time on materials that don't last. They've long used corrugated iron to build small, durable shelters-quick to erect, tough as old boots, and surprisingly low-maintenance.
So when I'm asked to repair the back or side wall of a garden shed-the side pressed right up against a fence, where no one looks but damp often gathers-I think back to those rugged hilltop shelters. The same practical, tough solution still works today: galvanised corrugated metal.
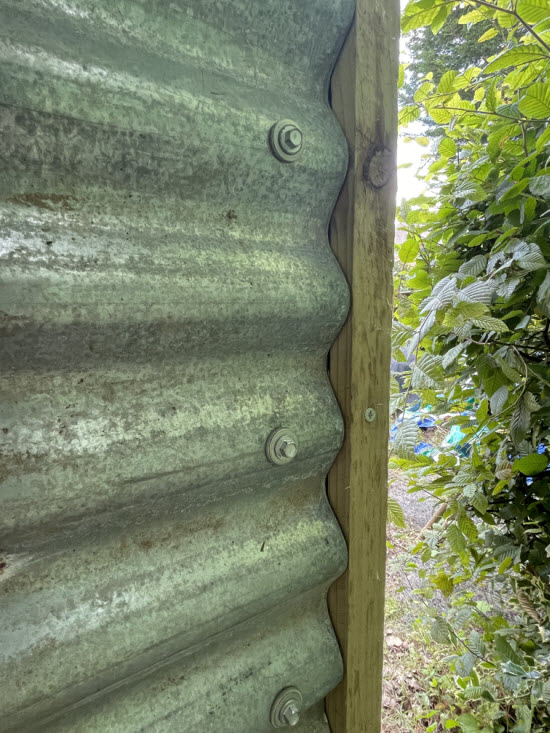
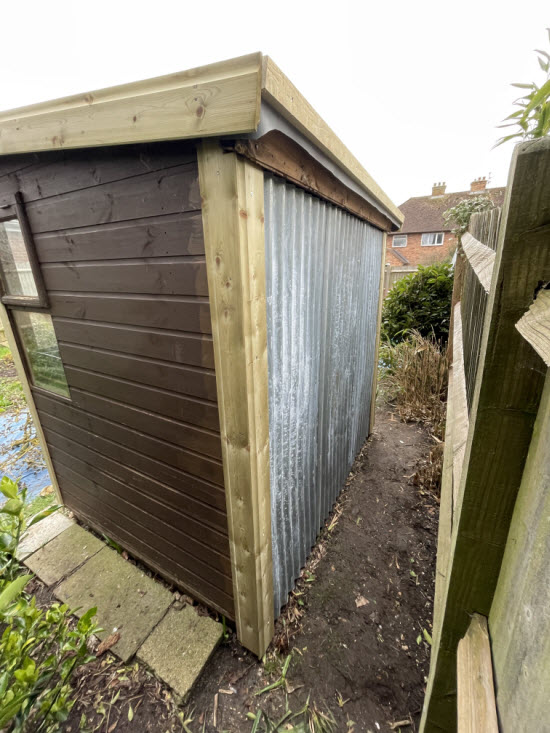 Shed cladding repair with galvanised metal corrugations running vertically
Why This Fix Matters
I often get called to repair just one wall of a shed. Almost always, it's the wall no one sees-the one crammed between the shed and the fence. The problems are always the same:
- No gutter, so roof water splashes down the wall.
- The fence is too close, reducing airflow.
- Old compost bins or tools are stacked against the wall, trapping moisture.
- Plants climb the shed and hold damp against the cladding.
And the result? Timber cladding that's soft, spongy, and starting to rot.
The solution? Clad over the damaged wall with galvanised corrugated steel. It's durable, weather-resistant, and quick to install. And because this side of the shed isn't on show, any concerns about aesthetics fade into the background-literally.
The Resistance to Metal (And Why It's Mostly Misunderstood)
'Corrugated iron is ugly.'
That depends on where you're standing. On a hidden fence-side wall, nobody sees it. And for what it's worth, I find its utilitarian look quite nostalgic-it
reminds me of those hardy Cumbrian farm buildings.
'It'll rust and look awful.'
Not if you use galvanised steel. It's coated to prevent corrosion and will last decades if properly installed.
'It'll trap moisture behind it.'
Quite the opposite. Fixed over battens, it allows air to circulate and helps dry out the timber behind.
'It must be hard to cut and fix.'
Actually, corrugated sheets are lightweight and easy to work with. You'll need basic tools-a grinder, some TEK screws, and gloves-but nothing exotic.
A Simple, Durable Fix: Step-by-Step
Let's walk through the process I use when repairing one neglected side of a shed with corrugated cladding. This approach assumes the other three walls are sound and you're looking to preserve rather than replace.
Step 1: Clear the Access Gap
Remove anything stored between the shed and the fence-plant pots, compost bags, tools, even ivy or weeds. You'll need a safe working gap of at least 500-600mm if possible.
Step 2: Inspect and Replace Rotten Timber
Peel off any loose or crumbling timber cladding. If the studs behind are rotten, replace or sister them with treated timber. For the remaining frame, apply a preservative, especially if untreated softwood was used originally.
Step 3: Fit Battens
The battens can be fixed horizontally or vertically, depending on which way it works best to have the metal corrugations. 25x38mm or 25x50mm treated timber roofing battens are ideal. Space them around 600mm apart. Make sure you screw them through into solid studs. These battens give you something to fix the metal sheets to-and create that all-important ventilation gap.
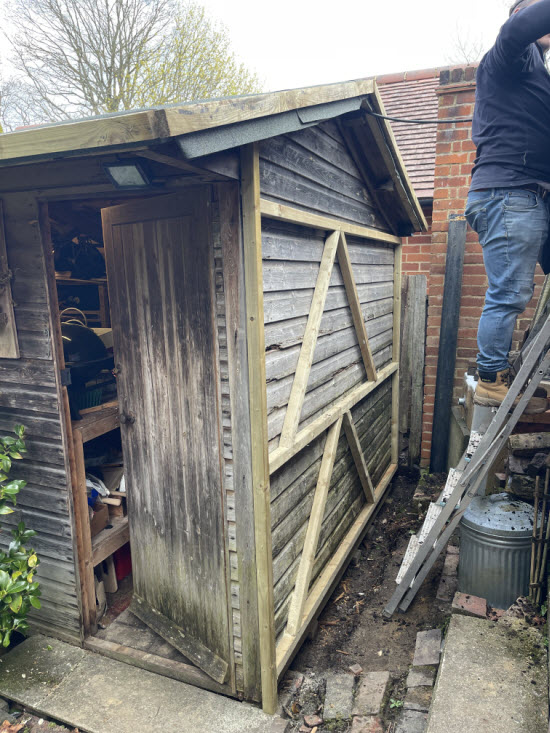 Battens on shed wall prior to installing vertically spanning corrugations. The diagonal bracing was to help stiffen the wall and not always needed.
Step 4: Maintain a Ventilation Gap
Avoid the mistake of screwing the metal straight to the wall. Without battens, moisture will get trapped and may worsen any decay. The battens lift the cladding slightly away from the wall, allowing air to flow and timber to dry.
Step 5: Measure and Cut the Corrugated Sheets
Cut your galvanised sheets to length. Most will come in 2m or 3m lengths-enough to do a full wall height in one go. I use a grinder or metal nibbler to cut sheets. Don't forget gloves and eye protection-those edges are sharp.
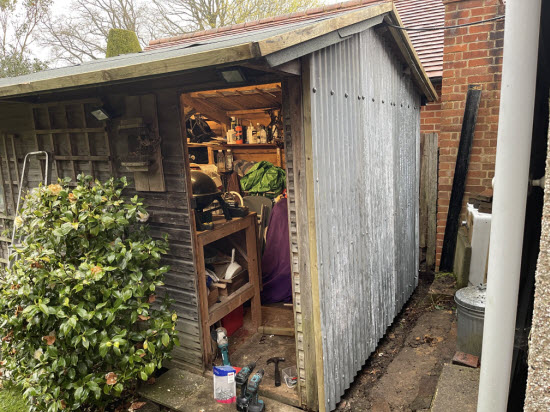 Shed cladding repair complete with corrugations running vertically
Step 6: Fix Sheets with TEK Screws
If the corrugations are running vertically, start at the top. Fix the first sheet using TEK screws with rubber washers. I use a long screw or nail and bash it with a hammer to dimple the sheet before screwing-it stops the screw tip from wandering. Overlap the next sheet by one ridge and continue along the wall.
If the corrugations are running horizontally, fix the lowest sheet first and then overlap the next sheet up. This gives a fish scale effect so any water running down the shed wall runs off, rather than being directed into the wall.
Place a profiled foam filler strip at the top and bottom edges between the battens and sheet. This stops insects and debris getting into the void.
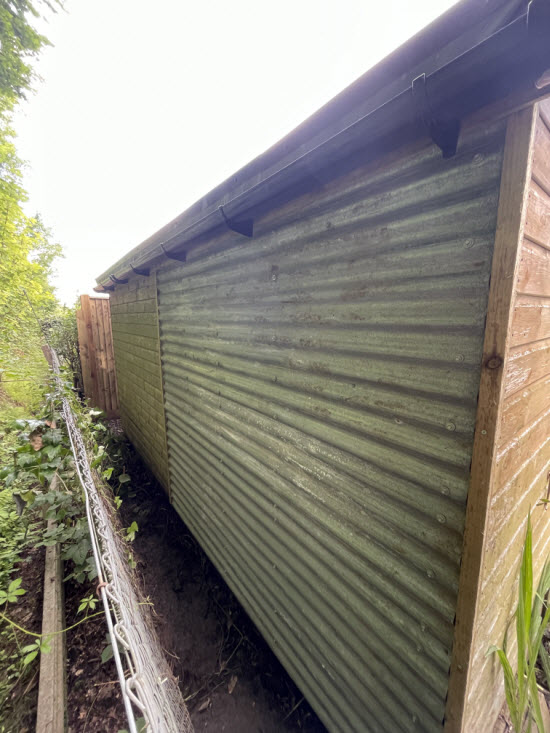 Shed cladding repair with galvanised metal corrugations running horizontally. The lower sheet was fixed first and the second sheet fitted lapping over it to help shed water
Step 7: Finish with Trims and Edging
Install a vertical timber batten at each end of the metal wall to cover the sharp edges and give a tidy finish. If the top of the metal isn't tucked under the shed roof overhang, add a flashing or timber trim to direct water away.
 Close up showing trim detail for horizontally spanning corrugations and fixing detail.
Step 8: Offer Damp Prevention Advice
Even with new cladding in place, I always give customers advice to reduce future damp:
- Add a gutter to the shed if possible.
- Don't lean items against the wall.
- Keep at least a 300mm gap between shed and fence.
- Trim back any overgrown plants.
These small steps will make the cladding last longer and prevent the problem from creeping into other walls.
Why This Method Works
- It's quick: One wall can be done in a few hours.
- It's cost-effective: Corrugated sheets are inexpensive and cover a large area.
- It's durable: Galvanised steel resists weather, impact, and rot.
- It's forgiving: Even if the old wall isn't perfect, the new cladding protects what's left.
And crucially, it lets the original timber dry out instead of trapping moisture.
Looping Back: From Cumbria to the Garden Fence
Back in Cumbria, those hilltop shelters are still standing-battered by wind and rain but very much intact. The farmers didn't choose corrugated iron for looks. They chose it because it worked.
And when I'm stood between a rotting shed wall and a damp garden fence, I think of those fell-side buildings. The same logic applies.
You don't always need to rip out and rebuild. Sometimes, the smartest repair is simply a matter of covering what's failing-with something that won't.
Corrugated cladding might not be glamorous. But it works. And often, that's exactly what your shed needs.


Keep in touch with our monthly newsletter
Shed Building Monthly