How to Pass a Pipe Through an EPDM Roof-And Still Sleep at Night?
If you need to pass a pipe through EPDM, here's the method pros use to keep it watertight.
You want to use EPDM on your shed because you want a roof that just works. No leaks. No lap joints. No loose edges flapping in the wind. It's one continuous membrane, glued down tight, doing exactly what it's supposed to: keeping the inside dry.
But there's a problem.
You need to pass a pipe through the roof, maybe it's a drainage pipe, a soil vent or a flue. And suddenly that flawless, seamless roof has a question mark hovering over it: Can you make a hole in it-on purpose-and still trust it to stay watertight?
Spoiler: yes, you can. But only if you do it the right way.
Why EPDM Is Fantastic-Until You Need to Put a Hole in It
One of the big appeals of EPDM is its seamless simplicity. A single sheet, glued down properly, will keep your roof watertight for decades. It resists UV, doesn't go brittle, and handles seasonal temperature swings with grace.
But what happens when you need to bring a pipe through the roof for a soil vent, an extractor fan, or a log burner flue?
Do you just cut a hole and hope for the best?
(Please don't.)
The Myth: 'There's No Way to Keep a Hole Waterproof'
Many DIYers-and even some less experienced roofers-think that introducing any penetration into an EPDM roof is just asking for trouble. They imagine the roof as a sealed balloon, and one snip means a permanent leak.
But that's only true if you don't know about pipe boots.
Meet the Pipe Boot: The Secret Weapon of the Leak-Free Roof
A pipe boot is a flexible, moulded rubber sleeve designed to wrap snugly around round penetrations-like plastic pipework-and bond permanently with EPDM roofing. These boots, sometimes called 'EPDM pipe flashings' or 'pre-moulded outlets', are designed to work with the membrane and adhesives.
The alternative is to make three part seal using epdm seam tape. However these are not purpose made they are prone to creases (which can allow water in)and have many more joins between them. All of which add up to the possibility of unidentified leaks at a later date.
Think of a pipe boot like a drysuit collar around a diver's neck. Tight, waterproof, reliable.
How to Install a Pipe Boot (Without Fear)
You don't need specialist roofing skills to install a pipe boot-just the right process:
- Mark and Cut the Pipe Opening: Measure carefully and cut a snug hole in the EPDM sheet where the pipe will pass through.
- Dry-Fit the Boot: Slip the boot over the pipe, the top section of the pipe boot is a bit like a cone and there are ribs on it for different pipe diameters. Put a section of the pipe into the cone to work out where you will cut it off. Cut the top section of the cone off above a rib and so that the pipe boot is a snug fit to match the diameter of the pipe that you are using. Position the base flange flat on the EPDM membrane. Mark on the roof surface the perimeter of the base flange
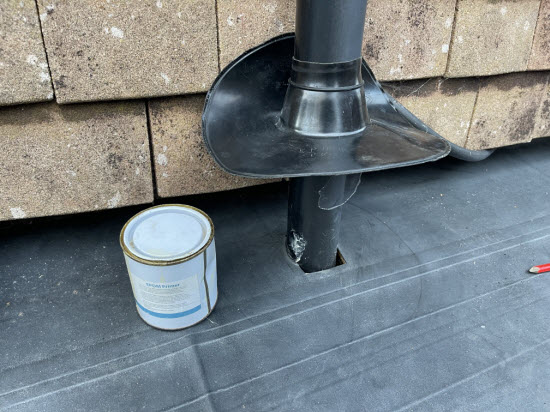
- Prepare the Surfaces: Clean both the EPDM surface and the underside of the boot flange with EPDM cleaner or a suitable solvent wipe.
- Apply Primer: Use EPDM primer on the roof surface and wait for it to become touch dry.
- Fix and Seal: Carefully remove the cellophane covering that is on the underside of the boot flange. Start peeling at one point on the circumference and press the boot flange firmly into position as you go. Roll the material down with a seam roller to ensure complete adhesion between the two surfaces.
- Secure: Install a 'jubilee clip' around the top of pipe to really secure the pipe boot around the pipe.
 The pipe boot installed over the downpipe and the perimeter of the pipe boot marked on the roof deck
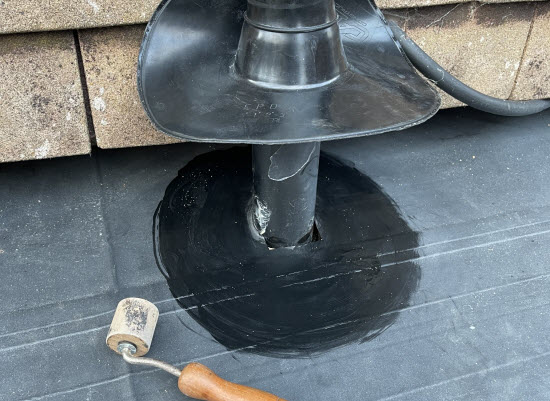 Primer applied and waiting for it to become touch dry. Seam roller at the ready to make sure the two surfaces get complete adhesion.
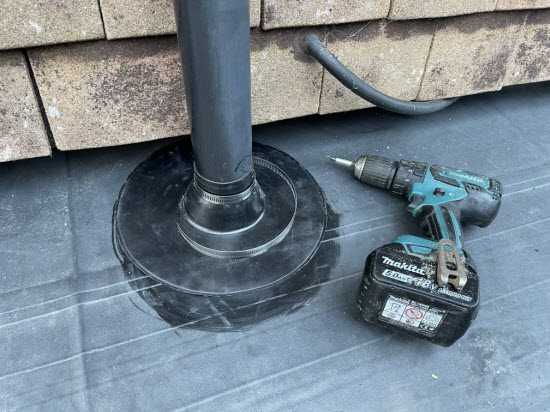 Jubilee clip tightened around the collar
The result? A seamless, watertight finish that maintains the integrity of your EPDM membrane.
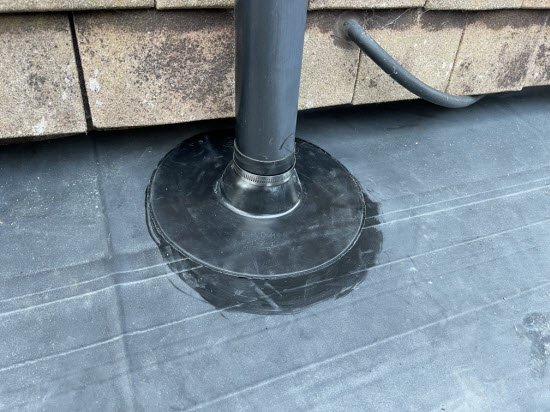 The completed pipe transition
What Can Go Wrong? (And How to Avoid It)
- Oversizing the holes: Don't cut more than you need in either the roof deck or off the top of the pipe boot 'cone'. Take your time-measure twice, cut once.
- Using a brush for the primer: Use a scrubbing pad to really work the primer into the dusted surface of the epdm.
- Using generic silicone: Only use sealants and adhesives rated for EPDM.
Why This Matters-Even If You're Not Doing the Work Yourself
Maybe you're not climbing up onto the roof yourself-but if you're hiring a tradesperson, you'll want to know they're doing it right. Watch out for improvised flashings or cheap sealant blobs around pipes. A proper pipe boot is the only correct method.
Back to That Lean-To Project...
So yes-EPDM is a fantastic material. But even the best roof can be undone by one badly handled detail.
That downpipe in our lean-to project? It's still bone-dry after multiple storms, because it wasn't guessed at or bodged. It was installed using the method every EPDM installer should know.
If you're a hands-on homeowner or just someone who likes to understand how their building works, this is one of those little things that makes a big difference.
Because one day, someone's going to say, 'Oh, you can just poke the pipe through and seal it with silicone.'
And you'll know exactly why that's a bad idea.


Keep in touch with our monthly newsletter
Shed Building Monthly