The Secret Logic of Pier Foundation Design for Sheds - Why Some Bases Never Move
The Shed That Didn't Budge
A few summers back, we built a shed in a customer's garden, which was gently sloping. Rather than levelling the ground in this area, we marked out a grid of foundation points and worked down through the topsoil with a digging bar. The clay underneath came up in heavy chunks, and the post hole digger made short work of removing the spoil. Each hole went just deep enough to reach solid ground, concrete piers were poured with a central steel rod and a timber ground beam installed with the bottom above the surrounding earth. This formed a great platform on which to construct the new building. The shed went up square, the doors swung true - and three winters later, nothing has moved a millimetre.
 This is the shed we built on ground with a shallow slope
The rest of this article explains why these simple concrete piers worked so well - and what goes into good pier foundation design for sheds. This isn't a how-to guide - that's covered in our companion article on Building a Shed Pier Foundation - but the theory behind how load flows through the piers into the soil, and why understanding it makes for long-lasting, level sheds.
What Pier Foundation Design for Sheds Really Does
When you stand inside a finished shed, it's easy to imagine the floor sitting 'on' the ground. But that isn't what's really happening. The shed's weight - plus whatever you store inside - travels down through the joists, into the beams, and then through each concrete pier into the soil beneath. The pier is just a middleman, passing on the load while spreading it over a wider patch of earth.
The soil does most of the actual work. Clay, sand, and gravel all have limits to how much pressure they can safely carry before they start to yield. The job of a good pier foundation is to keep those pressures low and evenly spread. If one pier presses too hard, it slowly sinks, and the whole frame follows it out of level. The theory of pier foundations is simply about keeping that invisible balance between structure and soil.
Why Size and Depth Matter
A concrete pier works a bit like a snowshoe: the wider it is, the less it sinks. The load your shed places on each pier might only be a few hundred kilos, but how that weight spreads into the soil depends on the pier's base area. Getting this balance right is at the heart of pier foundation design for sheds, where width and depth together decide how the load spreads into the soil. On soft or unknown soil, every square centimetre of extra width makes a big difference.
Us engineers talk about allowable bearing pressure - how much the soil can safely carry before it compresses. As a rule of thumb, soft ground can take about 50 kN/m2, and firm clay or compacted gravel about 100 kN/m2. That's roughly the difference between a 150mm pier supporting around 1 kN (100 kg) and a 250 mm one supporting nearly 5 kN (500 kg). In practical terms, a 200-250 mm pier gives a comfortable safety margin for most sheds. Depth, on the other hand, is less about strength and more about finding firm, undisturbed soil to bear on.
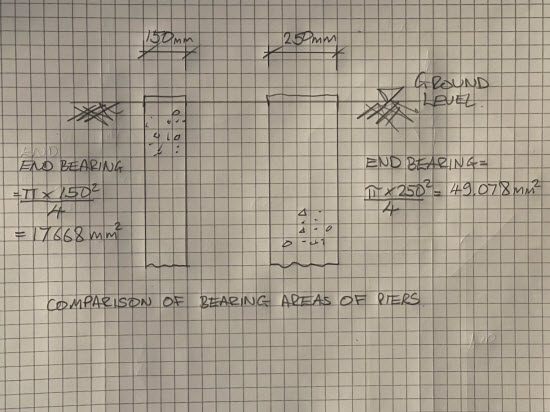 Comparison of bearing areas of two foundations of differing diameters
End Bearing - The Flat Bit That Does the Heavy Lifting
The base of a pier is where most of the real work happens. Imagine pushing your thumb into soft soil: the pressure is highest directly under the pad of your thumb. It's the same with a pier. The circular base spreads the shed's weight over an area of soil, and the soil resists by pushing back. This is called end bearing.
If that bearing area is too small, the soil slowly compresses and the pier sinks. Double the pier diameter, and you roughly quadruple the bearing area - a simple way to build in strength. But it only works if the base is clean and firm. Any loose soil, roots, or slurry act like cushions that compress over time. That's why, when digging, the last few centimetres are best loosened gently with a bar and left undisturbed before the concrete goes in.
Skin Friction - The Hidden Bonus (and Occasional Enemy)
Not all of a pier's strength comes from the flat base. The sides of the concrete also grip the surrounding soil, adding a useful boost - a bit like how a cork grips a bottle. This side contact, called skin friction, helps most once the pier extends into firm, undisturbed ground. In firm clay, for example, the concrete and soil bond together, sharing the load between the base and the sides.
However, near the surface, that same effect can work against you. In winter, when the top layer of soil freezes and expands, it can grab the sides of the pier and try to lift it - a process known as frost heave. That's why it's wise to take the pier down below frost depth, typically 450-600 mm in southern England, where the soil stays stable and the friction helps rather than hinders.
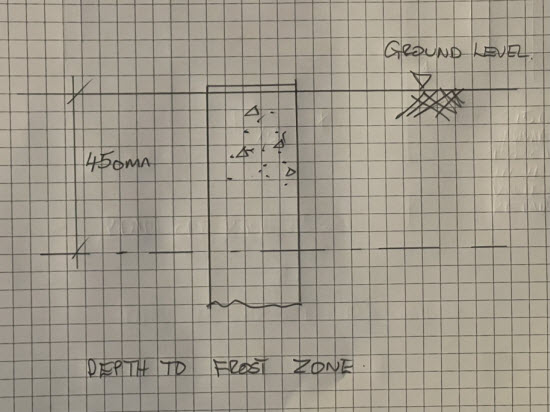 Sketch showing pier foundation projecting beyond the frost line
Choosing Diameter - How Wide Is 'Enough'?
Most sheds don’t fail because the concrete breaks - they fail because the piers are too small for the soil underneath. In pier foundation design for sheds, choosing the right diameter is what keeps things steady year after year. Once you know the ground type and the load each pier carries, diameter becomes the key variable. On firm clay or compacted gravel, a 200-250 mm pier is usually a good match for a typical garden shed. In softer or uncertain ground, 250-300 mm gives a much better margin of safety.
You can think of it this way: the soil sets the rules, and the pier spreads the load to stay within them. A little extra concrete at this stage costs very little but adds years of stability. Keep the piers evenly spaced - roughly a one-metre grid works for most floor beams - and the frame above will distribute weight evenly.
Depth - More About Stability Than Strength
When you're digging for a pier, it's easy to assume that deeper always means stronger. In reality, once you've reached firm, undisturbed soil, extra depth adds little to load capacity. What it really provides is stability - protection from the seasonal changes that affect the top layers of ground.
A pier taken down to around 600 mm in southern England sits below the frost line and beyond the zone where light clays swell and shrink with the weather. That's deep enough for most sheds and garden rooms. However, even that depth won't stop movement where highly shrinkable clays are affected by nearby trees. Roots can draw moisture several metres down, causing deep seasonal contraction that no small pier can resist. In those cases, it's wiser to keep trees well back or use alternative foundation designs, such as pads or beams that move uniformly rather than independently.
The Role of Concrete Quality
Concrete is often treated as just 'something hard' to fill a hole with, but its quality determines how well a pier performs over time. Many DIYers reach for post-crete because it's quick, but most rapid-set mixes are designed for fence posts, not structural supports. They set fast but often contain more voids and reach lower strength once cured.
For pier foundations, it's better to use a standard structural mix such as C25/30. Mix it from scratch by buying cement, sand and aggregate, or buy it pre-batched/bagged if you prefer. Place it in clean holes or cardboard formers, and lightly rod or tap it to remove air pockets. Voids or unmixed lumps weaken the pier and can trap water. A strong, dense concrete column not only carries load better, it also resists frost and moisture ingress. Good concrete isn't expensive insurance - it's what keeps your shed level through the next decade of winters.
More on mixing concrete for shed pier foundations
Anchors, Rods, and What They Actually Do
A threaded rod cast into each pier does more than just hold the shed down - it's the link that ties the timber structure firmly to the concrete below. I prefer to set the rods full depth into the pier, with a large washer and nut fixed near the bottom. That ensures the load transfers through the steel into the entire mass of concrete, and from there evenly into the soil.
Using a substantial rod - say 24 mm in diameter - allows it to project above the pier top to compensate for uneven ground or slopes. Once the concrete has cured, you can level the base plates or beams on washers and nuts without drilling or chemical anchoring later. The steel doesn't carry the compression load (that's the concrete's job), but it provides strong, positive fixity against uplift, racking, and sliding - the forces that often get overlooked in small buildings.
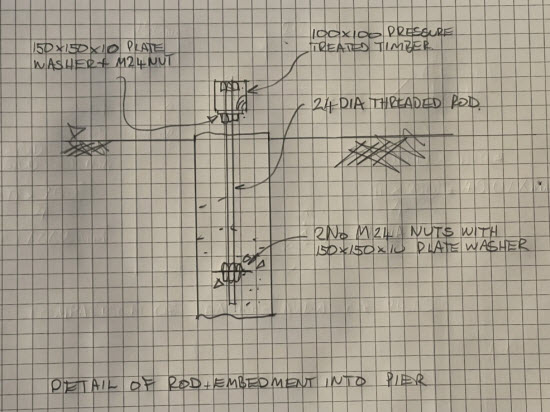 This sketch shows how the vertical load is transferred into the pier foundation
How Wind and Movement Affect Piers
It's easy to think of wind as something that pushes sideways, but on a small shed or garden room it often tries to lift instead. A strong gust hitting a 3x2 m wall can create an uplift of over 200 kg - enough to loosen a lightly fixed base if the piers aren't tied down. That's where well-anchored rods earn their keep. They hold the structure to the ground, turning the whole frame and foundation into one solid unit.
Movement can also come from uneven settlement. If one pier sinks slightly while the others stay firm, the shed twists out of square. Diagonal bracing within the floor and wall frames helps distribute any small movements so no single joint takes the strain. The combination of good anchorage, solid bracing, and uniform pier support keeps the building square, level, and able to ride out both wind and time.
Settlement - The Silent Foundation Killer
When sheds go out of level, the culprit is often settlement - one or more piers slowly sinking while the others stay put. The movement might only be a few millimetres, but that's enough to throw doors out of line or open up small gaps in cladding. It's rarely sudden; it creeps in over months as the soil consolidates or soft spots give way under load.
The cure starts before the concrete is poured. Clear away all topsoil and organic matter, and make sure each hole bottoms out on firm, undisturbed ground. A thin layer of clean gravel can help level the base and drain away any trapped water. After pouring, check every pier top for consistent height and line. Once the shed is built, settlement is almost impossible to correct without major lifting - so this quiet step in the early groundwork makes all the difference.
Bringing It All Together - A Simple Mental Model
If you imagine a shed as a person standing on tiptoe, each pier is a foot pressing into the ground. That's really the essence of pier foundation design for sheds - understanding how each 'foot' carries the load into the soil. The strength of the structure above doesn't matter much if one foot starts to sink. The theory of concrete piers is simply about keeping those 'feet' wide, firm, and even.
Soil type sets the rules - soft soils need larger footprints, firm clays can take more load. Concrete transfers the weight, and the steel anchor ties everything together so wind and racking can't pull it apart. Width gives bearing strength; depth gives stability. The result isn't just a level base on day one, but one that stays level through frost, rain, and the weight of years.
Once you see it this way, the small effort of digging a little deeper, mixing better concrete, or casting proper anchors makes perfect sense. It's physics made practical.
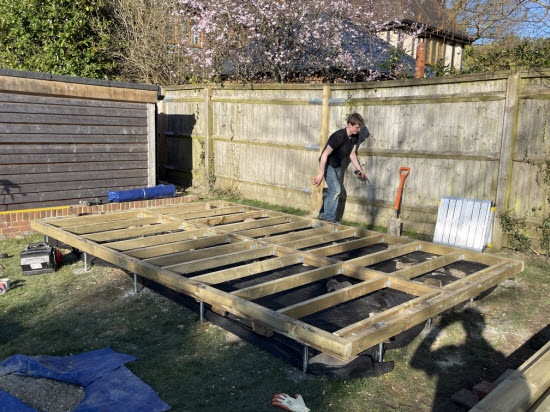 This photo shows the completed foundation with timber ring beams, ready for construction of the superstructure
Looping Back: The Shed That Stayed True
That shed on the slope still makes me smile every time I pass that customer's house. The ground there is solid clay, the piers are wide and well-anchored, and three winters later the doors still close with a click. It's a small reward for understanding how the load travels through concrete into the earth below.
Building on piers isn't about brute strength - it's about knowing what the ground will do, and helping it do its job. When width, depth, and concrete quality all line up with the soil beneath, the whole system becomes quietly reliable. When the principles of pier foundation design for sheds come together - width, depth, and concrete quality matching the soil - the whole system becomes quietly reliable.You don't see the theory once the shed's built, but you feel it every time you open the door and it still swings square.
If you'd like to learn how to plan and pour pier foundations yourself, see my article: Building a Shed Pier Foundation


Keep in touch with our monthly newsletter
Shed Building Monthly