How to Install Featheredge Cladding on a Shed (And Get It Right First Time)
It's Just One Board... But If You Get It Wrong, the Whole Wall Suffers
Ever seen a shed where the cladding just doesn't line up? The gaps drift, the nails miss the battens - and worse, the corners look raw, with exposed end grain staring back at you. It's the hallmark of a poorly planned install: uneven overlaps and detailing that feels like an afterthought.
Feather edge cladding isn't difficult, but it is revealing. The mistakes show - especially around openings and corners where a good finish makes all the difference.
This article is here to help you avoid those traps. It's written for the competent DIYer who wants to get it right - from setting out your first board to handling awkward edges and creating a finish that looks thought-through, not just thrown on.
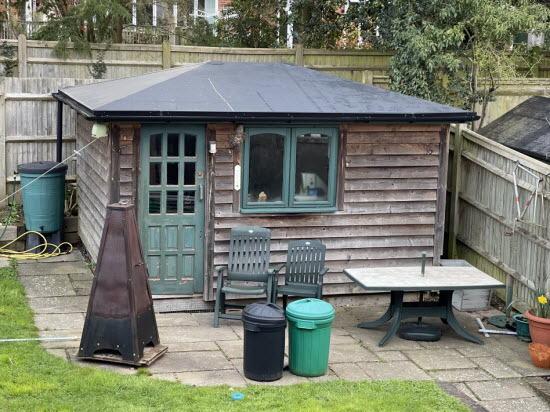 This is my shed, 16 years after construction, clad in pressure-treated softwood featheredge
What Featheredge Cladding Is (And Why It's Still One of the Best Choices)
Featheredge cladding is simple - and that's why I like it. Each board is cut from a single piece of timber, sawn diagonally to form a taper. So after the board is cut, on an angle, there are two pieces of feather edge cladding. That's it! No planing, no shaping, no fuss. That simplicity means you're not paying for wasted wood, and you're not losing strength to smoothness.
Because the boards are rough sawn, they also take pressure treatment more effectively than planed timber - which makes them more durable. The profile is clever too: the thin, weaker, edge is tucked away behind the next board, and the thick, more robust edge is the part exposed to the weather.
It's one of the most economical cladding options out there. And when it's installed properly, it's also one of the most robust. That's why it's still used on barns, sheds, and outbuildings across the country. This article is about making sure your installation does it justice.
Timber Types That Actually Work
Not all featheredge boards are created equal. The timber you choose will affect cost, lifespan, and the kind of maintenance it needs over time.
Pressure-Treated Softwoods (Affordable and Reliable)
For most garden sheds, pressure-treated redwood or spruce are the go-to options. They're affordable, widely available, and perfectly suitable when installed with care. The key is in the treatment: the rough sawn surface absorbs preservative deeply, giving it a strong defence against decay.
In fact, my own shed is clad in pressure-treated softwood - and 16 years later, it still looks good. No coatings. No cleaning. Just solid timber, well detailed and left to weather naturally.
Boards like this are ideal for typical outdoor cladding - just make sure they're UC3-rated for external use, and re-treat any cut ends with a brush-on preservative during installation.
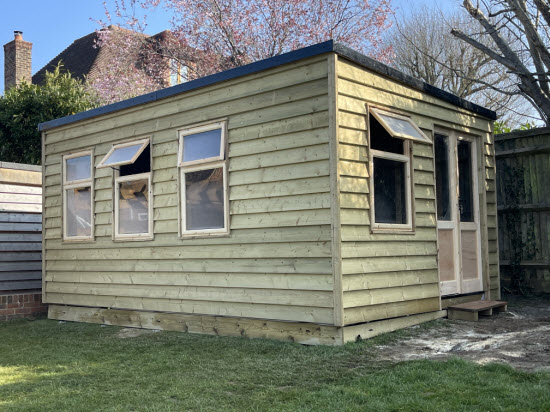 Freshly installed softwood featheredge, before exposure to the elements weathers it to silvery grey.
Naturally Durable Timbers (No Treatment Needed)
If you want to avoid treatment altogether, consider larch, oak, sweet chestnut, or Douglas fir. These timbers offer a higher level of natural resistance to decay and fungal attack.
- Larch is dense, slightly resinous, and holds up well with minimal maintenance.
- Douglas fir is straight-grained and tough, with good structural strength.
- Oak and sweet chestnut are particularly robust — but be aware they’re heavier, harder to cut, and can split if not pre-drilled.
Naturally durable timbers usually cost more upfront, but they offer excellent longevity and a traditional appearance - especially when left to weather naturally.
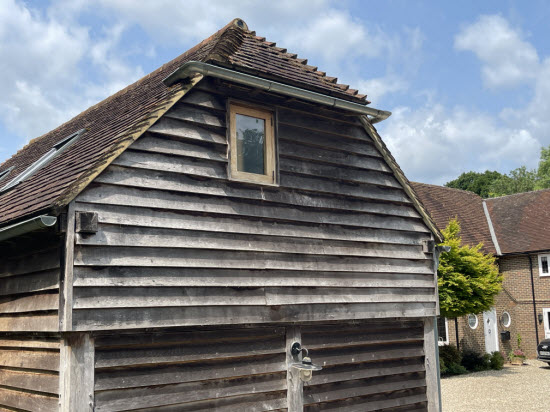 Weathered oak featheredge. The colours vary over the elevation of the building dependant on exposure to sun and rain
How Much Timber Do You Need? (And How to Calculate Overlap)
If you want fewer fixings, thicker boards, and a faster job - go for 175mm feather edge. That's what I prefer. The extra width means fewer courses up the wall, and the thicker taper makes the boards more stable with less cupping or movement over time.
But width affects your coverage - and this is where people often get caught out. You don't get the full 177mm exposed on each board. You need to allow for the overlap - typically 50mm.
That means each board covers about 125mm of height. So, for a 2.4m high wall:
2400mm ÷ 125mm = 19.2 boards
Round up - you'll need 20 boards per vertical run.
Then multiply by the width of the wall, and add 10-15% for trimming and waste. Don't be tempted to skimp - feather edge relies on that consistent overlap to shed water and look good.
Using wider boards saves time and fixings. But only if you plan the quantities properly first.
The Secret Is in the Battens (And When You Might Not Need Them)
Featheredge cladding is usually fixed to vertical battens - and for most garden buildings, that's the best approach. The battens create an even surface to work from, provide consistent fixing points, and help air circulate behind the boards so they dry out quickly after rain.
I typically use 50x25mm pressure-treated battens, spaced at 400mm or 600mm centres, depending on board length and wall layout. These are fixed directly to the shed frame, giving you a reliable base for each course of cladding.
That said, there are cases - particularly on tool sheds or storage sheds - where I fix feather edge boards directly to the frame. If the studs are well spaced and vertical, and you're not lining or insulating the walls, it can work perfectly well. It's simpler, saves materials, and still holds up if the boards are fixed properly.
So: battens offer more flexibility, airflow, and layout control - but for smaller, unlined sheds, direct fixing is a valid choice too.
Tools You'll Need to Install Featherdge Cladding
(Including One That Changes Everything)
Featheredge cladding doesn't require specialist tools - but a few simple ones will make the job faster, cleaner, and more consistent.
Your basic essentials:
- Hammer or nail gun (with galvanised or stainless nails)
- Spirit level or laser level
- Tape measure, pencil, square
- Saw (hand or circular)
- Preservative for treating cut ends
Setting your overlap - three options:
1. Marking Your Battens Before You Install Featheredge Cladding
Draw horizontal lines across each batten to mark the position of every board.
- Very accurate
- Time-consuming
- Hard to keep consistent over long spans
Best when you're cladding a small area or working with tricky alignment.
2. Using a Cut-to-Length Spacer
Cut an offcut to the overlap you want and use it as a temporary spacer between boards.
- Quick and low-effort
- Easy to slip or knock out of position
- Harder to get hands-free fixing
Handy for short sections or when working with a second pair of hands.
3. Why a Coursing Gauge Makes It Easier to Install Feather Edge Cladding Alone
A simple clip-on tool that sets the overlap and holds the next board in place while you fix it.
- Fast and repeatable
- Great for solo work
- Keeps lines tight and level
- Requires a bit of setup or purchase
Best for full shed walls or any job where you want a pro-level finish without a second person.
Of the three, the coursing gauge is the easiest to keep consistent - especially over large runs. It holds the board exactly where it needs to go, freeing up your hands to focus on fixing cleanly. Whether you buy one or make your own, it's a tiny tool that can make a big difference.
Starting the First Row: Get This Bit Right
The first board sets the tone for the entire job. If it's not level, every course above it will drift. If it's too low, it'll soak up moisture from the ground. And if it's not fixed cleanly, you'll spend the rest of the job trying to correct it.
Start by snapping a level line across the base of the wall. Then decide how you'll finish the bottom edge. I often use a starter strip - a thin length of treated timber fixed horizontally - to give the first board a solid seat and just the right angle for runoff.
Make sure you leave at least 150mm clearance from the ground. Any lower and you're inviting splashback, rot, and frost damage - even with treated timber.
If you're using battens, this is also the time to fit insect mesh along the base to keep bugs and wasps from nesting in the air gap behind the cladding. Tuck it neatly behind the first board and staple it to the battens before you start fixing upward.
Once the first board is up, double-check it's level. A small correction now saves a lot of fiddling later.
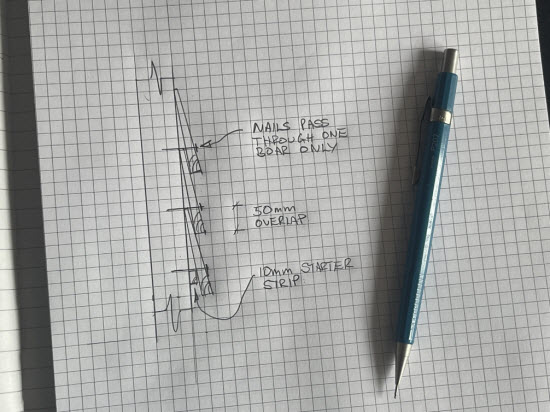 This sketch will get you started right:
Nailing Featheredge Properly
The rule is simple: one nail per intersection - where each board crosses a batten or stud. That one fixing does all the work it needs to.
Position your nail 30-40mm up from the bottom edge of the feather edge board. That's the thickest part of the profile. Drive the nail so that it goes through the thick part only, and into the centre of the batten behind.
What that fixing does is clever:
- It secures the thick edge of the board you're working on
- It clamps the thin edge of the board below
- It allows the thin edge to move slightly with the seasons - without splitting or cupping
Don't be tempted to double-nail. Pinning both edges locks the board in place and often leads to cracks or warped cladding.
Use ring shank galvanised nails for softwood, or stainless steel for hardwoods or exposed locations. Fix in a straight line, and space your nails consistently - it's a small detail that makes the whole job look crisp.
How to Install Featheredge Cladding Neatly Around Doors, Windows, and Corners
Where feather edge cladding meets an edge - whether it's a corner, window, or door - is where good planning makes all the difference. A neatly detailed finish gives the whole building a sense of purpose. A poorly planned one leaves exposed end grain, irregular gaps, and awkward lines.
At external corners, the simplest and most effective approach is to use a vertical corner trim. Fix this first, then butt the feather edge boards up to it from both directions. It gives you a clean, straight edge - and it masks the end grain of every board neatly and durably.
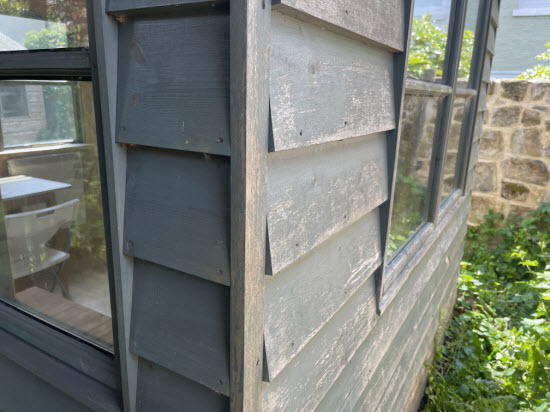 Featheredge cladding corner detail. My only suggestion would be that the corner board was slightly thicker so that it covered all of the end-grain.
For windows and doors, the key is to build out a lining first. Use a rough sawn timber lining fixed to the wall studs, projecting just far enough to match the thickness of your finished cladding. Then butt your feather edge boards against it.
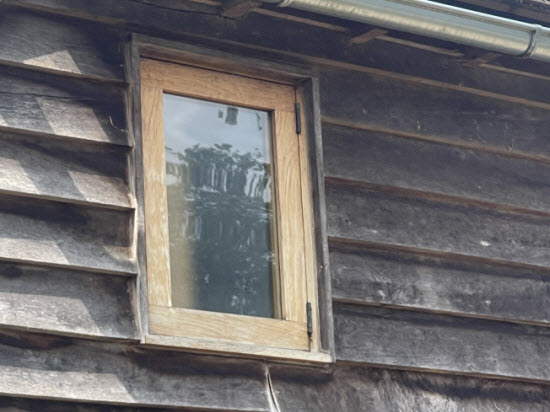 Featheredge cladding window detail. Nicely lined window opening
This gives you:
- A consistent, plumb vertical edge around the opening
- Concealed end grain, protected from weather
- A solid structure to fix trims or flashings if needed
When you plan these junctions before you start to install feather edge cladding, everything aligns better. And the final result - even with rough-sawn boards - looks intentionally finished.
Top Edge and Finishing the Featheredge Cladding
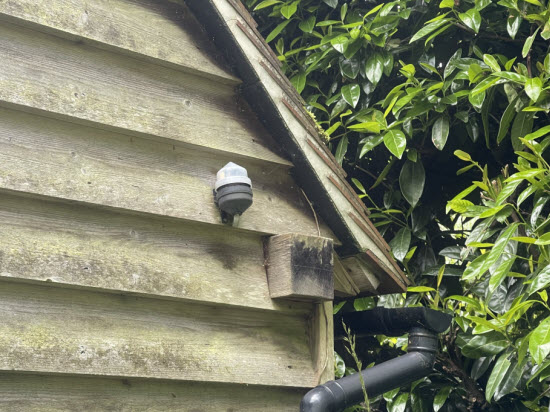
The top edge of the cladding doesn't need complicated detailing - as long as it's properly tucked under the eaves overhang.
In most shed designs, the top courses are sheltered by the roof itself. The overhang from the bargeboard or soffit creates a natural barrier, so wind-driven rain rarely gets in. The key is to make sure that overhang is generous enough - usually 50mm or more - to keep the top edge in the dry.
 Featheredge cladding eaves detail. Eaves overhang the wall and the cladding 'tucks' behind the soffit.
Bring your final course of feather edge boards right up to the underside of the eaves or soffit. Don't leave a gap. This closes the cladding neatly, helps resist draughts, and keeps the top edge visually aligned with the roof.
 Featheredge cladding gable detail. On the gable wall there is often less of an overhang and the boards are cut to suit the roof slope.
Painting, Staining, or Leaving Natural?
Featheredge cladding can be left to weather naturally, stained, or painted - and each option has its place.
If you're using pressure-treated softwood, you can leave it bare. It'll fade to a silvery grey and still hold up for years - especially if the cladding is well detailed.
If you want a specific colour or added protection, use a microporous paint or stain that allows the timber to breathe. Apply it after installation, and always treat any cut ends with brush-on preservative.
With naturally durable timbers like oak or larch, most builders leave them unfinished. The grain tells its own story - and part of the appeal is how it ages.
Common Mistakes (and How to Avoid Them)
Featheredge cladding is forgiving - but a few missteps can really stand out once the boards are up.
Fixing too close to the ground
Always leave at least 150mm clearance. Anything lower encourages rot, splashback, and frost damage.
Nailing through both edges
This locks the boards, causing splits and warping. Fix through the thick edge only - 25-50mm from the bottom, depending on the overall width of board that you use.
No insect mesh behind battens
Without it, you're inviting wasps, spiders, and other unwanted tenants into that ventilation gap.
Inconsistent overlap
Eyeballing it might seem faster - until you step back and see the drift. Use a spacer, mark the battens, or get a coursing gauge.
Exposed end grain at corners and openings
Always butt boards to a trim or lining. Exposed grain soaks up water and makes even good timber look rough.
None of these are hard to avoid - they just need a bit of forethought. And once you know what to look for, it's surprisingly easy to spot a shed that's been clad with care.
Install Featherdge Cladding Once — And Make It Last for Years
There's a reason featheredge cladding is still used on sheds, barns, and outbuildings across the country - it's cost-effective, robust, and looks right when it's done well.
But like a lot of traditional methods, it rewards good habits. Take the time to plan your layout. Use decent fixings. Keep your overlaps consistent. And pay attention at the corners and openings - those are the details that make a shed look thought-through, not thrown together.
Once you've done a good job, it stays looking good for years. Just like that first board - get it right, and everything else follows naturally.


Keep in touch with our monthly newsletter
Shed Building Monthly