Concrete Shed Base
A concrete shed base is the strongest type of shed foundation. It is at the heavier end of the work you will do to build your shed.
This article will help you to decide if you really need such a heavy duty solution or if something a bit lighter and simpler to install would work just as well.
To keep you on the right track I have split this article into three parts. This will help you from the first stages of deciding if a concrete shed base is right for you, to considering the details that you will need to build a concrete slab and finally how to actually build a concrete shed base.
- Do you really need a concrete shed base?
- What are the key technical details that you need to know?
- What is the construction sequence for a concrete slab foundation?
What are the pros and cons of building a shed on a concrete slab? Make sure that you really do a need a foundation of this type before diving in.
What thickness of concrete do you need and what volume? What type of concrete mix? Is steel reinforcement required? And of course how much is this going to cost?
How to plan the work from site preparation to finishing the top surface of the slab?
Do you really need a concrete shed base?
A concrete shed base is without a doubt the strongest and most durable form of shed foundation. It is also the most costly and labour intensive.
Before you start building let's get clear on some of the benefits and downsides of using a concrete slab to build your shed off.
Four Advantages of a concrete shed base
1. Most durable form of foundation
A concrete slab is without a doubt the most durable form of shed foundation. Dense well compacted concrete provides a level stable base that is resistant to frost and localised ground movement.
2. Good level, monolithic surface to support a timber sub-floor
A level concrete slab is a good base on which to construct a timber sub-floor. Damp from the ground is minimised by using a PVC damp proof membrane beneath the slab.
Use treated timber battens to raise the timber floor deck off the concrete surface to stop damp getting in to the floor. This also allows air to circulate beneath the floor which enables damp air to dissipate.
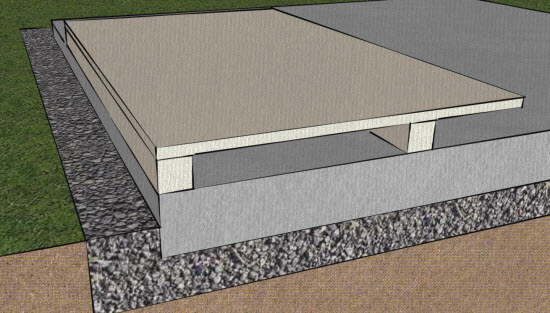 View of timber sub-floor supported above concrete slab
3. Enables shed floor to be built close to grade for flush thresholds and minimises the need for a shed ramp
If you have wheeled equipment that you need to get in and out of the shed, having a concrete floor means that the level of the floor can be close to ground level.
I recommend that you don't have the floor level at the same level as the ground as any small pooling of water can then get into the shed. Building the shed with the floor about 100mm higher than the surrounding ground then there is no need for a big ramp to get the grass cutter into the shed.
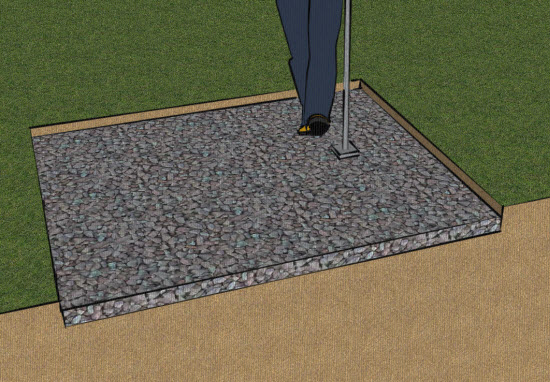
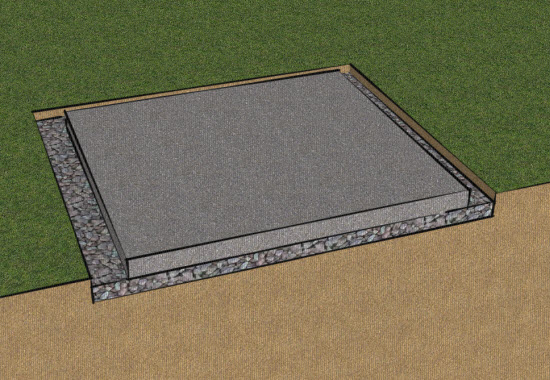
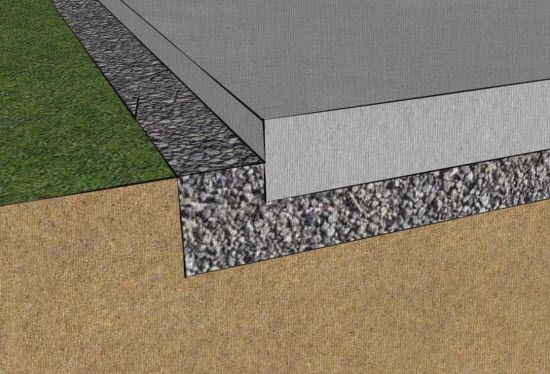 View of concrete shed base showing how close the surface can be to the surrounding ground
4. Suitable for storing garden machinery and other things that are put away wet
A disadvantage of timber floors is that if they are subject to persistent damp conditions then the timber can start to decay. This isn't a problem with concrete, so storing machinery that is put away whilst damp won't have long term implications for the durability of the floor.
As you can see from the above, concrete is good for the heavier duty end of shed floors/foundations. They aren't ideal or optimal for every situation.
If you are on the edge about whether you need a concrete shed base or not the following disadvantages may help you to make the right choice for you.
Four Disadvantages of a concrete shed base
1. Difficult to remove if garden is to be remodelled later
A concrete shed base takes a while to install. It also takes a fair bit of effort to remove if you decide to change your garden layout.
Breaking up a 3 or 4 inch thick concrete slab takes quite some doing with hand tools. So you may well have to pay for some heavier equipment to get it out further down the line if you want to remove it.
There is also a surprisingly large amount of rubble to remove. In contrast using pad foundations reduces the amount of demolition required. Also smaller pad foundations, such as paving slabs, can be re-used as foundations elsewhere (example Bunties shed).
2. Most expensive form of shed foundation
Concrete bases for sheds are the most expensive type of foundation. This is due to the amount and weight of material involved and the labour required to move and place it.
To estimate the cost of a concrete base you will need to know the volume of concrete required. To do this multiply the plan area of the shed and the thickness of base that you intend to use.
Once you have established the cost of materials you will also need to add in a time estimate for the cost of labour and machinery. (More on how to work out a cost later)
3. Cold on the feet if you don't install a timber sub-floor
Concrete shed floors are strong and resistant to damp conditions, but if you want to use the shed as a hobby room then it will be cold and hard on the feet.
An insulated timber sub-floor would feel warmer, but then why not use a timber suspended floor supported on pads instead?
A timber suspended floor would be cheaper and quicker to build and be indistinguishable in feel from the sub-floor.
4. Not good for the environment as lots of embodied carbon in concrete
Concrete is not great for the environment. A large amount of carbon is used to fire the kilns that combine limestone and clay at high temperature to make the cement that is used to bind together the aggregates to form the concrete. Also fuel is needed to transport all this heavy weight from the manufacturing plant to your home site.
The amount of concrete that you are using is small scale in the scheme of things, but if you can do something to reduce the human impact on the environment then why not consider one of the other lower impact foundation options? Such as a timber shed base or a pad foundation.
Having read the pros and cons of installing a concrete shed base you will have a good idea of whether this is the right option for you. So let's have a look at what you need to know to get the design of your concrete shed base off on the right foot.
What are the key technical details for a concrete shed base?
Once you have decided that a concrete slab is what is required for your situation then you will need to enter the 'planning phase' for your slab.
The first questions that you need to consider are very general and relate to where you intend to build the shed, what is the subsoil like where you live and is your area susceptible to heavy frost?
pAssess the overall siteThe first point when assessing your site is to look at the fall of the land around the shed site and ask the following questions.
Will surface water flow towards your shed? Is the proposed floor level above the surrounding ground? Does this area of the garden get water logged? What will you do with the rainwater from the roof of the shed?
What is are the ground conditions like?
You will also need to consider what type of soil you have. Is there a big depth of top soil? Is the ground a water logged clay soil or a free draining sand?
What we are trying to establish here is how deep to you need to dig to reach some sort of ground that is suitable for you to build your concrete slab on.
At this point you might wonder, how do I assess the bearing capacity of the ground?
A simple method is to use the heel of your boot. If the heel of your boot (about 100mm square) leaves a shallow imprint (say 5mm) in the soil then the ground is in pretty good shape to build a shed on.
What is your latitude?
How far north is your site? If you live in the North of Scotland, Northern and elevated parts of the US and most of Canada then if you are building a concrete shed base it is likely that you will need to build below the frost line.
The reason for this is that seasonal frost causes moisture in the ground to freeze and expand. This expansion will move the shed vertically. For this reason many building control departments require that all building foundations extend below the frost line. This varies depending on your latitude but typically allow for concrete filled Sonotubes at 1.2m centres.
Now let's get into a few more of the intricate details that you will need for your concrete shed base
Thickness of slab
The last details to consider are the make-up of the slab itself. Typically a slab for a concrete shed would be 3-4" thick (75-100mm).
The reason for the small variation depends upon how much preparation you are going to put into the base. The smoother the stone beneath, the higher the tolerance that you construct it to the thinner your target can be.
If this is your first slab best to go a bit thicker to accommodate any errors you may make.
Does the concrete need reinforcement?
The short answer to this is, No. A concrete shed base is like a very heavyweight patio slab, cast in one piece.
You might think that casting a lightweight steel anti-crack mesh with say 6mm bars at 200 ctrs would be help to reduce any cracking. However, casting reinforcing steel in a slab of this type can cause more problems than it solves.
Concrete in DIY projects is often relatively porous and this will allow the reinforcement to corrode. The corrosion products expand and disrupt the concrete causing cracking that they were supposed to avoid.
Shed floor (concrete or timber sub-floor)
When you are considering the detail of your concrete shed base I mentioned earlier about the possibility of using a timber sub-floor. A timber sub-floor is built above the level of the concrete slab. This makes it more comfortable for the users if the shed isn't purely for utilitarian purposes.
Take a look at the sketch below to see what I mean. The plywood floor is lifted above the cold concrete surface. Any damp from the concrete is stopped from getting into the floor by a PVC DPC on top of the timber battens.
Edge detail
Also consider the details around the perimeter of the shed. One problem that I am frequently asked is 'How to stop water entering around the perimeter of a shed?'
Well the real answer is to prevent water from getting in there in the first place by correct sizing of the slab. The slab is built to the size of the shed and the cladding overlaps the edge of the slab.
Any rainwater that runs down the side of the building will not get caught on the slab. Also the air flow beneath the shed floor will help any damp air to escape.
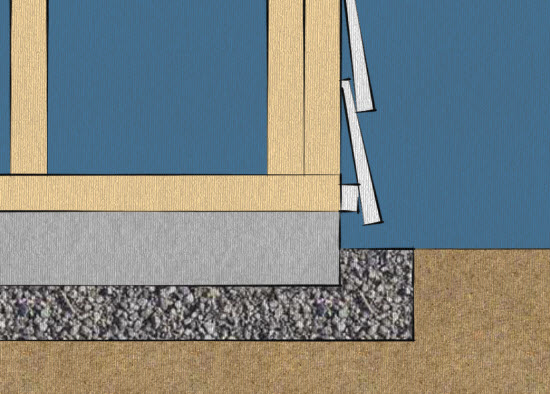 Detail showing the edge of the shed flush with the edge of the concrete base to avoid water penetration
Concrete mix
If you are going to use a ready mix concrete then specifying a mix of C20/Gen3 (reaches a compressive strength of 20N/mm² at 28 days). These mixes will give you good strength and durability for projects such as this which are light domestic applications.
If you are mixing your own concrete then make sure that you have a mixer, hire or borrow one. Mixing even a small volume of concrete (1m3 =2.5 Tonnes) is heavy work.
DIY concrete is generally mixed by volume and comprises 1 part cement: 2 parts sand: 3 parts coarse aggregate. This means a bucketful for each part.
If you are using 'ballast', which is a mixture of sand and coarse aggregate, use a ratio of 1 part of cement to 5 parts ballast.
How to build a concrete shed base
Excavation and blinding
The ideal scenario is that the ground that you are going to build on is firm and dry with good drainage. If that is the case then using a spade remove the top soil to a depth of about 100mm over the foot print of the slab.
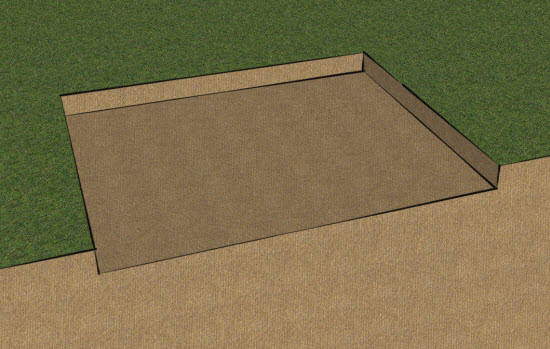 View of excavation for concrete shed base
A 50mm deep layer of crushed stone is then placed in the bottom of the excavation. This stone is a mixture of sizes and is intended to provide a solid level base on which to pour your concrete.
If you believe that the ground is damp and you want to incorporate a damp proof course then this is the place to install it. Use a 1200 gauge polythene sheet to provide a barrier to stop moisture travelling through the slab.
If the ground that you intend to build your concrete shed base on is quite soft then you may need to excavate deeper until you get down below the very soft top soil. If this is the case you will need to build the level back up again with crushed stone and you will be in for some heavy work removing the soft soil and transporting in the crushed stone.
 View of stone for foundation and compaction with manual compaction plate
As you place the crushed stone compact it in layers of 50mm. If you are casting a small shed then you can use a manual compaction plate for this job. A manual compaction plate is a cast-iron plate about 100mm square that weighs in at about 2.5 kilos. It has a wooden handle and is repeatedly raised and rammed downwards to compact areas of stone.
This is heavy work and good for you/J.
However if you don't fancy getting sore arms, then hiring a petrol driven compactor is the answer. These are a heavy metal plate with a motor on top that vibrates the plate, compacting the stone beneath.
For both manual and motorised compaction place the stone in 50mm layers. Compacting the stone in these thin layers will give you a lot more solid result than just placing all the stone at once and compacting. And the aim is to have a good 'bed' of crushed stone to pour your concrete on.
You will need to pay attention to levels as you build up the stone.
The best way to do this for a relatively small structure such as a shed base is to knock a peg in at a 0.3m offset from each corner of the slab. Drive each peg in to the ground so that the tops of the pegs are level with each other and bout 0.3m above the desired finished level of stone. Before you start placing stone place a long 4x2 timber across the top of the pegs and measure down to the ground level with a tape measure. This distance will give you an idea of how much you need to build the levels up. The aim is to establish a level plane as soon as you can and then to bring the level up evenly.
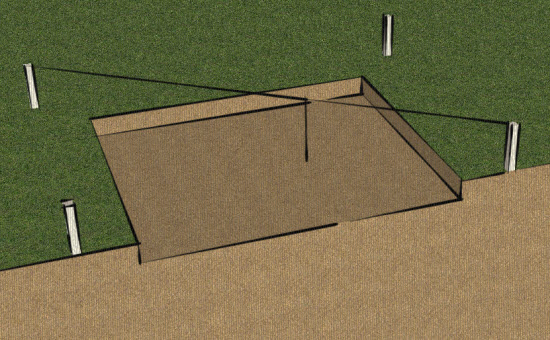 View of method of level control by measuring down from line set outside excavation. This works for control of the
levels for excavtion and also for placing of stone
View of method of level control by measuring down from line set outside excavation. This works for control of the
levels for excavtion and also for placing of stone
After all of that digging, moving of stone and compacting you deserve a cup of tea.
Now let's move on to the next step which is to place the side forms for the slab.
Formwork
The formwork for your concrete shed base is essentially just the sides that the concrete will be cast up against. As you are casting a 3-4 inch deep slab a section of 5x1" timber is idea for the edge formwork. This means that you will have a depth of 1 inch into the stone below.
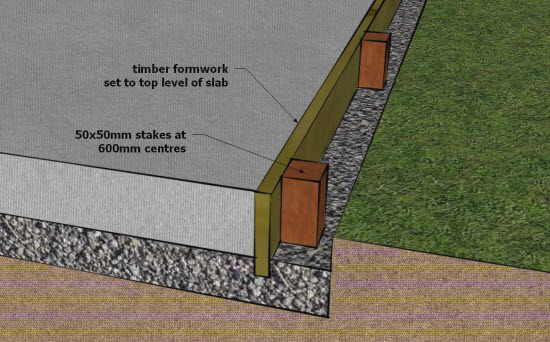 Detail of formwork to edge of concrete shed base
Place the timber board in position and then secure it in place with either steel pins or 2x2 timber pegs. The steel pins are easiest to drive in place as 1 12 mm bar will go 200mm into the ground quite easily with a 4lb lump hammer. Timber pegs are harder to drive in but are easier to fix the side forms to as nails can be used to hold the wood in place.
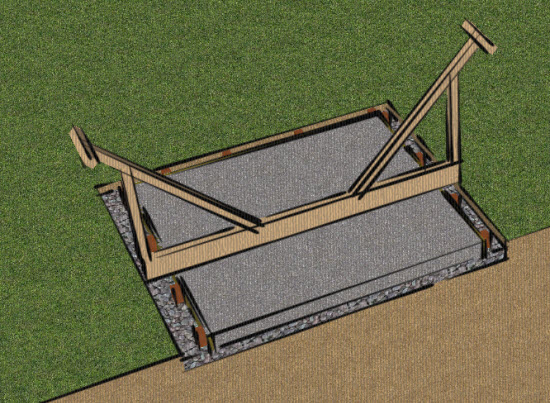
The aim at the end of this exercise is to have a timber board along each edge of the shed base. The top of each timber board should be level with the desired top of the concrete. The boards need to be securely held in place as the top of the boards will be used as a guide to control the top level of the concrete.
 General view of concrete shed base formwork
Mixing concrete
There are two methods of providing concrete for your shed base. The first is to mix your own and the other is to have it supplied by a ready-mix company.
Either way you will need to know the volume of concrete that is required. This is fairly simple and you can calculate in m3 or ft3. A tip here is to make sure that you have more concrete than you need. Not a lot more, but if you are short it is a lot more difficult to add to a cast concrete slab than it is to just not use the last few bucketful's.
Mixing your own concrete
If you are mixing your own concrete the mix proportions (by volume) are as follows
3 (Coarse Aggregate): 2 (Sand): 1 (Cement)
In rough terms half of the concrete mix is made up of crushed stone. The gaps between these stones are filled with sand. The powdered cement mixed with water forms the glue that covers the sand and stone and bonds them all together.
When the cement finishes its reaction with water, the particles are stuck together forming the rock-like material that we know and love as concrete.
In terms of measuring the quantities for your mix you should develop an eye for a 'standard' shovelful. This will be based on the amount of stone that you get on your shovel.
Try to get the amount (by volume) the same for the sand and cement, by getting the same sort of pyramid shape for these two ingredients.
I would also use a cement mixer rather than mixing the components by hand. Small electrically powered cement mixers, volume around 100L (0.1m3), do much of the heavy work giving you time to watch the quality and ensure the components are well proportioned.
The alternative to mixing your own concrete is to get a readymix company to supply the concrete to you pre-mixed.
Pre-mixed concrete
I mentioned earlier about types of mix that would be suitable. Speak with 2-3 suppliers in your area and ask them what they generally supply for this type of work. A mix that I would recommend would be a Gen 3 mix or one with a minimum strength of 20N/mm3.
When talking to your concrete supplier they will need to know the volume of concrete that you require. Also discuss with them the type of truck that they will supply the concrete in and how you intend to transport the concrete from the truck to where you intend to place the concrete.
Placing the concrete
Time is of the essence when placing concrete. Partly because the concrete mix starts to stiffen from the moment that it is mixed. Though it should stay workable enough to place for at least an hour or two.
Also the truck driver will have a time limit and may be keen to move on to his next assignment.
Your three options for moving the concrete from the concrete delivery truck to the site are:
Chute
With some thought and planning you may be able to get the back of the concrete lorry close to the shed base so that the concrete can be discharged directly into the slab.
Wheelbarrow
The most basic option for transporting the concrete is via wheelbarrow. For this the material is discharged from the chute at the back of the mixer and then wheeled to your sit and emptied. Then repeated until the concrete shed base has reached its level. When pouring concrete in this way it is good to have some help. At least one person with a wheel barrow and another person on the shed base moving and compacting the concrete.
Pump
If the base is further away than the chute will reach and the access is too tricky for barrows then you might consider a concrete pump. It will cost you to hire in the plant and the operator, but it will make very quick work of transporting the concrete over long distances.
The pump and a metal pipeline are set up before the concrete truck arrives. The concrete is discharged from the back of the concrete mixer straight into the pumps hopper. A hydraulic ram in the pump forces the concrete along a metal tube to the job site. A flexible hose is located on the end of the metal tube so that the concrete can be placed in an even layer in the formwork.
No matter which method you use for placing your concrete, you will need to use a shovel to distribute the concrete around the base to get the surface roughly level with the top of the edge forms.
Surface finishing
No matter which method you use for getting the concrete into the base the next step is the one that has the most influence on the concrete surface.
If you are going to install a timber sub-floor on top of the concrete shed base then the surface finish is less critical than if you are going to use the floor as the finished surface.
The finish for a timber sub-floor would be called a 'rough-tamped finish'. This type of finish is achieved by getting the concrete roughly level and then using a 'tamping board'.
One person is on each end of the tamping board. They then slowly walk the length of the slab raising and lowering the board. This will create lots of small ridge in the concrete surface. It will also draw some of the cement paste to the surface. Don't 'over-tamp' as this will encourage too much cement paste to the surface which can cause surface cracking/crazing.
 Finishing the surface to achieve a 'rough tamped finish'
If you are going to use the base as a trafficked surface then more effort is required to achieve a smoother and more hard-wearing surface. A bull float, generally a 4ft+ long, with a straight edge made of magnesium (for stiffness and lightweight) is used to smooth the surface.
This process is carried out once the concrete has had a chance to stiffen, you will have to use your judgement at this point. Do it too early and you will draw too much water to the surface. Use the bull float to create a flat smooth surface.
Finally use a steel trowel around the edge of the slab to bevel the edges ever so slightly so that they don't chip too easily.
With the concrete surface finished you now need to enable it to cure. Concrete doesn't dry out, it gains strength from the chemical reaction between the water in the mix and the cement powder, binding the together the stones and the sand. You need to make sure that the concrete doesn't lose water through surface evaporation.
 The completed concrete shed base
If you don't mind too much about the surface appearance of your slab then covering the slab with plastic sheeting or damp hessian sacks is one way to keep the water in the slab.
If you have a floated finish for the wearing surface then you should use a sprayed on curing agent. This can be bought from your hardware store and sprayed on with a garden sprayer. This curing agent forms a film on the concrete surface that prevents water evaporating from the slab.
The day after pouring you can remove the edge forms. Remember to protect the newly exposed slab edges, with the plastic/hessian sheeting or the sprayed curing agent.
Concrete gains strength rapidly at first and this then levels off over time. Most concrete is good to walk on after 2-3 days. You can then get on with building your shed and enjoying the fruits of your labour.
Summary
Hopefully at the end of all this you have a clear idea of when it is a good idea to use a concrete shed base, what the key elements you need to consider are and also the stages of constructing a concrete shed base.Related posts:
- Would building a pier type foundation be cheaper and easier than a concrete base?
- Is a concrete base too heavy? Ever thought of using a plastic shed base?
- Building a foundation on a slope


Keep in touch with our monthly newsletter
Shed Building Monthly