How To Build A Shed Ramp
A shed ramp is essential when you need to get heavy garden machinery in and out of the shed. A typical shed floor can be 9"-12" above the surrounding ground level, so some people even use a ramp for getting bicycles in and out.
This article gives a few ramp design hints as well as tips on how to build a timber ramp for a shed.
Choosing the ramp slope
As part of your shed planning you should make sure that there is sufficient space in front of the shed for the access ramp. The length of the ramp will be governed by the height from the external ground level to the shed floor and the slope that you choose.
A little bit of thought needs to go into the slope, for two reasons - safety and ease of use.
Safety
The steeper the slope, the easier it is to slip or trip. It most likely won't be you (as you built it and know its pitfalls) but one of your loved ones will. So 'listen up'.
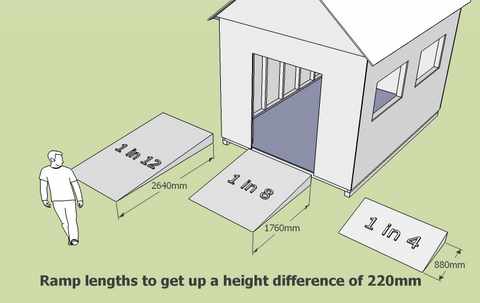
The steepest slope for a public ramp is one in twelve (1:12) which is governed by ease of use for wheelchair users. For use by the general public many building codes recommend a maximum slope of 1:8 (that is one inch rise for every eight inches horizontally.) With a 1:8 slope, if the floor is nine inches above the ground, the ramp will be 72 inches long (1.83m long). It is possible to go steeper, up to about 1:4 for fit able-bodied people if you want to, however do remember the increased risk of slipping.
My recommendation is to make the slope as shallow as possible, this will avoid many safety and practical and access problems.
Ease of use
The other factor to remember is the geometry of the machinery you are to use. If you are using a ride-on lawnmower or garden tractor they will have plenty of power to get up the ramp but you need to consider if the machine will ground in the middle as the undercarriage of the mower goes over the door threshold. If you are using a snow plough, the blade may run into the ramp before the wheels if the slope is too steep! To determine the critical slope check in the machinery manual or do some site experiments.
Make the garden shed ramp at least six inches wider than your door opening on both sides. This gives a bit of tolerance in going in and out, use this space to fix a kerb to the ramp (stops the mower sliding off).
Ramp surface
A wooden shed ramp will become slippery over time as it gets wet and algae grows. The slip or skid resistance of the ramp surface can be improved in a number of ways:
- One option is anti-slip paint (see your local DIY store). The specialist paints are formulated with grit sizes and paint that work. The homegrown version of this is to use exterior grade paint and sprinkle on some coarse sand.
- The other option is to use a roll of galvanised chicken wire or expanded metal sheet and staple this down to the ramp surface using galvanised staples.
- Make a concrete ramp with a tamped finish
Build a ramp for a shed
When it comes to the construction, the choice is a wooden ramp or concrete.The ramp should be founded on crushed stone as described here Shed Foundations
Concrete
A concrete ramp may be considered a bit of overkill (but as always the most durable solution). Use a tamped finish in a herringbone type fashion, so that water can drain from the surface and the ridges give slip resistance for the tyres.
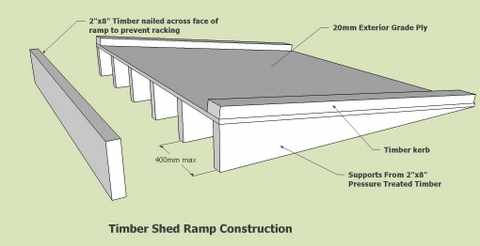
Wooden shed ramp
This sketch of a free standing timber shed ramp will prove a durable solution, when constructed from pressure treated timber and exterior grade ply.
Related posts:
- More about different shed ramp building materials
- Find out more about types of shed foundation
- Did you know there were this many different shed designs?


Keep in touch with our monthly newsletter
Shed Building Monthly