Installing Roof Shingles Is A Great Option For Making A Watertight Roof To Your Shed
Installing roof shingles is popular roof covering for sheds in North America and with the advent of more substantial sheds and Home Offices in the UK is an increasingly popular option. Not only does the shed roof have a more attractive, interesting appearance but roof shingles are a more durable roofing option and not much more difficult to install than standard mineral roofing felt which is the most common roofing material for sheds in this country.
Make sure the roof structure is sound before you start
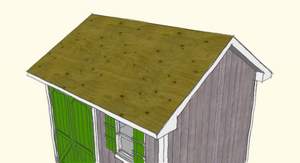
But first things first(I know you are keen to start installing roof shingles!), if you are building a shed from scratch make sure the shed frame is square and level before you begin your roof construction. Once all beams are in place, cover with 12 mm (~1/2") exterior-grade plywood sheathing. Make sure you buy exterior-grade plywood because it is moisture resistant and less likely to warp when exposed to outdoor conditions.
The plywood sheathing should be laid with the grain of the plywood perpendicular to the roof rafters. Laying the sheathing this way ensures that you create a sound structure.
Use a chalk-line to mark each plywood sheet, snapping the line to clearly mark where the rafter beam is located. Then, in accordance with local guidelines, nail the sheathing to the rafter beam using 2" galvanized nails. Some local guidelines may suggest nailing the sheathing to the rafter beams every 4" or 6", the requirements vary based on local weather conditions such as hurricanes, tornados, and snow loads.
Installing the Roofing Underlay
Next, fix what is commonly referred to in North America as 30-pound felt paper, or tar paper and this side of the pond as Roofing Underlay. This layer will create a watertight barrier. Note: the underlay will only last approximately six months (or less) if left exposed to the elements. The underlay provides a secondary, or backup waterproof layer to stop any water that makes it through the overlapping shingles above.
Begin at the bottom of one side of the roof and lay the underlay horizontally all the way across the roof. Often what is referred to as cap nails (or"red head" or"green head" nails) are used to attach the felt to the plywood because these nails have a large nail head with a small tack in the middle, making it less likely to rip or tear the felt.
Nails should be placed every 6" to 1 foot along the felt at the seam. Once the first row of felt is laid and attached, lay the second layer of felt (moving up toward the peak). The second layer of felt should overlap the first layer by about 6", this is usually pre-marked on the felt so that the builder has a clear guide to assist in lining up the sheets.
Continue to lay the felt and secure with cap nails. Both sides of the roof should be completed before you place the final sheet on the roof peak. This sheet should be laid last to ensure that all water drains away from the roof peak. All seams should face down toward the ground.
Selecting Roof Shingles

Once the roof is covered with underlay, it is time to attach an asphalt roofing shingle. Cheap builder's grade shingles are generally a 20-year shingle. This type of shingle is likely to be sufficient for most shed projects. If you would like a more durable option, consider a 25-year shingle (which is slightly thicker) or a 30-year shingle. The 30-year shingles are thick and can add a more three-dimensional look to the roof. If you want the shed to match the look of the main house, which may have a more dimensional shingle, consider one of these thicker options. Also the thicker shingles will increase the durablity of the roof and resistance to high winds..
Note: The years associated with shingles, for example 25-year shingles or 30-year shingles, generally have more to do with the thickness of the shingle rather than the number of years they are expected to last.
Roofing shingles come in strips that are generally about 3-feet long and 8 or 10 inches wide.
Start installing roof shingles
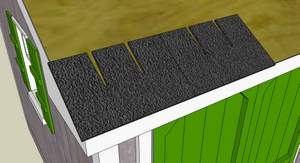
In order to make your roof water tight and to eliminate wind infiltration, first place tar on the bottom edge of the roof and lay a row of roofing shingles upside down all the way across the bottom of the roof.
Note: Avoid applying too much tar because it may ooze out and onto your building when you place the shingles on. It's easier to avoid tar drips than to clean them off!

Once this first row of upside down shingles is affixed to the roof with tar, begin laying the shingles. Start in one bottom corner. Lay the first shingle on top on the upside down shingle that is affixed with tar. Nail the new shingle in using roofing nails. Depending on the building codes in your area, your shingle may need 4-6 nails for each section of shingle.
As you lay subsequent rows of shingles, stagger their placement so that seams do not line up and allow water infiltration. In the second row, move the shingle sheet over one third. This way, every third row of shingles will line up. Some people also suggest moving the shingles over 6" for every new row. Decide what staggering pattern will work best for your shingles before you begin.
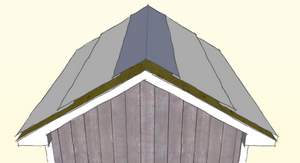
Remember the ridge piece
One you have covered both sides of the roof, you will need to attach a roof ridge shingle. This important piece protects the roof peak from water penetration.
Installing roof shingles, as you have just found is straight forward and if done correctly creates a durable, watertight and attractive roof for your shed!
Related posts:


Keep in touch with our monthly newsletter
Shed Building Monthly