Sliding shed doors have to be the second best space saving invention ever
Don't worry I will tell you the best space saving invention later in this article.
But first, I want to cover three major points about how sliding shed doors work, these are:
- What are the options for arranging sliding doors on a building?
- What are the principles of how a sliding shed door works?
- Where to source the parts for sliding shed doors, or even to build your own sliding door gear?
I will also cover a few problems that can arise when installing large sliding doors.
Where to locate sliding shed doors on a shed
The main reason why shed builders choose sliding doors is their efficient use of space. Eliminating the 'swing' space required for a hinged door means that the space in-front of the door has a lot more options.
- Maximising the use of space in a small garden
- Not obstructing the pavement on to a busy street
- Access in a busy horse livery yard
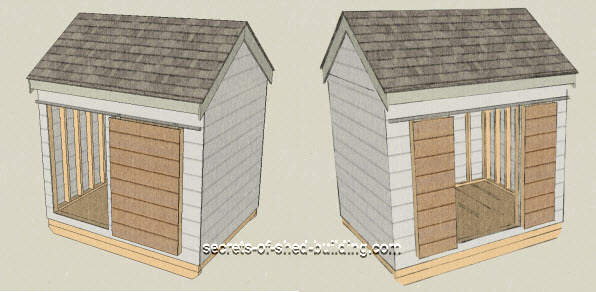
To make the most of this space efficiency a sliding door needs a section of 'free' wall alongside it. This is where the door is 'parked' when it is in the open position. For this reason sliding doors are often installed on the side walls of smaller sheds (rather than the shorter gable end). The picture below shows the two main arrangements.
Points to note:
- The maximum opening size is just less than half the wall length, but the door has to be offset to one side when one door is used.
- The door can be located centrally but has to be split in two. This can have advantages, as two individual doors are lighter than one large one.
It is also worth having a look at the image below and making sure that the door doesn't clash with any proposed window positions.
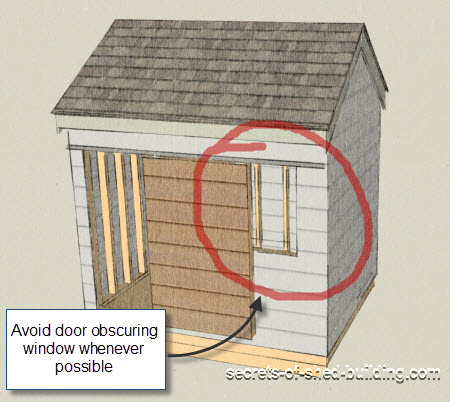 Generally windows are located so that they aren't obscured when the door is opened
The size of opening required or lack of space are generally the reasons for choosing sliding doors. But then there are some very nice sets of barn door style hardware that will really do make your shed look great.
How do sliding shed doors work?
The general principle is that the weight of the door is supported by two sets of rollers per door, which are fixed to the top edge of the door. The best rollers have height adjusters built-in so that you can ensure the door is level.
The rollers run in a track which is fixed to the side wall of the shed and runs over the door opening. It is important that the lintel over the opening has enough strength to support the door without deflecting. Otherwise, the door can 'ground out' when it is in the closed position.
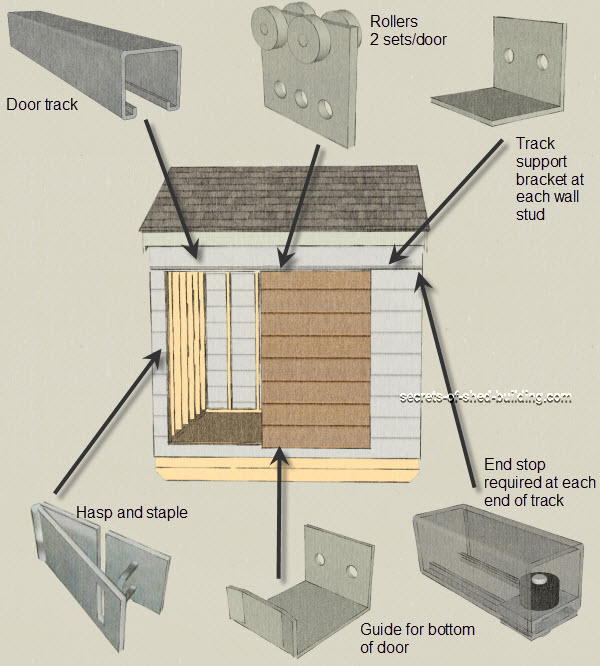
The tracks for commercial sliding door systems are a channel and the rollers run inside this channel. The channel is supported off the wall and lintel by brackets, at each wall stud position. The run of the door is unimpeded. At the end of the channel a stop is fixed to prevent the rollers sliding out of the end. If the doors are split in the middle then a stop can also be fixed centrally.
The bottom of the door is prevented from swinging out by rollers, or bracket guide, fixed to the shed wall near the door jamb.
With double sliding doors a drop bolt can be used to secure the free end of one door. The doors are then secured to each other with a hasp and staple type arrangement.
For single doors the 'free' end of the door is secured against the door post with a hasp and staple.
The sliding door gear should be the 'right size' for the door you are using
By 'right size' I mean that they should be strong enough to support the weight of the door. If the rollers don't have enough capacity then they either won't work or will become damaged and stop working prematurely. If the rollers are too strong the only problem will be that you might pay a bit too much for them.
The sort of 'general duty' rollers that I link to below have a capacity of 100kg. So with two sets per door that gives a maximum door weight of 200kg
A shed door with a 12mm ply face and timber backing of 4"x2" timber studs at 400mm centres has a weight of approximately 15kg/m2. This gives a maximum area of around 13m2. If the door is 2.2m high then the door could be 6m long. So for most practical sheds of the size discussed on this site then weight should not be an issue for the rollers.
The last part of the introduction to sliding shed doors is where to source the sliding shed door hardware
What sort of sliding shed door hardware is available?
A quick Google search for sliding shed door hardware will throw up a ton of solutions.
Many of the products that are shown from this search are for internal use and won't stand up to being outside for long.
The sort of product that you need is for use on small farm buildings or light industrial use. The internal style products don't always make this clear.
Things to watch out for and avoid are:
- Aluminium tracks and nylon rollers - I would suggest you need galvanised steel
- The product look very stylish (we are looking for rugged lightweight industrial, not 'chic' barn door style)
- Single sided rollers. These are not suitable for outdoor structures as the door can be lifted off it's tracks.
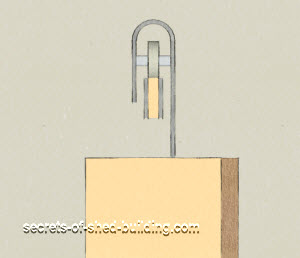 Section through single sided sliding shed door gear. This is not very secure as the door can be lifted off its tracks
|
The sort of products to investigate include those from National Hardware in the US and Henderson or Barrier Components in the UK. Unistrut also provide a useful looking set of rollers that work with their almost universally available (and cheap! channels). I have compiled a short list of the type of rollers that would work for this type of project that are available on Ebay. I haven't used each and everyone of these products but they are the brands and type of products that I would be using for a project of this type. |
Once you have had a look at the commercially available products you might also consider making your own sliding shed door hardware.
Making your own sliding shed door hardware isn't as difficult as you might think
This article on instructables shows how one shed builder built his own sliding shed door gear, using stock steel plates and roller skate wheels.
I like the idea with this project but am not convinced that it provides a great solution or is even that much cheaper in the long run.
 Arrangement of rollers and track support bracket on roller skate wheel sliding shed door
The plus points:
The door gear encloses the rail so that the door is secure and can't be lifted off.
The minus points:
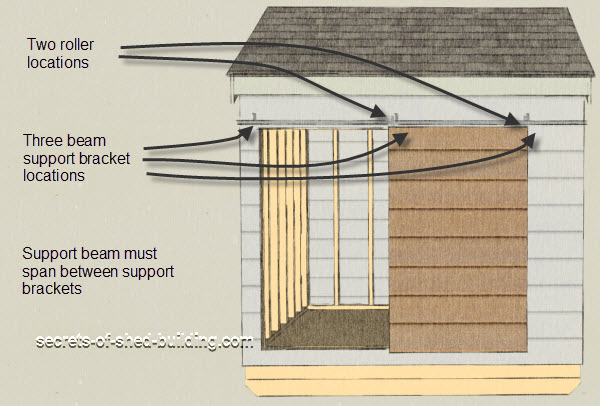
- The door must be bigger than the opening to avoid rollers clashing with the support brackets.
- The door track had to be strengthened as it didn't have enough strength to support the door. With the proprietary channel the supports can be at each stud position without affecting the door movement. The channel is kept small and track deflection is not an issue.
- The Proprietary rollers are more expensive than roller skate wheels, but not by much.
Overall, I prefer the proprietary solution. Even if it doesn't sound as cool as saying you made your sliding shed door gear out of skateboard wheels!
So, what are the problems that you might come across with your sliding shed door installation
Issues that you will need to consider as part of your installation include:
- Weathertightness
- Structural capacity
- Security
Weathertightness
In areas where there is rain you will need to pay attention to weather proofing around the perimeter of the door. (Not Southern California in the Instructables example!)
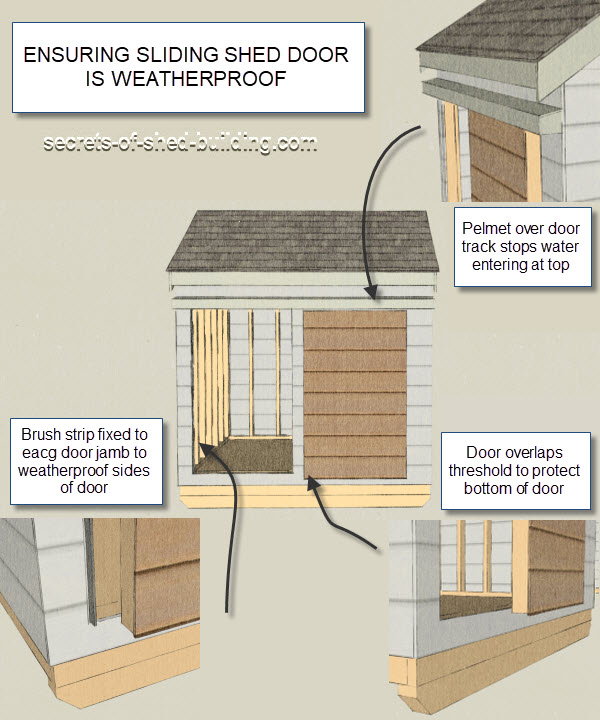
At the head of the door a cover or pelmet is installed to shed water coming from above (see picture below). At the sides, brushes or baffles can be used. The threshold detail will depend if the floor is raised or flush. At the bottom of the door the door should extend past the floor level. For a flush threshold then ensure that there is a slot drain and the outside ground slopes away.
Structural capacity
The lintel over the door opening needs to be sufficient to support any roof loads and the weight of the door without deflecting. If the beam deflects the door can ground out and stick. This is mainly an issue for larger door openings and longer span sheds. For most of the sheds discussed on this site a pair of 6"x2" timbers should be good for spans up to 3m.
Security
With a decent C channel the door can't be lifted off its track. When in the closed position it is held at the bottom two corners by the roller/guide and by the hasp and staple. This along with a strong frame to the door should deter most intruders.
Summary
Installing sliding shed doors is well within the reach of most DIY shed builders. The key points to remember are:
- Pay attention to the location of the door including where the door will be in the parked location
- Have a good understanding of how the sliding door system that you propose to use will work
- Take a look at a few different options to get the solution that works best for you in price and functionality.
Finally.....
I mentioned at the beginning that for space saving, the sliding shed door was the second best space saving invention ever. In my opinion, the best is the roll up shed door. It is more expensive and a bit more complex. But it is better in terms of space efficiency as the door is stored at roof level when it is not used. Rather than being parked to one side on the shed wall. Read on to find out more about roll up shed doors.

Looking for more information on how to get your shed door working perfectly?
Return from Sliding Shed Doors to the Shed Door Hardware hub page


Keep in touch with our monthly newsletter
Shed Building Monthly