How to install shiplap cladding on your shed
If you are installing shiplap cladding on a new shed or replacing shiplap cladding on an older one this project is a great place to find out how. You will learn the details that you need including sketches and photos of a hands on project.
Before we start, a word or two about terminology and the principles of how shiplap siding works. In my book, the terms siding and cladding are interchangeable. The description shiplap siding is used more in the US, whereas here in the UK we tend to use the term shiplap cladding. On this page I tend to use the term cladding, elsewhere I use siding!
Also many people ask 'Is shiplap cladding waterproof'. Well the boards have an overlap and are sort of like fishscales. So in theory they should be.
However in practice the overlap isn't that great. So with wind driven rain for long periods and cappillary action water does come through the seams.
I have seen people discuss sealing the joints with caulk or silicone. This isn't the right method as it just holds water in contact with the wood, leading to early failure. The answer if you really need your shed to be fully waterproof is to use a breathable membrane.
Incorporating a breathable membrane into the wall is the best way to achieve a water tight structure.
- Interior lining
- Fibreglass insulation
- 'Breather' membrane
- 14mm thick shiplap cladding
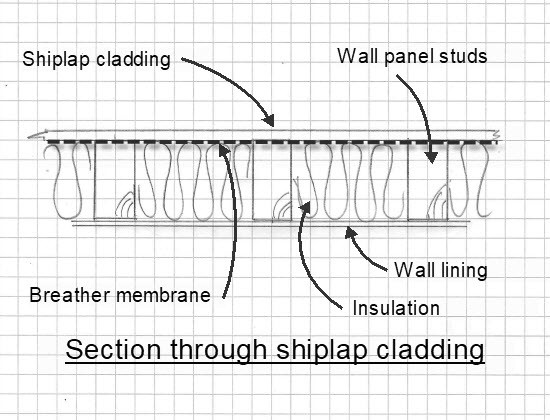 Section through a typical lined, insulated and clad shed wall
So now lets move on to the practical example of installing shiplap cladding on a real life shed.
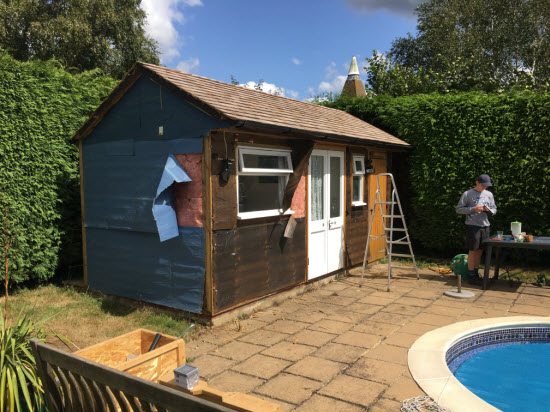
Replacing shiplap cladding on a poolhouse shed
The shed had two very different exposures. On two sides was a hedge that was about a metre away from the shed and which had been regularly clipped. The siding on these two sides was immaculate it was as good as the day it was installed.
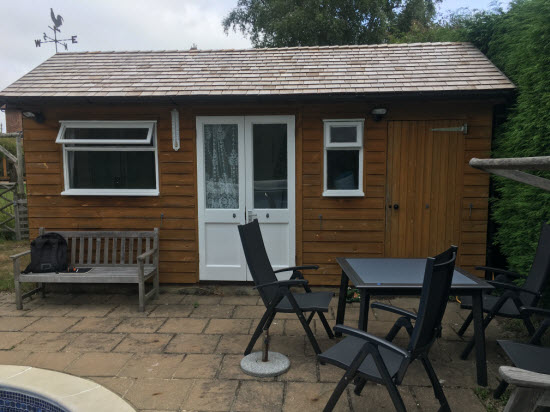 View of the poolshed prior to recladding
The other two sides were very exposed to the sun, rain and wind. Sections of the cladding had become quite distorted. The bottom edge of many of the boards had started to become mis-shapen and the overlap of the boards was no longer protecting the shed.
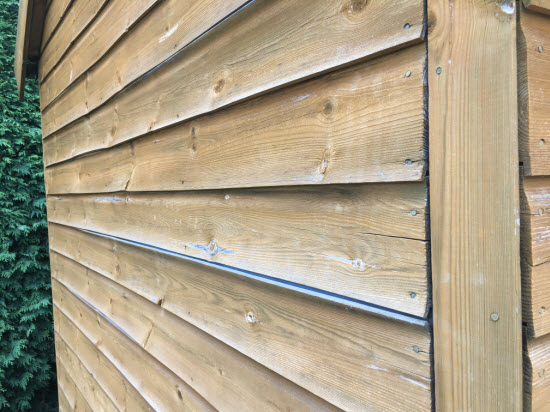 Close up of the shiplap cladding boards showing distortion and splitting
Weathering of the boards would have been reduced by:
- Pre-painting the boards before installation
- Regular application of the Sadolin wood stain as a protective coating
Now it was too late and the only way to get this shed a future was to take off the old damaged cladding and replace it with new.
The purpose of the project was to replace the shiplap cladding on the two exposed elevations. We took two design steps to try and reduce future problems with the weathering on these two elevations.
We used a thicker shiplap cladding board. We couldn't go too thick as it needed to tie into the existing cladding on the other two faces. We used a board that was 17mm thick vs 14mm before. This doesn't sound much at only 20% thicker. But, resistance to warping is proportional to the square of the thickness. This increase in thickness meant it was 45% less likely to warp.
The other strategy was to paint both sides of the board before installing them on the shed. The reason for this strategy was to equalise and reduce the permeability of the board to water. Slowing down and reducing moisture changes would reduce the likelihood of the board warping.
Also pre-coating the boards means that the boards get a full coat of preservative, even in difficult to reach areas. After the shiplap cladding was installed the shed got another coat of Sadolin.
The future maintenance regime is to give the shed a new coat of Sadolin every 3-5 years. This will maintain the external protection of the timber to weathering.
Starting the shiplap cladding installation
Take lots of pictures and sketches
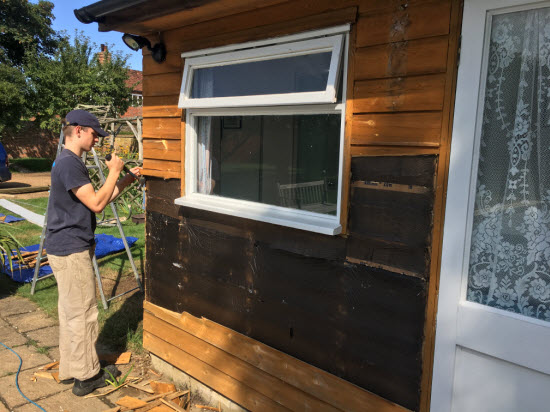
 View of area between the window and door with the cladding removed
The first step in the recladding project was to take lots of pictures of the shed. Take care to take:
- Close-up pictures
- Locations where it is difficult to remember exactly what was there before.
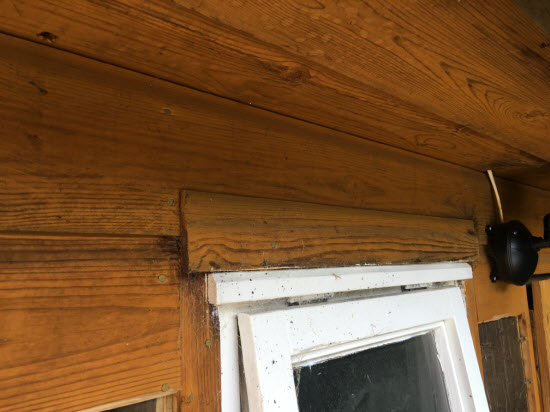 View of area above the window prior to removing the cladding
Also, make notes or sketches of how the shiplap cladding fits together. This applies equally if you are installing shiplap cladding on a new build shed project or on a refurbishment project such as this.
The reason for this is to refer to during the installation process so that you limit the number of mistakes that you make.
The existing cladding detailing had worked successfully in keeping the water out. There wasn't a need to drastically change details to improve the performance.
Removing the cladding
The cladding was carefully removed using a crowbar and the end of a claw hammer.
 Removing the cladding using a claw hammer
The aim was to take off all the cladding, the fixing nails and the existing breather membrane. The existing breather membrane, made from a heavyweight cellulose based paper, was to be replaced with a more modern Tyvek building wrap. Tyvek membranes are waterproof and breathable, sort of like giving your shed a Goretex jacket.
The existing insulation was fibreglass 'batts' fitted between the timber wall studs. The building wasn't heated and so there wasn't a real need to upgrade this to a more thermally efficient material.
 View of shed with the cladding removed. Showing two types of membrane and the insulation
Installing a breathable membrane to weatherproof shiplap cladding
The Tyvek draught/waterproof membrane serves two purposes:
- To keep any rain that made it through the cladding out
- To allow any moisture from inside the shed to escape
The purpose of this is to prevent the build-up of water around the timber frame.
The breather membrane is supplied on a roll about 1.2m wide and installed from the bottom upwards. For this shed, it meant that there were two 'courses' of fabric. The upper layer overlapped the one at the bottom of the shed giving a shingling effect. There were 3 courses on the gable elevation.
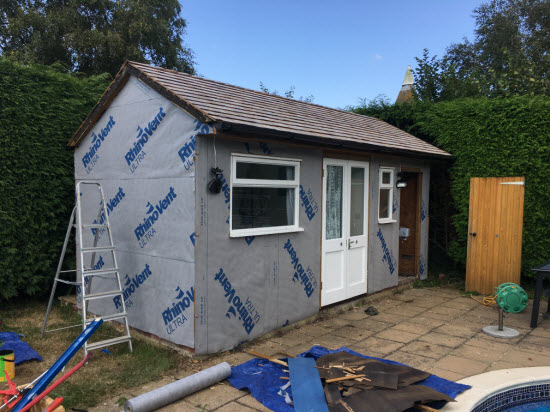 Shed with breather membrane installed
At the corner of the building, which receives the brunt of the weather, a corner layer of Tyvek was used. This covered the corner seam between the two panels.
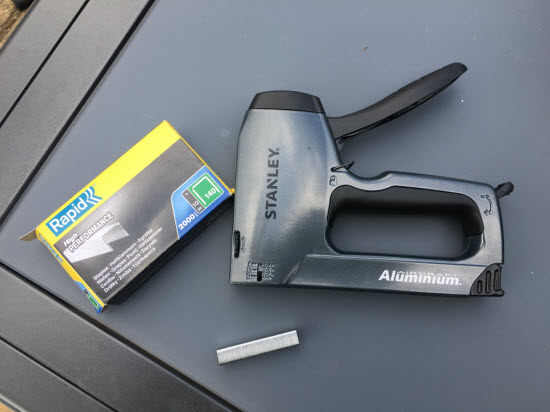 Staple gun and staples used for fixing Tyvek membrane in place
One improvement to this building would have been to install vertical battens between the cladding and the Tyvek. This would have created an air/drainage space behind the cladding and allowed any water coming in or out of the building to escape.
Pre-paint the shiplap siding
Part of the strategy for maximising the durability of the siding was to pre-paint it before installation. And not just to paint it on one side but to fully coat the board.
This is quite a time-consuming process. Also, you have to be sure of the weather before you start so that your work isn't damaged by potential rain. We were lucky for this project in that there was a double garage for shelter. This meant that we could keep on painting regardless of the weather.
To pre-paint the cladding it is best to use some sawhorses with a 4x2 timber on top to increase the number of cladding sections that you can paint at one time.
How to use shiplap cladding at corners
Looking at the detail below you can see the detail how the two corner panels attached to each other.
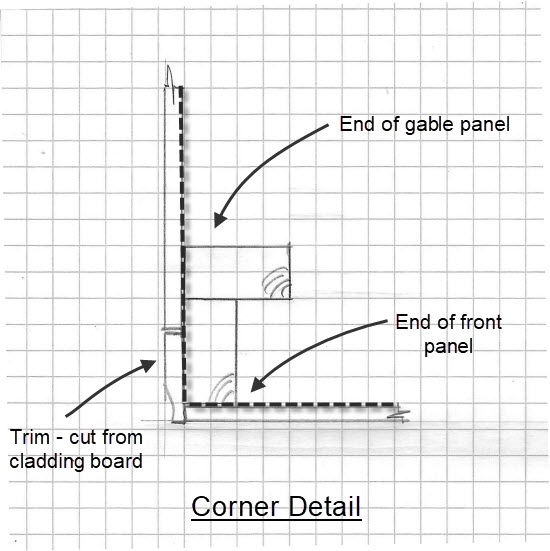 Sketch of corner trim
The corner trim gives a 'solid edge' to fix the siding up to and it also gives some end protection to the end grain. Measure between the trims at the top bottom and middle, this will tell you if the ends of your shed side panel are square.
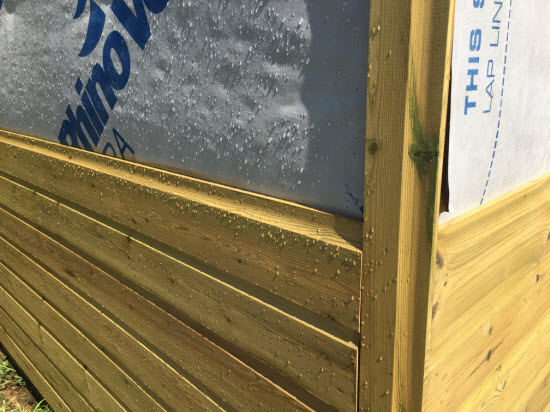 Picture of corner trim as installed
I started installing the shiplap cladding on the gable panel
I started cladding the gable of the shed first as it had no internal 'obstacles' such as doors or windows to fit around.
How to install the first (bottom) row of shiplap cladding
I started at the bottom. Making sure that the bottom of the Tyvek membrane overlapped the base of the shed and also the first of the shiplap boards.
 First row of shiplap cladding in place
I used my spirit level to ensure that the first board was as level as I could. Then nailed the board to a stud to one side of the centre of the panel. Lifting/lowering the opposite end, and with the help of the spirit level, I made the board as level as possible. (See Sketchup detail at bottom of shed).
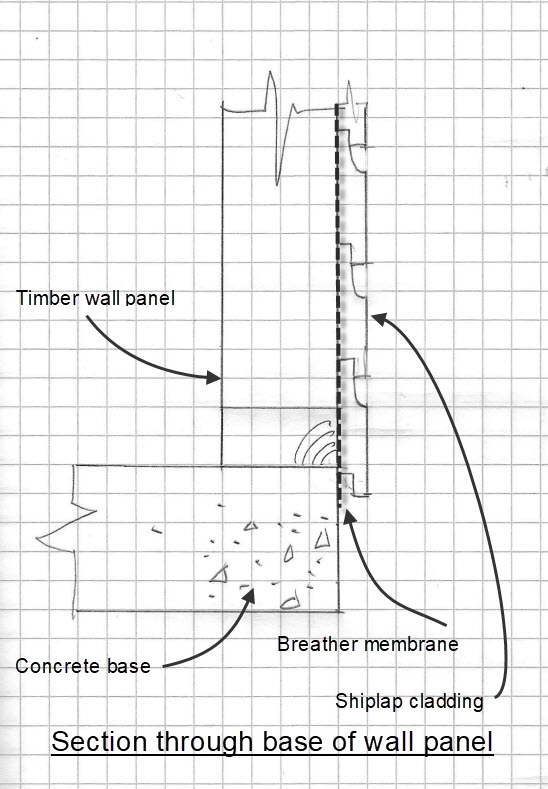 Section through wall at base of cladding
With two nails in place you can then fix the board each time it intersects with a stud.
What nails to use to secure shiplap cladding
- The nails used should either be galvanised or stainless steel. This prevents staining of the timber if the fixings were to corrode.
- To ensure a secure fixing use nails that are at least 2.5 times the thickness of the board that you are securing. For this project, the board was 17mm thick. 2.5x17 = 42.5mm, so I used 50mm long, stainless steel, ring shank nails to secure the boards.
- The boards only need one fixing per board and this fixing goes just above the bottom of the board. This clamps one board to the next and allows the board to expand and contract width wise with the seasons. Two nails can cause the board to split in the middle.
- The boards only need one fixing per board and this fixing goes just above the bottom of the board. This clamps one board to the next and allows the board to expand and contract width wise with the seasons. Two nails can cause the board to split in the middle.
The cladding process then continues
Install the next board resting on top of the first. You don't need to pay quite as much attention to level as that first critical board. Though you do need to keep an eye on the level of the boards as the installation progresses, to avoid 'creep'
Creep is the result of an accumulation of errors all in the same direction. For example, one board might be 5mm out of level, which isn't too critical. But if each of the next 4 boards are 5mm out of level the top board would be 25mm from being horizontal. This would definitely be noticeable.
 Shiplap cladding progressing upwards on both elevations
The moral of the story is to keep checking as you go along so you don't end up with a nasty surprise at the end.
With all that checking, your boards will still be level when you get to the eaves. At this point, you will need to start measuring and cutting the ends of each board so that they match the roof slope.
Cutting the ends of the boards to match the roof slope
For this shed, the roof slope was 30 degrees which is a ZZin 12 roof slope. I checked the roof slope using my roofing square and spirit level. With the level horizontal, I laid the roofing square on it and rotated it until it was parallel with the roof slope. I could then read the roof slope, in degrees, off the roofing square scale.
This roofing square has two scales for reading the roof slope. The other popular way of checking roof slope is expressing the slope as the number of inches of rise in the roof vertically for each 12 inches you go horizontally.
I used the mitre saw to cut the ends of the board to the required angle. And measured along the top of the previous board to see how long the bottom of the next board up would be.
The junction between the gable wall and the edge of roof was protected by an overhang of about 150mm. Even so, I used a section of offcut board as trim to protect this junction between the gable overhang and the wall.
Adding fascia boards to the eaves
The roof of the shed had cedar shingles as a roof covering. The edge of the roof was trimmed using the barge boards. These were given an extra protective coat of stain, before being re-fixed.
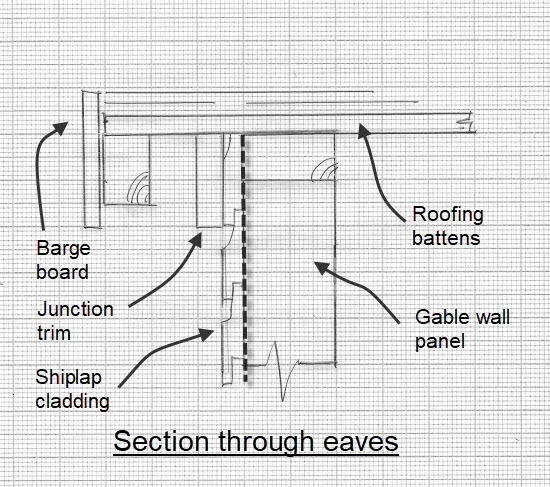 Section through the eaves
It was then time to move on to the front elevation. This was slightly trickier as it included two doors and two windows. This meant more cutting and some other little tricks. I will show you these to help ensure that your shiplap cladding stays in place for at least 15 years.
How to fix shiplap cladding around windows and doors
At any junction in the cladding, there is the potential for water to get in. On this particular shed there were several design elements that made the elevation of the shed more resistant to the weather:
Firstly the design details that you need to know are:
- How to use shiplap cladding to either side of the windows
- How to use shiplap cladding at the head of the windows
- How to use shiplap cladding beneath a window
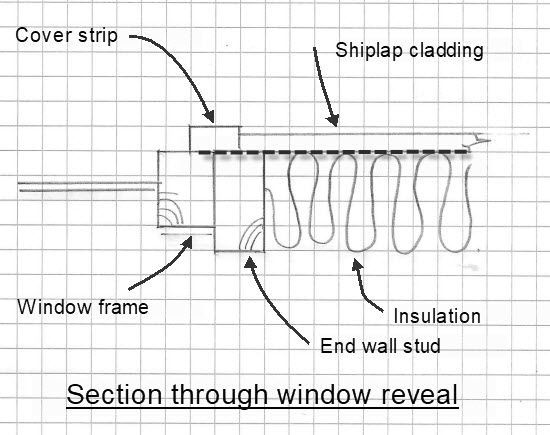 Section through window reveal
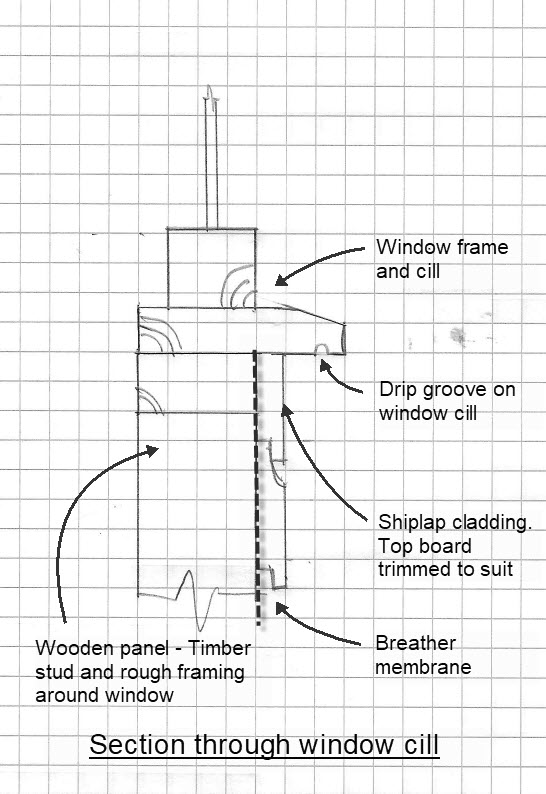 Section through window cill
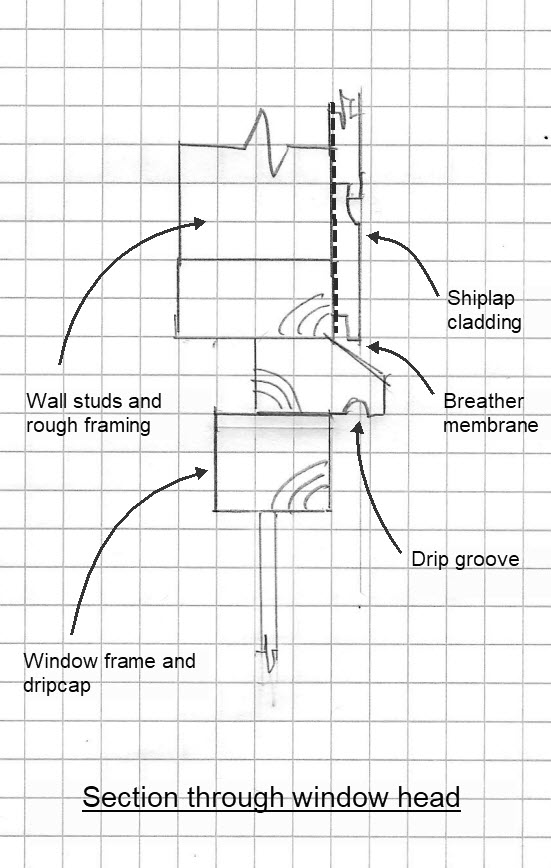 Section through window head
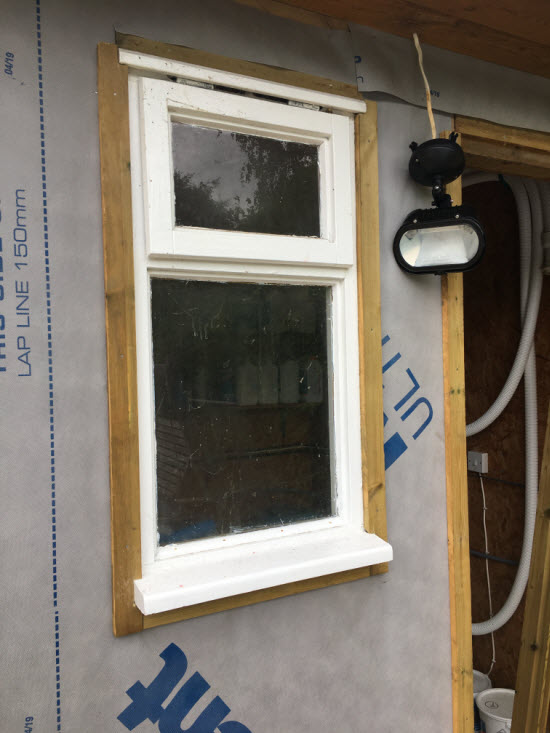 Picture of window with some of the trim in place
Then here are the next ones, same drill:
- How to use shiplap cladding to each side of a door
- How to use shiplap cladding over the door
- How to use shiplap cladding at a door threshold
Other critical points that you need to know:
- As elements get shorter then there is a greater tendency for them to split. The solution to this is to pre-drill the short shiplap cladding part. The nails I used were 2.9mm diameter, so I pre-drilled with a 3mm drill bit. This prevents the element from splitting, though do take care not to overdrive the nail as this can split the wood too!
- There needs to be something to nail the cladding to, which can take some planning. This automatically happens for larger expanses of cladding with studs at 400mm centres. But can be slightly more tricky where there are openings such as windows and doors. Sometimes the trim means that you will be nailing very close to the end of the cladding piece. The solution is to plan ahead and fix a 'nailing piece' to the side of any stud where you think you might be running short of space for fixing the cladding. An example is here.
The pictures below show a few of the above points in action!
Finishing touches to our shiplap cladding installation
Before we re-fitted the hardware the whole shed had a second coat of Sadolin. This was the blah blah type. For more about applying exterior wood stain to prolong the life of your shed read more here.
 Cabin hooks re-fixed to hold the doors back
The final element of our shiplap siding installation was to reinstall the doors and shed hardware. This included cabin hooks for holding the doors open, a supporting bracket for the hose and a wall mounted thermometer.
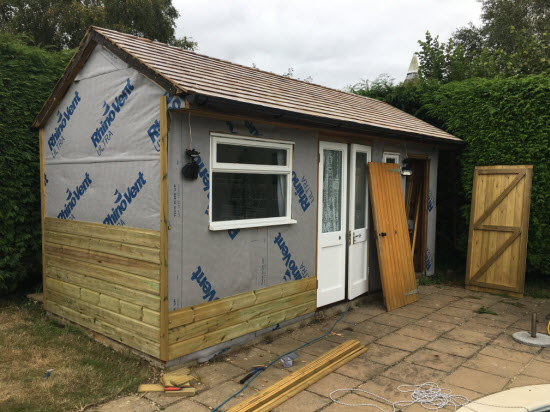
I think you will agree the finished project looks great! New siding and a new cedar shingle roof!
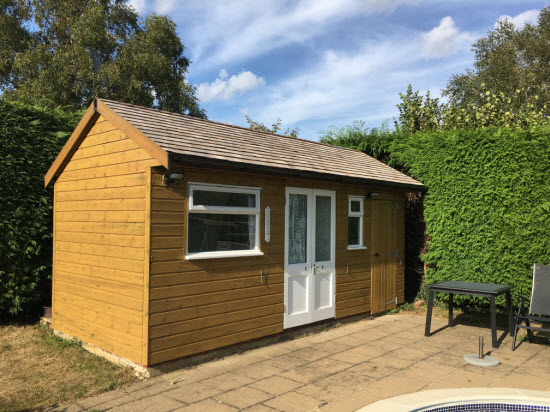 View of completed project
Summary
Before we completely finish lets recap on 5 key points for your successful shiplap shed siding installation:
Before you start any siding project make sure that you have a firm idea of the details for each of the junctions that will occur on your project. For a refurbishment project such as this, you will be replicating details that are already there. For a new build project, you need to plan these yourself and carefully study the plans that you are working from.
Save time and make a better quality, longer-lasting job by pre-painting each piece of siding before you install it. Also, remember to paint any cut end to protect areas where the un-treated wood might be exposed.
Make sure that the shed building wrap overlaps each other to shed water out of the building.
Remember to get the first piece of cladding really level and keep checking as you work up the building to avoid cumulative errors.
Give the finished project a final coat of stain for that bit extra protection against the sun, rain and wind.


Keep in touch with our monthly newsletter
Shed Building Monthly