How to double the floor area of your shed with a shed loft
Do you like magic tricks? Well, I'll let you into a simple trick of how to double the floor area of your shed.
It is of course to create a shed loft. The loft is essentially a platform supported of the side walls of the shed. To take full advantage of this space above your head there are a few factors that you need to take into account. Firstly in relation to planning the best use of this bonus space. Then actually building a strong and robust platform to support the 'stuff' that you are going to store.
What is the best layout for a shed loft?
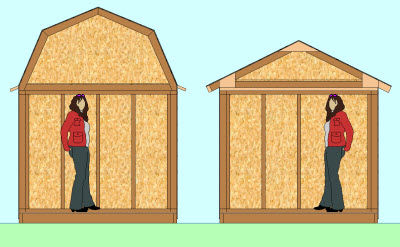 A Gambrel Roof creates much more roof storage volume than a Gable
The first point to consider is the shed roof shape.
The most space is available with a gambrel roof, due to the steep slope of the lower roof section.
Next is the gable roof there is less space available in the gable roofs triangular shape. So it is only possible to build a loft that it is possible to stand up in if you have a very large shed or a steep roof pitch.
Full or partial shed loft?
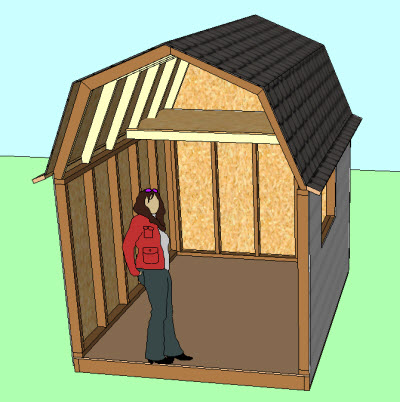 A partial shed loft makes it easier to access
than covering the full floor area
The floor area of the loft can extend over the full area of the roof. Or you may decide that it is best to build the platform for a short distance from the end wall.
Having a loft over the full floor area means that you create the most storage space.
However, it is easier to access stored items with a partial platform. You simply reach up for things when you need them, so the partial platform is good for items that you use often.
Access to the loft is a big item to consider for a platform over the full footprint.
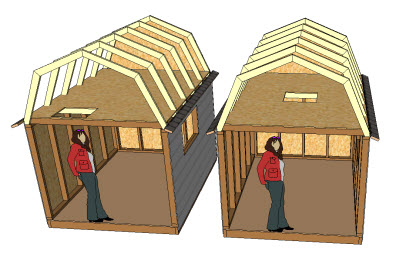 A central hatch is better for accessing items.
Whereas floor area utilisation is maximised with a hatch at one end.
If you are going to use the floor for storing 'stuff' then it is most likely best to have a central hatch. That way when you need to access something close to a far wall then you don't have to climb over other stored items. The distance to any item is then shortest.
If you intend to use the loft as a 'hangout' space then it is best to have the loft hatch at one end. This arrangement maximizes the usable floor area. The choice is yours!
For very long items it might be best to use a door in the front wall of the loft. One reader of this site was going to use this arrangement to enable him to store a Kayak in his loft space.
To help you decide the layout of the loft space, find out the maximum building height that you have available. so that it doesn't compromise the space below. A standard room has a ceiling height of 2.4m (8ft). But sheds used as on a temporary basis can cope with less than this.
Access to the loft space
The third factor is what method are you going to use for accessing the items that you have up in the loft. For partial shed lofts, use a small step ladder to give you the extra height to reach what you are looking for.
With a full floor loft, you might consider a stair, a fixed ladder or a drop down loft ladder. I wouldn't really recommend using a non-fixed ladder to access your loft. Having a removable ladder means that it will go 'missing' elsewhere around the house/garden just when you need it. Which will be an extra barrier to getting what you need when you want it.
Once you have decided the layout of the loft you will need to start working on the details of how to build the platform.
Building a shed loft
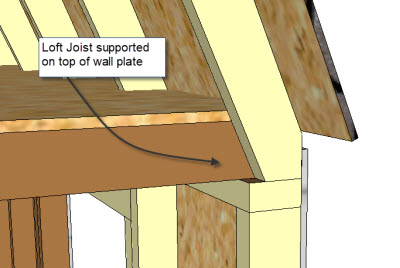
If you are building a shed from scratch the simplest way to support the platform is off the wall plate. If you are building a gable shed then make sure the bottom tie has enough strength for your requirements.
An alternative method of supporting the platform is to fix a horizontal member to the wall studs. The loft floor joists can be supported on this.
The type of loading that you design the loft for will depend on what you are going to use the loft for.
If you are using the space for light storage a value such as 50kg/m² is suitable. This is a typical attic storage loadings where headroom is low.
For comparison, the typical floor loading in a domestic house is 150kg/m² (and would be the value to use if you are going to store larger items in the space and use for regular access) and for a shed roof without regular access is 0.75kg/m².
The two factors that decide the size and spacing of the joists that you use are:
- The applied loading (dependent on the proposed use of the loft).
- The span (the longer the span the larger the joist).
There are online calculators that enable you to work out joist sizes. However, I prefer to look at printed tables. Using tables you can quickly see the impact of changing loading, spacing and spans to work out what you need.
All of the shed plans that I create show the size and spacing for loft floor joists if you need them.
The plywood for the floor deck is once again best sized using charts. The main variable is the spacing of the floor joists. Typically these will be either 400 or 600mm. However I would recommend using 18mm ply and this will be more than adequate for most situations.
To summarise the shed loft design process
Firstly consider the size and shape of your shed to determine if you are going to have a full or partial loft.
Then review how you are going to access the items you have stored up there. This includes the location of the access hatch and the type of ladder you use.
The easy part is deciding on the size and spacing of the floor joists and checking the deck material.
All very straightforward really and unlike I mentioned at the start of this article, no magic involved.


Keep in touch with our monthly newsletter
Shed Building Monthly