How To Install Shed Guttering To Collect Rainwater And Protect Your Shed From Decay
I frequently install shed guttering as part of my shed repair work. The work is often requested as the customer has seen with their own eyes the damage that lack of a 'roof drainage system' can do to the base of garden sheds and summer houses.
In this article I will show you: The parts of a shed roof guttering system, How to install a typical installation and then give you some tips that I have picked up along the way.
Before we get started on the 'how', lets just refresh quickly on the two main reasons why to install shed roof guttering on your new shed.
The two main reasons to install Shed Guttering
The first reason is to protect the sides of the shed and the base from water damage. Water dripping off the eaves of a building 'bounces'/splashes when it hits the ground. This repeated soaking of the bottom section of the building over an extended period of time causes decay. By collecting the roof water in the guttering this source of damp is removed at source so prolonging the life of the building.
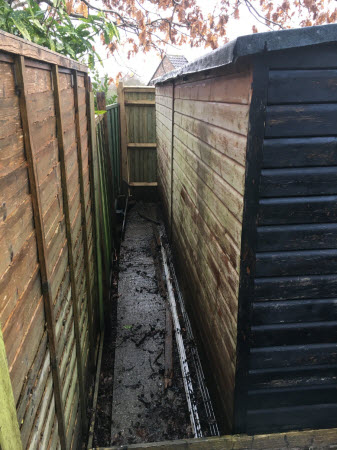 This shed had no guttering the water draining off the roof caused extensive water damage and decay to the wall and floor of the shed
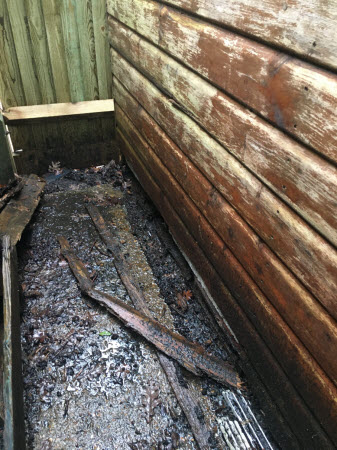 A closer view shows just how bad the damage had become
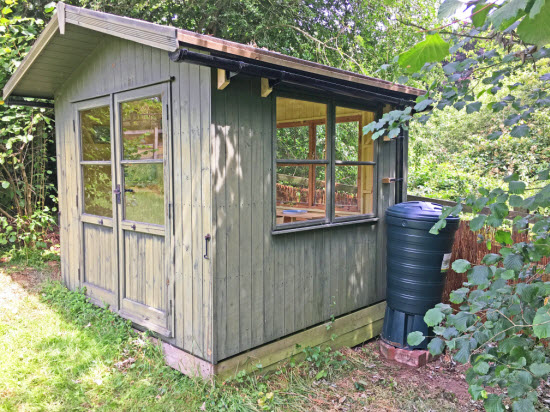
The second reason to install shed guttering is to collect the rainwater in a water butt for use in the garden. By storing the rainwater, you help to reduce the load on the public stormwater drains. It also means that you have a convenient source of water for your garden in dry periods.
 Nice guttering installation with water butt collecting water for the garden
Getting started on fixing your shed guttering
There are many materials that have been used for guttering systems. The cast iron gutter is a historic choice and more recently aluminum gutters and pressed steel gutter systems have been used. But the material most frequently used today is the plastic gutter.
There are a number of different plastic gutter systems available, but they all use a similar components that screw to the shed wall/fascia and clip together.
There are three things that you really need to know to get started on fixing plastic guttering to your shed:
A. What the main parts are and how they fit together
B. How to plan the guttering layout and order the right components for your gutter kit
C. How to fix the component in place on the eaves of the shed
A. What are the main components of a shed guttering system?
There are eight main components of PVC guttering; The guttering section, support brackets, the end blank, corner pieces, dropper section and connector piece.
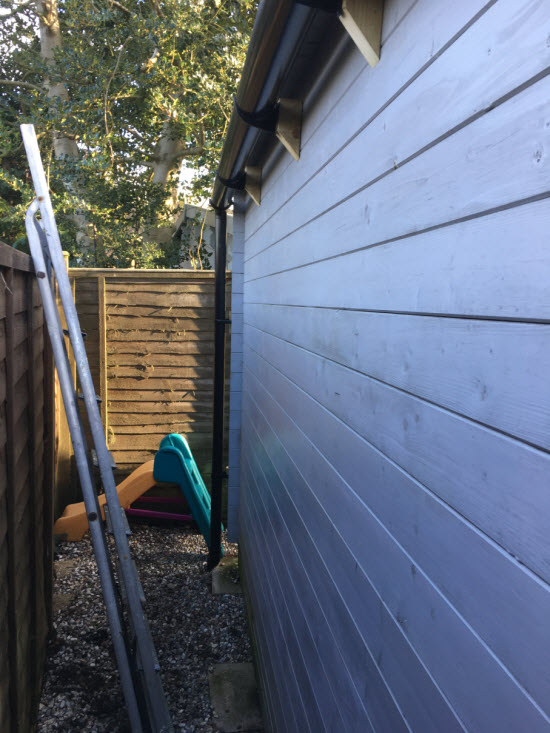
1. Gutter pipes
The main component is of course the half round PVC guttering pipe itself, normally about 4" (112mm) diameter. This comes in standard lengths (about 10' (3m)) and you will need to cut at least one length per side of your shed to give you the correct length for your building. Cutting it to length can be done with a handsaw but I find it a lot easier and more accurate to cut using a cordless circular saw.
Then there is the downpipe this is a smaller diameter PVC pipe, just under 3" (68mm).
There are mini-guttering systems available, which are aimed at smaller sheds and green house owners. I tend to stay away from these mini gutters. The leaves and moss that can block rain gutters remain the same size regardless of the building size. So by going for a smaller gutter size you may just be increasing the frequency that you need to check or unblock your shed gutters.
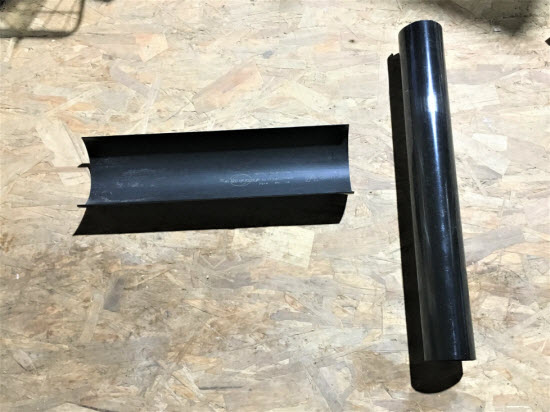 Typical section of PVC shed guttering and downpipe
2. Fascia brackets
The half round gutter section is supported by gutter brackets fixed to the fascia board at typically 2-3ft intervals (600-900mm) . The precise spacing of these gutter brackets should be checked though as different systems do vary.
I use a minimum of two of the half round downpipe clips to restrain the downpipe, dependent on the height of shed and whether a water butt is used or not.
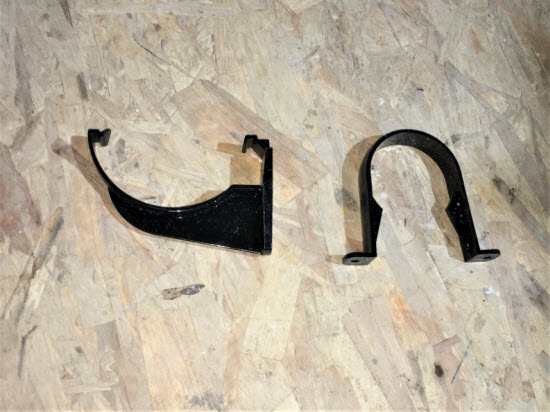 Gutter support bracket on the left and downpipe bracket on the right
3. The union bracket
The half round union bracket is used to form a connection where two pieces of gutter meet. It is often combined as a bracket piece to avoid the need for an extra bracket to support the ends of guttering immediately adjacent.
4. The gutter stop end
At the highest point of the guttering run you will need to place a stop end to cap off the pipe and stop the water flowing out of the end at times of very heavy rainfall.
 Half round union bracket that doubles as a support bracket on the left and guttering stop end on the right
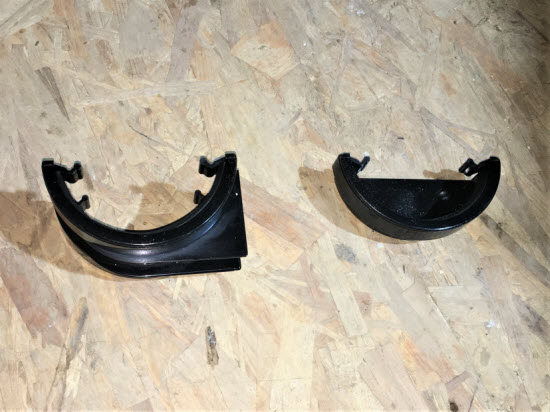
5. The corner piece
There are two types of corner piece, internal and an external corner. For most small rectangular buildings only external corners are required.
 External 90 degree corner piece
6. The gutter outlet
There are two types of gutter outlet; the gutter stop end outlet, used at the end of a run and the running outlet that allows water to flow in from both ends that is used in the middle of the run of gutter.
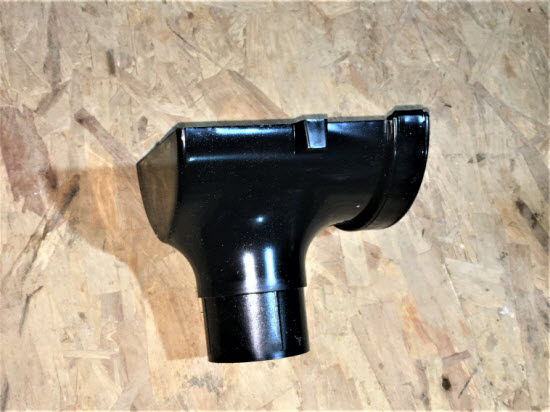 This gutter stop end outlet section is used at the end of a run. Water comes in from one side and the other is blanked off. The running outlet is used in the middle of a run where
water can flow in from each side
This gutter stop end outlet section is used at the end of a run. Water comes in from one side and the other is blanked off. The running outlet is used in the middle of a run where
water can flow in from each side
7. Downpipe shoe
The downpipe shoe is used at the bottom of a downpipe to deflect the flow of water in the desired direction.
A downpipe shoe isn't always required, if for example the water is being directed into a water butt.
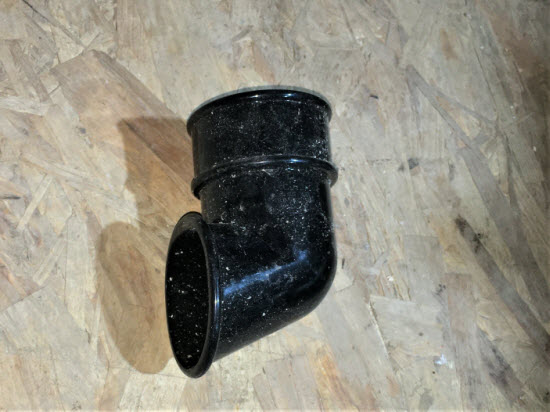 Shoe to deflect the water flow at the bottom of the downpipe
Now you know what the main components of a shed guttering system are, the next step is to calculate how many of each piece you will need.
B. How to plan your shed guttering layout and calculate your material requirements
There are two basic guttering arrangements that will cover most sheds;
The simplest is having guttering along one side.
This is particularly applicable to pent sheds, as in the picture below. Where due to the single roof slope water only flows off one edge of the roof. It can also be used for gable sheds and the same arrangement used for both roof slopes, so there are two discharge points.
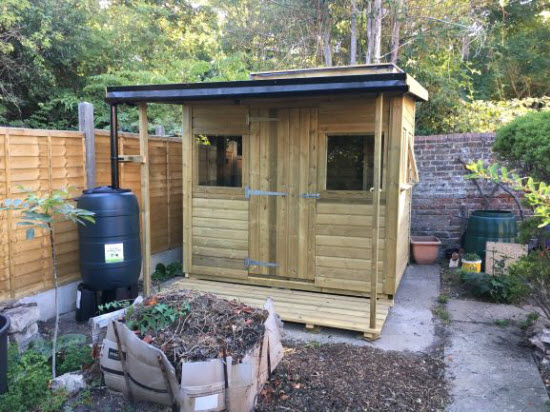 A fairly straight forward gutter installation. The roofwater on this pent shed flows to the front of the overhang and is collected by the gutter
it then flows along to the left hand side where it is collected in the rainwater barrel.
A fairly straight forward gutter installation. The roofwater on this pent shed flows to the front of the overhang and is collected by the gutter
it then flows along to the left hand side where it is collected in the rainwater barrel.
A slightly more complex arrangement is frequently used for an apex roof.
In this arrangement the shed guttering runs along both roof edges and are connected on the 'back' wall of the shed. In this arrangement there is only one collection point.
 A more complex system was used for this duopitch summerhouse. Water was collected from both sides. A pipe was used along the back of the summerhouse
to feed water from both roof slopes into the same barrel.
A more complex system was used for this duopitch summerhouse. Water was collected from both sides. A pipe was used along the back of the summerhouse
to feed water from both roof slopes into the same barrel.
The first thing is to decide which of the two options you prefer and if you are going to use a water barrel. Then work out your shed guttering kit of parts,
Then measure the length of half round guttering that you need and also the amount of down pipe. Based on this length work out the number of support brackets that you need, based on a spacing of about 2' (600mm). I normally add in a few extra support brackets than I need, just in case. Sometimes the brackets, which are relatively small items get lost or broken and it is really helpful to have a few spare.
Finally, order any connectors, end caps, corners, outlets and shoes that you need to complete the kit.
In addition to the plastic guttering parts, you will need screws to fix the brackets to the shed.
I always try to fix the brackets at a wall stud location. It is good for strength to be fixing into something solid and also it is not great to have screws protruding through any timber cladding. I use 30 or 35mm screws, they don't have to be particularly long as the loads aren't particularly heavy but they will be longer than a typical shed cladding board.
Oh yes, and use exterior grade screws. I like either stainless steel or the organic coated ones.
C. How to install shed guttering - remember "water flows down hill"
Once you have all of your parts you are ready to install the guttering on the shed.
You should aim for the guttering to 'flow down hill' as I mentioned at the beginning of this article. Manufacturers recommend that the minimum fall is 1 in 350. So for a standard 3m length of guttering the fall would be 10mm.
Work out the total fall that you will have on your system.
Fix the outlet first aiming to get the bottom of the gutter no more than 50mm below the bottom edge of the roof tiles. Then fix the union bracket for the first length of guttering to get the fall recommended above. Use a length of string between the two to enable you to mark the line and level of the intervening support brackets. With these brackets in place continue up to the end of the run at the highest level of the slope.
My tips for fixing brackets are to use a powered drill/driver with an extension bar for fixing the screws. Just using the normal bit on the end means that the end of the driver clashes with the bracket and it ends up being difficult. Using the extension bar enables you to hold the screw and bracket in one hand whilst driving the screw in using the driver with the other hand.
The plastic gutter system components 'click' into place very easily
Once you have the brackets and union pieces installed start fitting the first length of gutter. Start at the outlet and offer the back of the gutter into the bracket first and then push the rest of the gutter in so that it clicks into place.
Work your way along each length of gutter clicking it in to each bracket as you go.
I have sometimes tried re-fixing old guttering systems and found that as time goes on they get brittle and sometimes snap.
Also, trying to install guttering at cold temperatures can be difficult as the plastic becomes brittle and can snap.
But overall if you are using new material and the temperature is above 5 degrees C (41 degrees F) or so you should be OK.
 I installed the guttering on this log cabin about 4 years after building it. You can see that the water dripping from the roof and splashing on the ground
had encouraged the green staining on the bottom of the wall. By diverting the water into the gutter instead this problem should be prevented from spreading
I installed the guttering on this log cabin about 4 years after building it. You can see that the water dripping from the roof and splashing on the ground
had encouraged the green staining on the bottom of the wall. By diverting the water into the gutter instead this problem should be prevented from spreading
With all the shed guttering pieces installed you now need to check your work
Get a watering can and pour it in to the gutter at the high end to see that it does flow smoothly along the gutters to the outlet, that there are no pools of water left in the gutter and that you have achieved a water tight seal on the connections.
This test will also confirm something else that you knew all along.....water really does flow down hill.


Keep in touch with our monthly newsletter
Shed Building Monthly