How Onduline Roofing Can Save You Re-felting Your Shed Roof Every Five Years
Felt roofing is cheap. It is the cheapest way to cover your shed roof but as you may have found out it wears out quickly. After five or so years it starts to crack, tear and let in the water.
You soon realise that the cheapness of felt roofing is costing you time and money
If you need a fast, cheap way to keep the contents of your shed dry it could be worth considering Onduline roofing sheets.
What is Onduline?
Onduline is made from cellulose fibres that have been impregnated with bitumen. This mixture is then compressed into a board that is 3mm thick and given corrugations, so that it looks like those old corrugated iron roof sheets. The good thing is though that a 2m x0.95m wide Onduline panel only weighs in at just over 6kg, so lifting it up in to place is very easy.
Onduline roofing sheets were first developed about 60 years ago, so it is pretty well tried and tested. The manufacturers are so confident that they have a 15 year insurance backed waterproofing guarantee.
It sounds good but is it suitable for my shed?
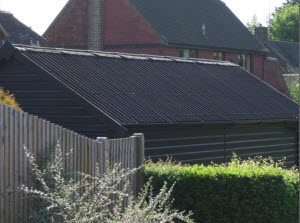 Onduline roofing on a straightforward gable roof
It could be. Onduline roofing comes in a couple of different profiles. The classic profile has 38mm corrugations and is probably more suited to larger buildings. The smaller 'mini profile' has 24 mm corrugations and is more suited to roofs of sheds, workshops, summerhouses and garages. I would have a look at the two side by side before you decide which is best for over-roofing your shed.
How do I install Onduline on my shed roof?
Before you start installation, you need to measure up your shed roof and decide how many sheets you need to cover the area that you have. When you are calculating the number of sheets to order, remember that the sheets need to lap by at least 170mm in the direction of the corrugations and one corrugation on the sides for roofs with a pitch of 15 degrees or over. These laps need to be increased to 300mm and 2 corrugations for roof pitches of 5-10 degrees.
The roofing sheets are fixed to the existing roof with nails that come supplied with the sheets. These nails are ring shank nails that have a superior resistance to 'pull out' than plain round nails. The nails also have a shaped head to shed water and ensure that nothing leaks into the nail hole.
The nails need to have a minimum penetration of 25 mm into the roofing substrate and so you will need to check that you can achieve this on the roof that you are considering. If your roof is not 25mm thick, which is quite likely for a typical garden shed, then you will need to screw some 25x38mm timber battens to the roof at a minimum of 450mm centres. The roofing sheets can then be fixed to these battens.
Where do I start fixing the sheets?
Start fixing the sheets from the eaves and work your way all along the edge of the building to complete the row before you move on to the next sheet. The next row should be started using half a sheet. This creates a 'brick-bond' effect in the way that the sheets are arranged on the roof. But more importantly it means that you will avoid having the thickness of four plies of materials where the corner of four sheets coincide.
Continue on to the next row alternating again by half a sheet until you reach the ridge.
What happens when I reach the ridge?
In your plan you will have worked out how many sheets you need to reach the ridge. The great thing about Onduline in comparison to metal sheeting is that it is so easy to cut. If you are cutting a sheet at right angles to the corrugations then you can use a hand saw, circular saw or a jig saw. If you are cutting parallell to the corrugations you can just score the sheet with a Stanley knife and then flex the sheet a couple of times to snap it along the score lines.
Installation of the Onduline roof sheets sounds easy enough, but what about the tricky bits?
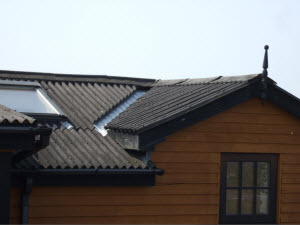 This picture shows that Onduline roofing
can cope with most
situations.
Here we have a ridge, verge, eaves,
valley and even a rooflight!
If by tricky bits you mean the ridge, eaves and verge then don't worry these have all been thought through.
There is a specially made ridge piece to cover the roof at the ridge. These roof pieces should be lapped by 12.5cm. When you are considering which end to start work out the direction of the prevailing wind and then 'tile' the ridge pieces so that they shed water in the same way as a tile roof would.
At the verges you have a couple of options, the refined and finished or the 'quick and dirty'. The refined option is to use a purpose made verge unit which is right angle shaped and will give the edge of the building a clean looking line. The 'quick and dirty' option is to fix a barge board level with the underside of the Onduline sheet and to fold the edge of the sheet over this board and then nail it into position.
At the eaves you will have gap between the sheets and the roof deck. If left open this will form a space for birds and insects to nest, which may cause future problems. I would recommend using the purpose made 'corrugation filler' to seal this gap. You could use the proprietary eaves ventilator strip which will keep out larger objects but if you want to keep out dust and finer particles the corrugation filler is the way to go.
OK OK...the Onduline Roofing sheets sound great but don't they cost a lot?
Onduline roofing typically retails at about £5.5/sqm so that is about twice as much as the traditional felt system. But when you factor in that you will be on your third re-roofing of traditional felt by the time that the guarantee on the Onduline runs out then it starts to look even better.
Related posts:
- Metal shed roofing is a similar system (but different material) to Onduline - find out if it might suit your needs
- More about all shed roofing systems


Keep in touch with our monthly newsletter
Shed Building Monthly