Hip Roof Shed
The hip roof shed is my favourite type of shed roof. This type of roof is more of a challenge to build than regular gable or pent shed roofs but with the benefit of my experience you can avoid the pitfalls and build a beautiful roof to be proud of.
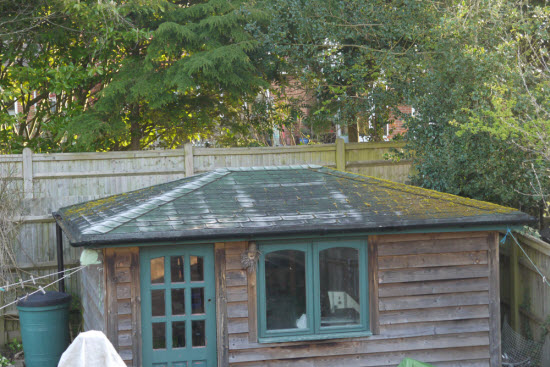
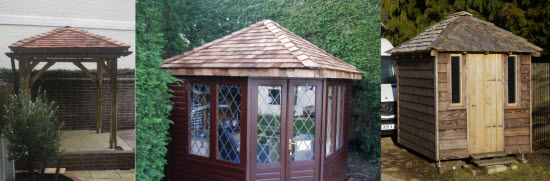 Some beautiful hip roof sheds
Why build a hip roof shed?
For me initially it was the challenge of getting all of the angles right and making all of the pieces fit together. But for many it is the aesthetics of a hip roof, they do actually reduce the apparent bulk of a roof and are also visually a much more attractive and interesting shape when used on small buildings.
Along with the visual benefits of an attractive hip roof shed come a few challenges
These 'challenges' are possibly the reason why hip roof sheds aren't more widely used. By reading on you will be find out what these challenges are and how you can overcome them.
The main challenges:
- More complex construction than simple pent or gable shed roofs
- Roof covering is more complex as there are additional seams to be made waterproof
- More edges to drain if you are installing guttering
The first and most challenging of these is the framing of the roof.
How to frame a hip roof shed?
The components of a hip roof shed are shown on the sketch below, the key elements being:
- Ridge
- Common rafter - These are rafters of a common length that span from the wall plate to the ridge
- Jack rafter - These rafters vary in length and span from the wall plate to the hip rafter
- Hip rafter - These rafters span diagonally from the corner to the ridge and support the jack rafters
- Wall plate - This is a timber on its side around the perimeter of the roof that supports the rafters.
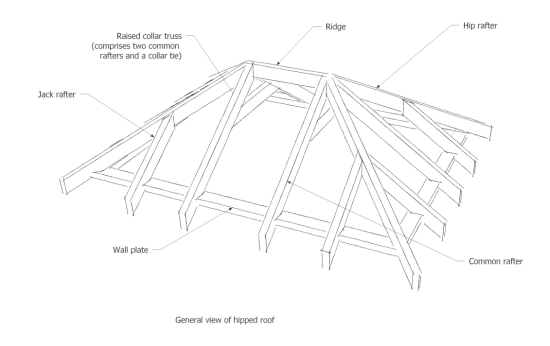 Hip roof shed components
Framing tips
In terms of setting out your roof make sure that the hip rafters are at 45 degrees to the wall plate. Make the slopes on all four sides the same.
The hip rafter is generally thinner and deeper than the jack rafters. So that the jack rafters get a full bearing at the top.
For larger hip roofs I recommend that you introduce a collar tie about 1/3rd of the way up the rafter to prevent the end rafters spreading. House roofs use the ceiling binders of the floor below to stop this rafter spread.
Use a mitresaw for quick and accurate cutting of angles on your timber. A mitre saw is especially useful for the Jack rafter and hip rafters where 'compound' cuts are required. A compound cut is when the end of a rafter has an angle that needs to accommodate slopes in two directions.
Dimensionally, smaller hip shed roofs don't need to have the rafters adjoining the end of the ridge made into a raised collar trusses. But it is advisable to firmly connect the corners of the wall plate and even to use a diagonal brace to stop the rafters spreading.
I use Google Sketchup to create a 3D model of the roof before I start construction. This means that I know how the roof goes together and I can work out the dimensions of all of the components. As we are working with timber, which isn't always straight and uniform! Those dimensions don't always work out perfectly but for small roofs such as sheds they generally work pretty well.
With those bits of tips and advice on framing the roof now lets move on to the roof covering.
What is the best roofing material for a hipped roof shed?
In contrast to pent and gable sheds my normal recommendation to use EPDM as the go to durable shed roof covering doesn't apply. This is because the hip roof shed has additional seams along the hips. Use a sheet material such as EPDM and it will look terrible.
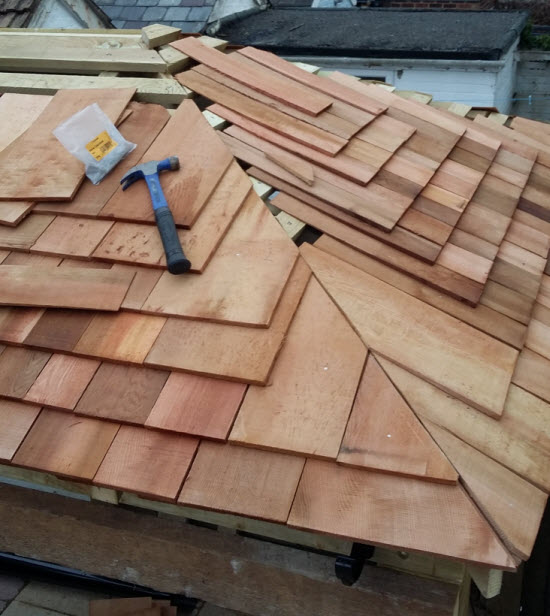
Using shingles, whether they are felt, cedar or riven sweet chestnut, is the way to go. Shingles are a lot more time consuming to install than a sheet material but the appearance along with the thickness of material and durability make it well worth your while.
The most significant issue with roofing a hipped roof shed is how to weatherproof the ridge and hip junctions where there is a change in slope of the roof.
Creating waterproof hip roof shed junctions
There are three alternatives to use on the hip junctions that I have tried:
- PVC soaker tiles on the hip joint with cover tiles over
- Tiles up to the joint with a 150mm wide strip of lead or lead replacement, with cedar tiles over
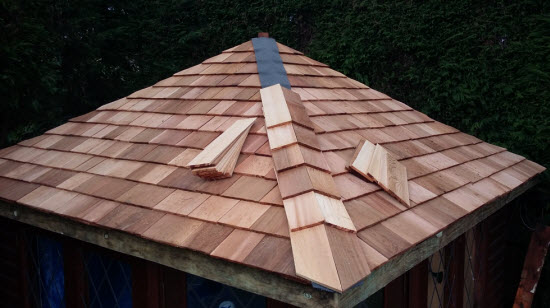
- Just cedar tiles with ridge tiles
Building the roof piece by piece at roof level. The first hip roof shed that I built over 10 years ago was built piece by piece with the two support trusses going in first and then the rafters being cut and placed individually at roof level. This approach created a strong roof but took quite a while to build and was very hard on the legs with all that ladder climbing to check, cut, re-measure etc. So a change of approach was required.
Trial assembly of roof at ground level. For the next roof I learnt from my first experience and built the roof at ground level first so that I didn't have to keep climbing a ladder to check dimensions and fit the rafters individually. Of course, I needed to take the roof apart once it was complete but reassembling the roof as a 'pre-made' kit once I had built the walls was much easier. I also left some of the components, such as the trusses, as 'assemblies'. This saved time on dismantling and reassembly and also gave rise to the next innovation for my next hip roof shed project.
- Trial assembly of roof at ground level and designing large elements. The next project was a gazebo, which is just the same as an open sided shed. Once again, I assembled the roof at ground level first. But this time took it a step further by installing the roof battens on the ends of the roof prior to disassembly. This saved time on both disassembly and reassembly. It also made transporting the roof to site much easier.
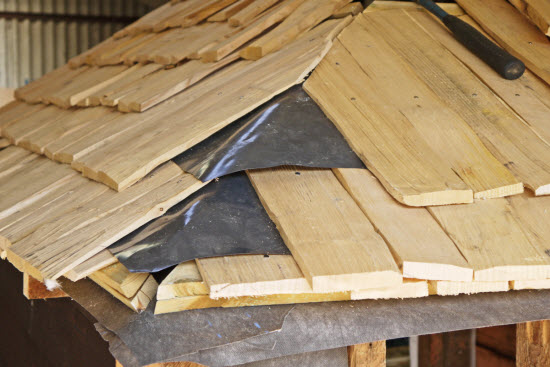 Hip roof joint waterproofed with 'soaker'shingles
 Hip roof joint waterproofed with strip of lead replacement
 No additional waterproofing for this cedar shingle roof to a gazebo
I have used each of these approaches and they all work. Your choice will depend on the degree of exposure to the elements and your need for the structure to be completely waterproof. Method 1 is the most weather resistant and Method 3 the least. Though having said that the top of a ridge is generally where there is least water.
Drainage of hipped roof sheds
The last additional item for hipped shed roofs is that the roof water drains in four different directions. This means that if you are going to install guttering to reduce water damage at the base of your shed then you will need to install a few extra lengths of plastic pipe. Not a big deal but just something that I thought that I should point out.
You will need two runs of pipe starting at one corner and then running in opposite directions to meet at the diagonally opposite corner. Guttering doesn't require much of a gradient. Most manufacturers recommend a slope of 1:600. I generally try to achieve something a bit steeper than this say 1 in 200 or 5mm per metre. More on installing shed guttering here.
We have now covered the reasons why you might want to build a hip roof shed. We have identified potential problems and how to overcome them. We also looked at the best materials for making a good looking weatherproof covering.
That must mean that the design stage is complete and we are ready to start construction.
Construction sequence for hipped roof sheds
My approach to this has developed over the years. I have used three different approaches improving on each method with the next build.
 Trial assembly of roof at ground level prior to installation
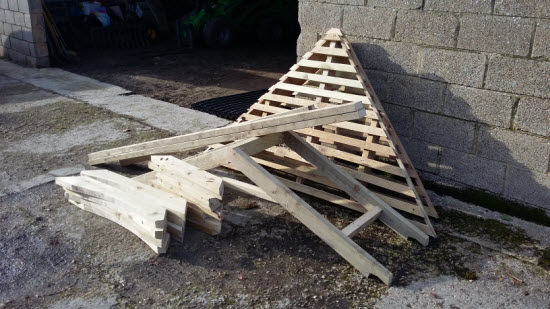 Hip roof elements prior to transporting to site and assembly
So what is in store for my next hip roof shed build?
Well I intend to take the pre-assembly a step further, as installing the cedar shingles at roof level is very time consuming with all of the shingle cutting required at the hip junctions. So, my next project will endeavour to make the roof into four individual roof sections, each with battens installed and shingles pre-attached. The roof can then be lifted into position in four pieces and connected together. The only detailed work required at roof level then is the installation of the hip and roof tiles. Quite a big saving and development from the original project I undertook where all parts were cut individually and lifted up to roof level for installation.
 My original hip roof shed built over 10 years ago with felt roof covering. You can see the roof members highlighted by the frost.
In conclusion
Hip roofs are more complex than simpler roof such as pent and gable roof styles. However, this additional complexity reduces their bulk and improves their appearance. There are also ways to make the construction of these roofs easier by constructing the roof at ground level and then lifting pre-assembled components into position. Also in my view hip roof sheds are some of the most attractive in terms of appearance.


Keep in touch with our monthly newsletter
Shed Building Monthly