Cedar Shed Repair
A judicious cedar shed repair can bring a much-loved outbuilding back to life. Cedar sheds are beautiful, but like any piece of property, they don't last indefinitely. A bit of care and maintenance along the way helps to prolong their life. Occasionally you will notice damage that is a bit more extensive and wonder whether your garden structure has come to the end of the road.
Be careful at this point, old timber can often look terrible and beyond redemption. But with a bit of judicious attention rotten wood can be cut out and replaced and the source of degradation removed.
The acid test is: Does it cost more to replace the structure than to have a cedar shed repair and how long will the repair last?
The only way to really find out about this is to ask a specialist how much the repair would cost. If you live in Kent or East Sussex this is the sort of thing I do, so please don't hesistate to get in touch.
Why is it worth repairing cedar buildings?
The main reason is their high initial cost. The price of a quality cedar shed or greenhouse can run into the thousands of pounds. So having some structural maintenance undertaken is often far less than the cost of a new shed.
The other reason is the beauty and longevity of cedar wood itself.
Cedar wood is durable because the wood contains natural oils and acids known as polyphenols. These in-built chemicals give the timber a natural resistance to decay and insect damage.
Cedar isn't completely immune to decay. Over time the sun and rain weather the outside of the timber to a beautiful grey patina. However if there are places on a structure where the timber stays damp for long periods rot can set in. This is part of the importance of preventative maintenance.
After experience with a number of cedar buildings I find that decay often occurs at localised places influenced by the design and situation of the shed.
I have a couple of examples to show you which demonstrate how localised damage that is quite severe can be repaired and thus the shed can sail on happily for many years into the future.
The first example is decay that started at the base of the shed
Cedar shed repair - decay of floor, door and door frame
In this case the damage to shed comprised decay of timber bearer, the cedar door frame and the frame of the door itself. The cause of the decay was partly due to a lack of guttering around the eaves and also due to a fault in the base of the shed. A very close inspection showed that there was a low point on the concrete shed base and the shed was actually standing in a puddle for long periods of time. This promoted decay in the damp timber.
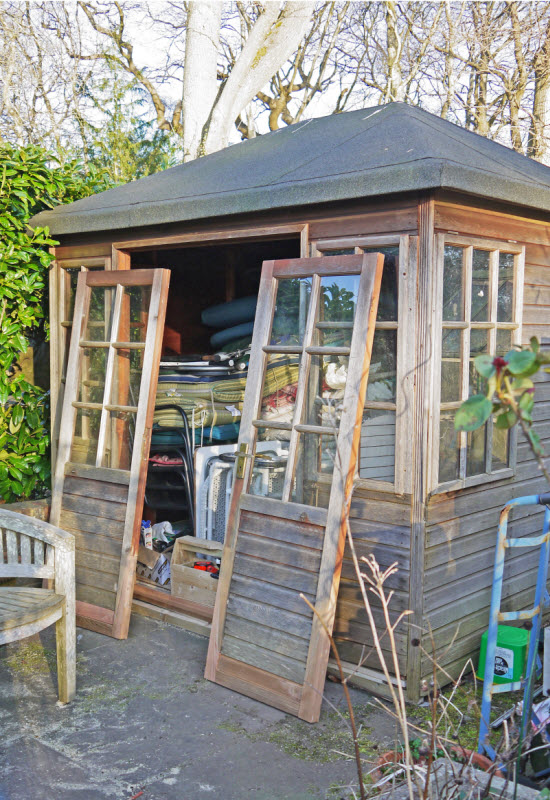
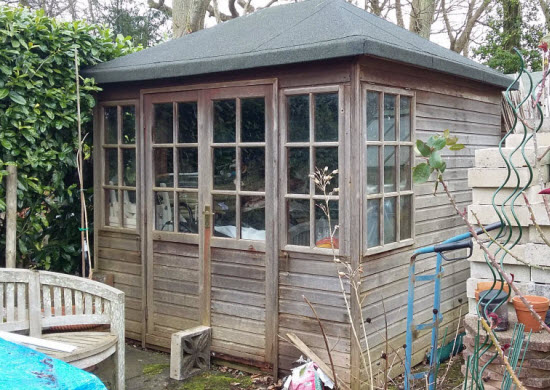 General view of cedar shed requiring repair
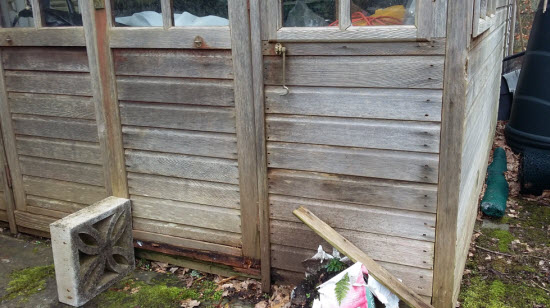 Close up of doors showing area of decay that extended into the floor boards, door, door frame and floor bearers
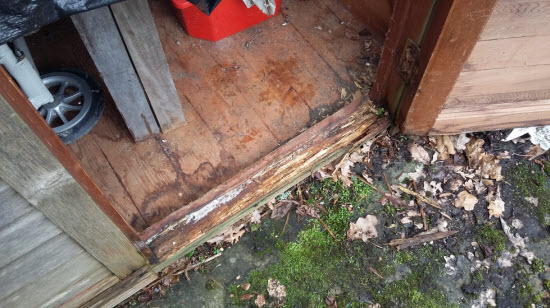 The dooor threshold was very soft
The solution was to cut out the decayed wood. The front of the shed was re-built and plastic bearers were used underneath the corner of the shed. The plastic bearers acted as a damp proof course to stop moisture from the base entering in the shed, which time had shown was only a problem in this corner.
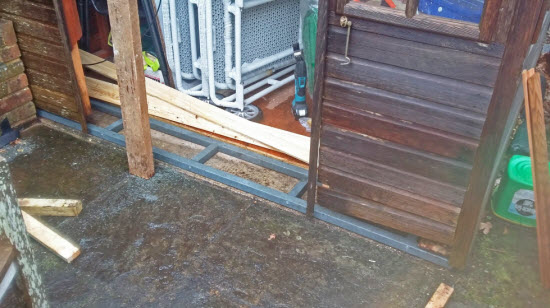 Plastic bearers used to prevent ground moisture locally entering the shed
One of the good things about cedar shed repair is that square or rectangular sections of timber can often be machined to match the sections of cedar used on a particular shed. Which brings me on to the topic of what materials should you use for the repairs to a cedar shed?
What grade of wood to use for cedar shed repair?
Most companies offer a guarantee on their products that last for 10 years or so. The durability of cedar is such that a reasonably designed building should last for at least 15 years. So the manufacturers are quite safe from any claims!
A manufacturer in some distant town will have large callout fees or not be in a position to offer ongoing repair outside of a guarantee period. They may even want to sell you a whole new shed!
When it comes to structural repairs/maintenance to a cedar building that has already given many years of service a local specialist is ideally placed to undertake the repair for you.
For repairs to the structural frame of a cedar shed or greenhouse I believe it is important to use only the higher grades such as grade 2 clear or better. This timber is free of knots and has straight grain so can be spliced in to the existing timber using glue and/or mechanical fixings.
When it comes to repair of cedar sheds you are often only replacing a relatively small amount of the timber, the cost of labour in contrast to the material is much more. So really it doesn't make sense to cut corners on the cost/quality of the repair material. Just use the best that you can.
The same principle applies to fixings used for cedar shed repair
When it comes to the fixings such as nails, screws and bolts care needs to be taken. The same oils and acids that give cedar its resistance to decay are actually corrosive to ferrous metals. So repairs to cedar sheds should utilise fixings that are resistant to corrosion. These can be made of stainless steel, copper or bronze.
Does a cedar shed repair involve removing all of a timber section if only part is decayed?
This depends on the size, location and type of damage. For this door and frame only the bottom threshold and part of the door frame were replaced. The same applied to the door itself, the bottom of the door was replaced and a structural repair made.
 Use of glued scarf joint with oak dowels to repair door frame
For structures such as cedar framed greenhouses smaller spars are replaced completely. Longer and more substantial members will have the sections of timber that are suffering from decay cut out and a new piece of timber spliced in. The type of connection that is used for a cedar shed repair must be appropriate to the location and use of the timber.
Will the new timber match the existing?
Initially it won't match the existing. Though over time it will start to blend in as the new timber weathers to match the existing wood.
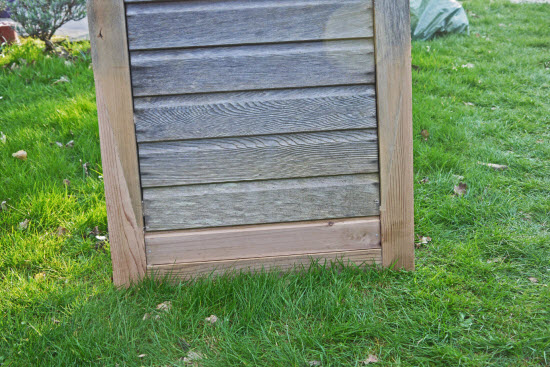
 Shed doors ready to be installed after re-building
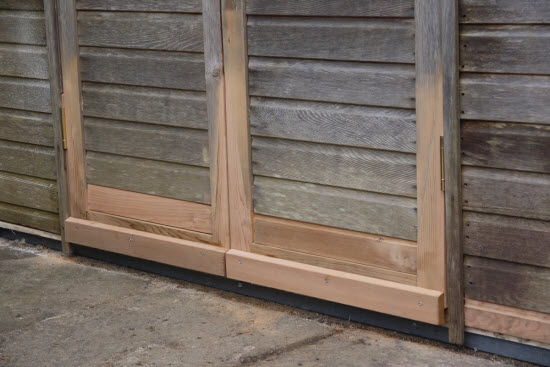 Completed repair. New timber is sanded in to provide a 'soft' boundary between new and existing timber colour
To help the new and old timber blend in I sand the surface beyond the joint and fade out the sanding so that joint becomes less visible.
No paint or oil is required as the cedar is naturally durable and the new timber will gradually weather in to the same colour as the existing.
Cedar shed repair - replacing a cedar shingle roof
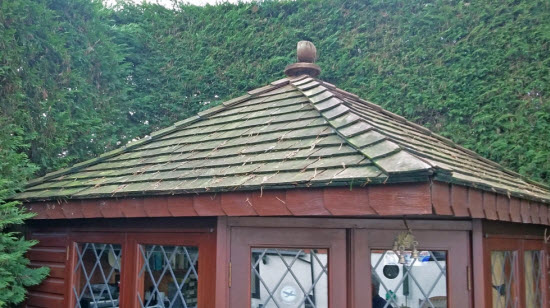
Despite the superb appearance and longevity of cedar roofs they do eventually come to the end of their service life.
In this example the area of most extensive damage was due to a build-up of leaves from an overhanging tree at the rear of the shed. Though even the shingles on the front of the shed were suffering from a build up of algae and damp.
 View of 20 year old cedar roof from the front
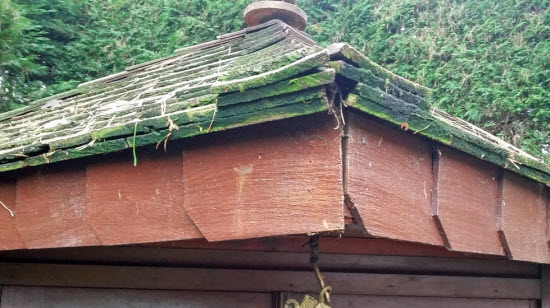 Close up of front hip of shed. The timber was damp with extensive algae growth
 Inspection of the joint in the hip showed the flashing had perished and the nails barely held the shingles in place
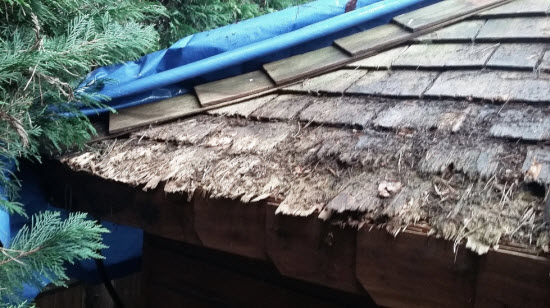 The shingles at the rear of the shed had extensive decay due to the build up of pine needles
My advice to use only the best grade of wood for cedar shed repair differs when it comes to replacing roof shingles. There are three commonly available grades of cedar shingle. No.1 Blue, No.2 Red and No.3 Black. And there are quite significant price differences between the different grades.
What are the grading points for cedar shingles?
Straight grain - provides the most direct way for water to drain off the shingle. The drier the shingle the longer it lasts
Knot free - Knots are defects that allow the retention and/or the absorbtion of water and so the less knots the better
Heartwood - The wood at the centre of the tree is the most resistant to decay. Shingles are generally sawn 'through and through' so the further the shingle is from the centre of the tree the lower its quality. You can see this in the straightness of the grain too.
All of the above points are used by timber suppliers to accurately grade the wood that they supply.
This link to the Cedar Shake and Shingle Bureau gives the technical specification for each grade of shingle in a lot more detail.
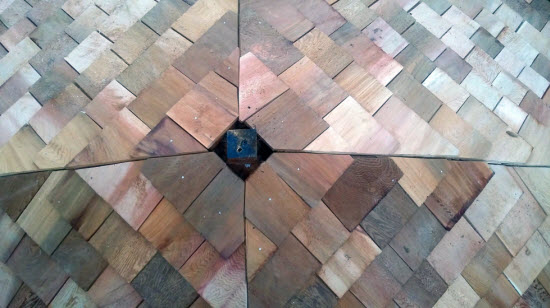 View on top of the new cedar shingles showing the lines of the hip joints, variation in colour of the shingles and post to support the roof finial
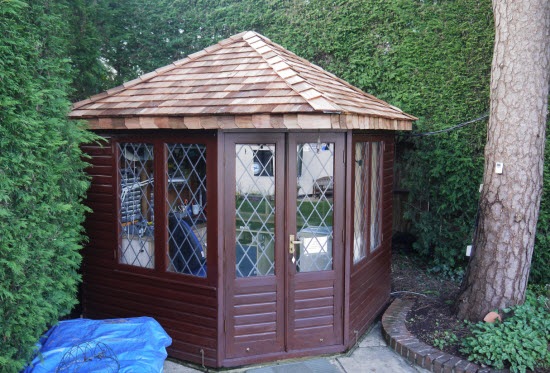 The completed roof, just waiting for installation of the roof finial
Here is my take on the different grades of cedar shingle as applied to a shed roof
No.1 Blue: The best and most expensive grade. Straight grain, knot free and 100% heartwood. Obviously the very best, great for houses and permanent dwellings but for sheds the extra savings could be spent elsewhere.
No.2 Red: The middle grade. The grain is sometimes a bit wavy. Knots are restricted to the top third (this is important as they will be covered by other shingles). From the grain pattern you can see that some of the shingles are made from wood that is at the edge of the heartwood/sapwood boundary.
No.3 Black: The difference between red and black shingle is quite significant. The Black shingles are a lot more irregular and fragmented. I don't use these but suspect they are mainly used for shims and packing pieces in areas not subject to view or weather. They are much cheaper than even the red shingles, but definitely not the thing for a durable weatherproof roof!
Now we have talked about the viability of cedar shed repair and recovering the roof let's look a bit more closely at what you can expect from repairs to your cedar shed roof.
Can you just repair part of your cedar roof?
What you will often find is that one slope of the roof is in worse condition than another and the question arises do I have to replace all of the cedar shingles?
Cedar shingled roofs are different from clay tiled roofs in that every single tile is nailed in position. Clay tiles are heavy and only a proportion of them are fixed by nails. This means that if a clay tile becomes cracked then it can be replaced by only removing a small number of tiles around it. However as cedar tiles are so light in weight each tile is nailed in position. Often by more than one nail, as nails from layers above often fix through the tiles below. So when it comes time to repair a cedar roof it is necessary whole sections of roof.
Often clients will ask if I would recommend only replacing the section of roof that is of immediate concern. What I have found is that although the 'good' area of roof is much better than the area that caused the initial concern that enough defects will be found in it to justify replacement. On the roof we discussed earlier for example. The rear of the shed was in a terrible condition which caused the initial callout. However as work progressed the battens at the front of the roof were found to be rotten and required replacement. So the decision to replace the whole roof was justified.
Summary
In summary repairing the structure and cladding of cedar sheds and greenhouses is often viable (contact me for a quotation).
Whilst undertaking a cedar shed repair it makes sense to consider why the repair is needed in the first place and if possible introduce some measures to reduce damage to that area of the structure in the future.
Repairs to cedar can be fairly subtle but joint lines and the appearance of new wood will still be visible. These will blend in over time and become part of the 'patina' of the building.
If you have a cedar shed or greenhouse that needs some TLC, drop me an email and some photos and I will see what I can do to bring your cedar structure back to tip top condition.


Keep in touch with our monthly newsletter
Shed Building Monthly