Breathe New Life into Your Malvern Summerhouse with a Roof Upgrade
Over the years, your Malvern summerhouse, nestled in your garden, has offered a peaceful respite. Perhaps functioning as your secluded craft workshop or an inspiring artist's studio. But recently, you've noticed a leak that threatens to dampen your haven. Fear not! Try not to see this as a calamity, but an opportunity to breathe new life into your summer abode with a roof upgrade.
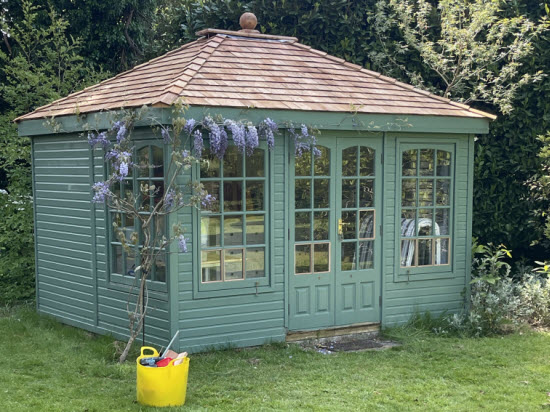
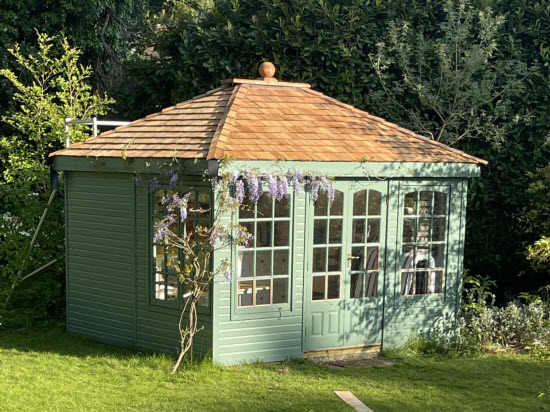 Malvern summerhouse with cedar roof and wisteria in Sevenoaks, Kent
Although the manufacturer might not provide a roof repair service, there's absolutely no reason to despair or think about replacing the whole building. This article aims to guide you through a repair scenario that will provide a new lease of life to your Malvern Summerhouse. Restoring its roof to its original beauty or potentially transforming its aesthetic, making it even more inviting.
I'll start of by talking you through different materials for repair, then give you an idea of a typical repair procedure before showing you a few examples of summerhouses that have had their roofs replaced so that they once again are fully protected against the elements.
So, fasten your seat belt for a step-by-step guide to fix that leak, backed by inspiring case studies that throw light on how Malvern summerhouses across the southeast UK have been wonderfully reroofed. Remember, aesthetic and durability can coincide beautifully in a well-planned summerhouse roof restoration.
Let's dive right into our first Malvern summerhouse roof replacement option,
Cedar Shingles
These traditional beauties evoke an old-world charm with their unique, rustic aesthetic that blends naturally with the rest of your garden. Cedar Shingles are not only pleasing to the eye, but they're naturally resistant to insects and UV radiation, making them a popular choice for many Malvern summerhouse owners.
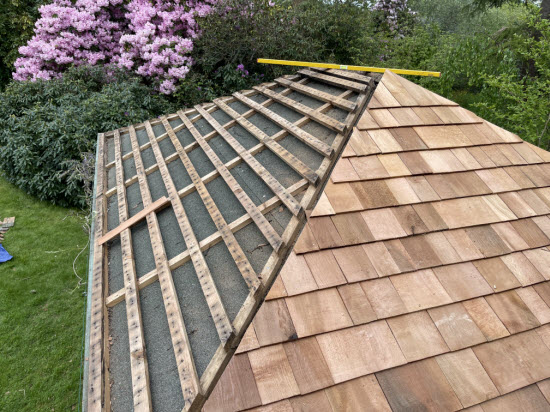 Close up of cedar shingle replacement
In terms of durability I find that I get called in for replacement at any time from 12 years onwards, depending very much on the building's location and surroundings. If the building is not overhung by trees then this could be longer as there won't be a build up of leaf debris and the shingles stay dry for longer, so delaying the onset of any decay.
There is always the thought that some maintenance of the shingles could have prolonged the life of the roof. A little occasional brushing at the end of autumn to remove fallen leaves and curb moss growth can go a long way. I have also seen it recommended that the application of an oil based clear coat, semi-transparent or semi-solid stain would help. This would only be done immediately after installation and may help to reduce uv damage and delay the natural greying of the shingles. Also, installation of a 100mm zinc strip at the ridge will help to reduce moss and algal growth. This works as when the zinc is exposed to rain, zinc carbonate, which is anti-fungal, washes down the roof inhibiting the growth of moss, algae and fungi.
Next in line is Eco-Slate Roofing
Eco-Slate is a relatively new product made from recycled plastics. It offers a great blend of traditional aesthetics with the recycling/eco-friendly twist. This synthetic roofing material mimics the look of natural slate, as it is moulded with a textured surface and riven edges. The most frequently used colour is traditional grey but they are also available with a green or red hue.
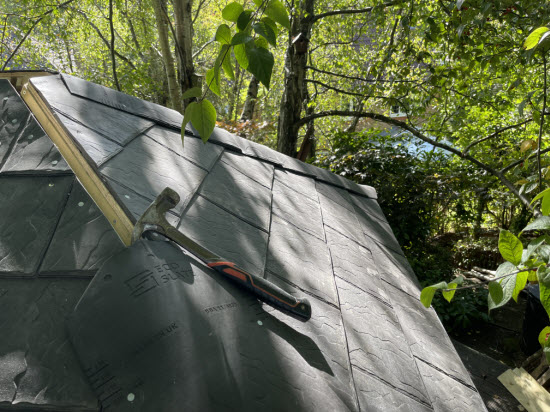
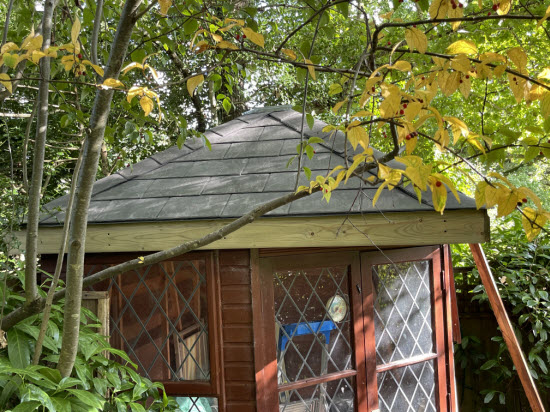 Malvern summerhouse with Ecoslate roof in Crowborough, East Sussex
The tiles are relatively light weight and easy to install, using a couple of galvanised clout nails, but their big advantage is their flexibility. They can be bent to create weatherproof hips and ridges which make a very attractive finish to any summerhouse.
Eco-Slates are marketed for their longevity with the manufacturer offering a 50-year guarantee on the materials. I understand that this has been arrived at through accelerated ageing tests. In my view they just look and feel as though they could handle all sorts of weather conditions with ease.
The material cost of Eco-Slate is significantly less than cedar, which as good news. The only downside is that as all the tiles are a regular width they produce a certain regularity to the roof in contrast to the variable widths and natural charm of Cedar Shingles.
Finally, let's talk about Pressure-Treated Timber Slats
These slats offer a simpler, minimalist approach to your summerhouse roof. They have been pressure treated to resist rot and insects, making them an excellent, low-maintenance option. The slats themselves do not rely on being completely water proof, but in a similar way to other Malvern summerhouse roofs they also have the back-up layer of felt beneath the main weathering surface.
 Malvern summerhouse, Near Heathfield, East Sussex, with timber slat roof
Timber slats give a modern, trendy look to your summerhouse, making it stand out.
On the downside, timber slats might not offer the same longevity compared to the sturdier Cedar Shingles and Eco-Slate.
Now you have a bit of material knowledge of a few of the summerhouse roofing options let's see how a typical Malvern summerhouse roof repair project works.
How the Malvern summerhouse repair process works
Step 1: Discovering a Leaking summerhouse Roof
Your journey starts with the realization that the roof of your beloved Malvern Summerhouse has seen better days. You may notice the roof is leaking when you spot an unexpected puddle of water on the floor one day. Or, you might have some concern about the condition of the tiles on your roof. These signs can be worrying, as leaks and dislodged tiles can quickly affect the overall health of your summerhouse if left unattended.
Step 2: Reach Out for a Professional Assessment
From the moment you discover the leak you mind will start to think of potential options. Is this something that you have the skills to repair yourself or do you need to call someone to help?
That's where I come in.
By contacting me you can gain access to someone who understands the intricacies of Malvern Summerhouse roofs and get a deep understanding of what might be causing the issue.
Step 3: Comprehensive Roof Evaluation
After contacting me, generally via email, I will normally ask for a description of the problems and pictures of the building to get a preliminary idea of the project. Assuming you are close enough to my base in Tunbridge Wells, I will then arrange a site visit, at a mutually convenient time to undertake an inspection to gauge the exact nature of the problem. The assessment will aim to identify the cause behind the leaking roof and any other issues you've noticed.
At this point it's important to get to the root of the problem, rather than just addressing the immediate symptoms. By doing this we can work out an effective solution that will work best for you.
Step 4: Discussion of Potential Solutions
Following the assessment, I generally have a chat to discuss potential solutions based on what I have found, your preferences and budget. This is a transparent and collaborative phase to ensure your Malvern Summerhouse's new roof complements your particular aesthetic and functionality needs.
Step 5: Providing a Detailed Quotation
Once we've settled on the best course of action for your roof, the next step is that I go away and prepare a detailed quotation for the work. This quotation will include a description of the of the work needed and a fixed cost to give you a clear idea of what is required. Sometimes there are areas of uncertainty and I will highlight these so that you have a clear idea in advance of what the difficulties may be.
The end result for both of us is to reclaim your summerhouse's health and beauty.
Step 6: Commencement of Work
Assuming that you are happy with the quotation we can then arrange a start date. This will be at some point in the future depending on time to procure materials, any pre-fabrication work that is required and my current workload. I am generally busy in the summer months and quieter in the winter. So an accurate lead in time isn't possible to quote. But generally, once I give you a week that I will be starting that is it. Nearer the time I use the met office to look at the weather and work out the best days to be on site to avoid rain, frost or even excessive heat.
Whatever the problems that arise through this repair journey, my aim is to bring back the joy of your quiet summer retreat, one shingle at a time.
Now you have a good idea of the material options and the work process for your summerhouse roof repair lets have a look at a few examples.
Cedar Roof Shingles
This project in Sevenoaks, Kent, was a straightforward direct replacement of the original cedar shingles. There had been no actual leak into the interior of the building. However, the owner had become increasingly concerned that the board and balls on the roof had become decayed and that the hip tiles were being coming off.
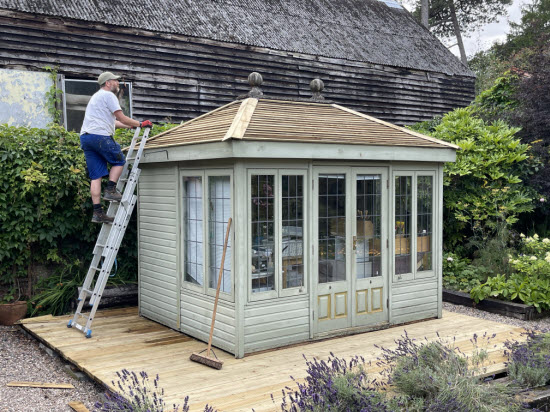
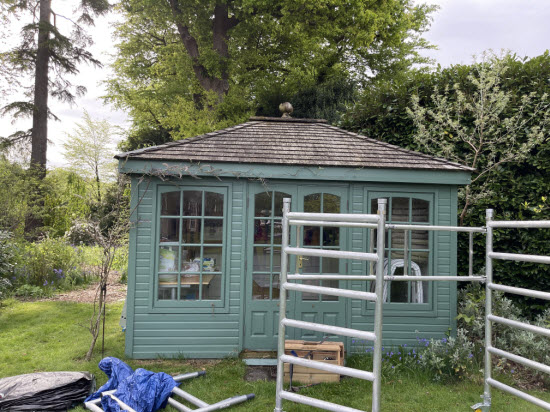 This was the summmerhouse when we started work
As I removed the shingles it could be seen in the affected areas that there were areas of decay and 'hotspots' where there were lots of woodlice and slugs! These areas are often where tiles are pulled off by birds looking for a quick meal.
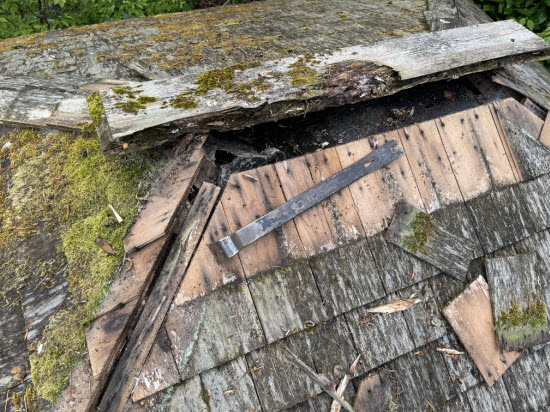 The decayed ridge board and moss growth
The repair work on this project involved removing all of the shingles and then replacing them with new Grade 1 sshingles and hip tiles.
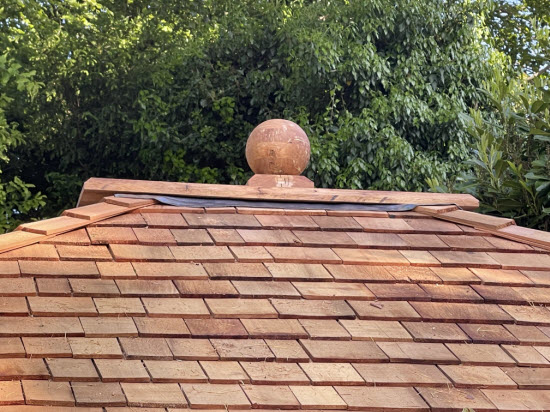 I sourced a new oak board and made a new laminated oak ball for the roof.
 The customer and I were both very pleased with the result
Ecoslates
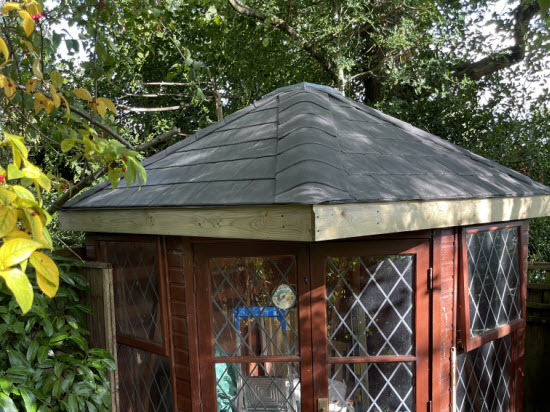
This summerhouse in Crowborough, East Sussex,originally had a cedar slatted roof. It was located in a wooded area with many overhanging trees. Over time there had been a build up leaves on the roof and damp in the roof that caused the cedar slats to decay. Despite this the roof itself had not leaked thanks to the secondary layer of felt beneath.
 Detail of Ecoslate roof
Discussions with the owner concluded that opting for a super durable option such as Eco-slates would help to avoid recurrence of the decay that the first roof had endured.
The eco-slates were installed on to panels in my workshop, after detailed measurements on site. I brought the panels to site and fitted them to the building. Then fitting the hip tiles to the sloping hips. At the point where the four hips met I sealed the gap with a lead cap.
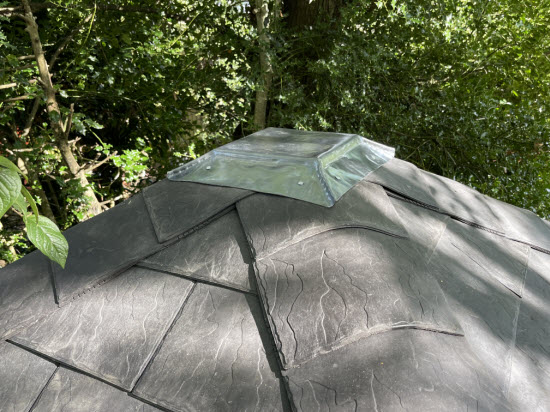 Lead roof cap to Malvern summerhouse
 The customer was super happy with the new roof which was installed in the autumn, in time to resist the cold wet weather of winter.
Treated timber slats
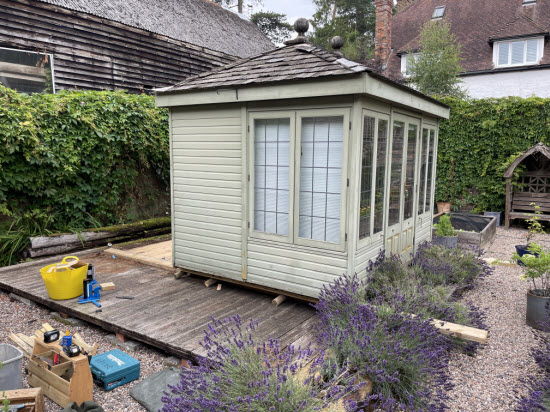
This summerhouse was used as a jeweller's studio/workshop near Heathfield in East Sussex. The existing roof had started to become a haven for insects, the local birds had discovered this and were pulling off the tiles in their search for a meal.
The preferred option for the roof was pressure treated slats. This was combined with an additional layer of roofing membrane to keep out any wind driven rain.
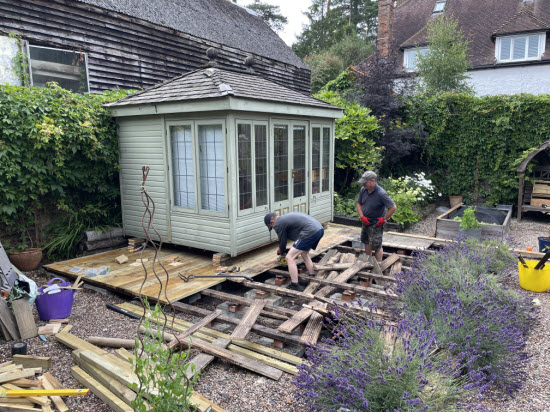
Another problem with this building was that it was built on a deck that had started to decay around the perimeter of the summerhouse, due to the roof runoff. So, the deck that the summerhouse was built on needed to be replaced as well as the roof.
 To replace the deck the whole cabin was moved forward on rollers to enable reconstruction of the back section of the deck.
 The summerhouse was then moved back on to the new section of deck so the front of the deck could be re-built.
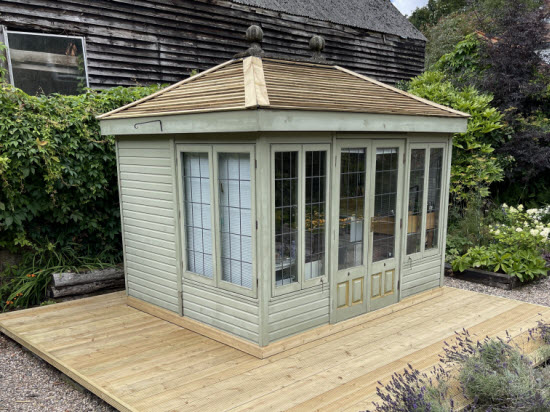 Finally, the summerhouse was moved into its original position and re-connected to the electricity supply.
All of this was completed in less than a week. This had been a specific concern of my customer as they had jewellery commissions to complete!
Once again, a successful completion and a happy customer.
Conclusion
As we conclude our excursion into the world of Malvern Summerhouse roofs, I hope that I have helped you understand that the life of a summerhouse does not wane with a leaking roof. In fact, it often initiates a fresh chapter of revival.
By understanding the charm and longevity that Cedar Shingles, Eco-Slate roofing, and Pressure-Treated Timber Slats can give your summerhouse and understanding the straightforward process of roof replacement - I hope by walking you through the entire journey I've shown that the whole process can be relatively painless.
My aim is to help you visualize how these traditional and modern materials can slot perfectly into the story of your summerhouse, breathing new vitality into it.
If you live in West Kent, East Sussex or South London and you have a Malvern summerhouse with a roof in need of some care and attention please get in touch.


Keep in touch with our monthly newsletter
Shed Building Monthly