Shed insulation - What is the payback period? A case study
My friend Andy keeps really detailed records of his cars petrol mileage. Every time he fills up with petrol he has a notebook and he records the exact amount of petrol bought, the price paid and the mileage of the car. Using these records he has a very accurate record of his expenditure and the cars performance.
I thought Andy's record keeping behaviour was a bit exceptional
Until I got chatting with another friend, Simon from Tunbridge Wells. Simon works in his shed which is located in his garden and has been keeping similarly detailed records of how much it was costing him to heat and light his garden office.
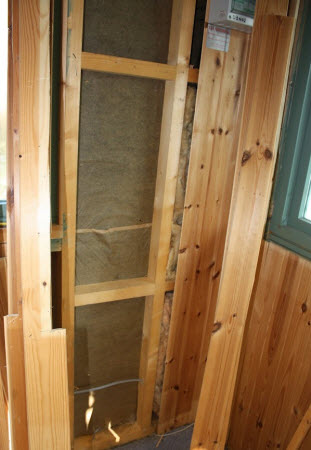
 Simons Garden Office
The office is 3m by 4m and has been relocated once during its life, when Simon last moved house. The shed had been built using glass fibre as the insulating material. Over the years this became displaced (and as work progressed it was found that the shed insulation was missing over large areas of wall. )
Simon was increasingly concerned about the amount of money that he was spending to heat the shed and also about achieving a comfortable working temperature in the days when he was working there.
Simon was keen to install shed insulation to improve his comfort factor and save money
After investigating the structure of the shed Simon found that he had room in the cavity of the wall for 50mm of foam board shed insulation (Simon used a brand called Celotex). A quick comparison showed that foam board insulation gives an insulation value of 0.02 W/m/K compared to 50mm of glass fibre insulation which would give an insulation value of 0.045 W/m/K. The lower value of the foam board means that it is over twice as good at retaining heat for the same thickness.
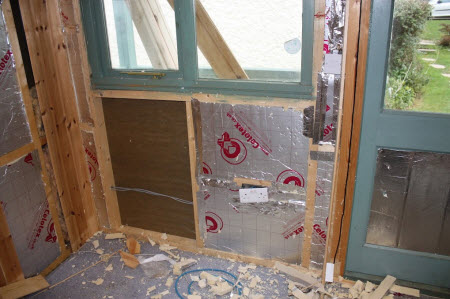
 Typical wall with tongue and groove cladding removed
The project was undertaken in stages
The internal pine wall cladding needed to be removed very carefully to avoid breaking it (which was virtually impossible). The gaps between the vertical wall timbers were different throughout the shed so each piece of Celotex foam had to be individually cut to size. In addition each board had to be cut to accommodate electrical sockets and channels were carved out of the foam to allow space to fit the wiring for the lights, sockets and heaters.
 Carving the insulating panel around the wall sockets
Despite the care taken to fit the insulation boards as exactly as possible, draughts still occurred. To minimise the loss of heat due to these cold draughts Simon used 'hundreds' of metres of aluminium tape to help make the shed air-tight. Sealing around the electrical wall sockets was a particular headache.
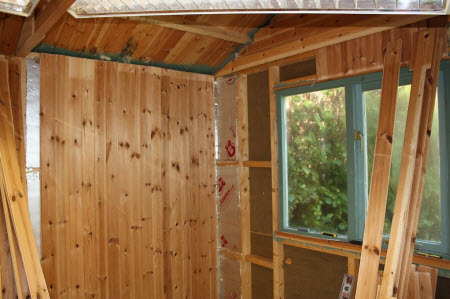 Replacing the tongue and groove boards
Once the walls were insulated the project moved on to the floor and roof
The original floor construction was a single layer of floorboards with a thick underlay and carpet. Simon's feet used to freeze during winter even with a fan heater on underneath his desk.
The foam insulation boards (the same as were used for the walls) were easily fixed between the floor joists and sealed with aluminium tape before replacing the floor boards.
The insulation phase of the project is now complete
But other elements are still required to upgrade the thermal performance of the shed.
The first item on the agenda is to install some acrylic glass secondary glazing. The original windows are double glazed the air gap is only 7mm wide so having another air gap should reduce air loss in that area.
Secondly the shed has double doors which let in a massive icy blast beneath them during winter. Draught excluders are to be fitted in these areas to make the shed more airtight.
When these two elements are finished the project will be complete.
So what did Simon learn during this project?
Firstly Simon found that with all of the cladding that had to be replaced a nail gun was essential for replacing the woodwork. It was also a great toy to 'invest' in.
An unexpected aspect of increasing the airtightness of the shed is that the shed gets a lot hotter in summer due to the sun shining in through the windows. Blinds are now to be installed to reduce this aspect of solar gain.
Simon had hoped that the insulation would improve the sound proofing
His work involves making very noisy telephone calls and the shed is right up against a neighbour's boundary. The soundproofing was disappointing and is probable due to the 'solid' nature of the insulation board. The original glass fibre insulation if used in conjunction with the foam board would probably have given a better result. However the space between the internal cladding was only 50mm and so unfortunately this was not possible.
With the winter months approaching and the project almost complete it will soon be put to the test!
So what are expected numbers in terms of energy saving?
Last winter Simon was spending over £4 per day to heat the office on the days that he used it (the office is used 2-3 days per week on average). The office does not need heating during the summer months.
Given that the project is just about complete figures are not available for the shed in its newly insulated condition. However Simon estimates that with the improvements the new heating cost will be around £2 per day.
In addition the new LED lighting that was installed at the same time as the shed insulation should save an additional 60 pence per day.
So for 9 months of the year the energy cost was £360 (9months * 4 weeks per month * 2.5 days per week * £4 per day = £320)
The new energy cost will be about £126 (9months * 4 weeks per month * 2.5 days per week * £1.40 per day = £126)
Giving an annual saving of £194.
The whole shed insulation project cost around £500, so the pay back period should be between 2 and 3 years. As an energy saving project that looks pretty good to me. Many domestic solar energy projects take over 7 years to recoup the initial investment.
So was the shed insulation project a success?
Like Andy and his monitoring of mileage and petrol costs, Simons record keeping gave him a great baseline to monitor how effective the shed insulation is. Those detailed records should help him to determine whether the projected savings match up to his expectations. I will be keeping in touch with Simon and get back to you with details of conditions in his shed in the forthcoming winter months.


Keep in touch with our monthly newsletter
Shed Building Monthly