Introducing the Shed Audit
An ounce of prevention is worth a pound of cure. A stitch in time saves nine.
Sayings such as this are good advice for catching problems before they progress too far in many areas of life. They are particularly applicable in the world of sheds and are the reasoning behind my latest invention - The Shed Audit.
What exactly is a Shed Audit?
A Shed Audit is the first line of preventative maintenance for your shed. Rather than wait until a small problem has grown into a larger one, the idea is to undertake an annual inspection of your shed to catch small problems in the bud before they develop further.
An important point about a Shed Audit is that it should be undertaken at the same time each year so that it becomes a habit. I recommend early autumn is a good time to put in your diary. The prompt is that the kids are going back to school, if you don't have kids you will notice that the journey to work takes longer! Also with wet and windy weather of autumn and winter on its way, it is a good time to identify and fix any small problems before they progress any further.
If the idea of saving time and money appeals to you then you may be wondering 'What exactly does a Shed Audit entail?'
There are five main parts to your Shed Audit
The Shed Audit only takes about 10 minutes so that is roughly two minutes for each of the headings below:
1. Walk around the outside of the shed
This is the introductory part of the audit, so we are looking at the big picture here.
How is the shed looking overall? Is the paintwork looking tired? Is there any damage or bits of the shed that are coming loose? Make sure that you take pictures and notes so that in future years you can compare any problems that seem 'marginal' to see if they have progressed.
2. Look at the roof for signs of damage
The roof is the part of the shed that is most exposed to the weather, the sun, the wind, the rain and falling debris. The effects of damage to the roof will mean that water can penetrate into the structure below.
In particular pay attention to the eaves, ridge and hips (if your shed has a hipped roof). These parts of the shed are more prone to localised damage from falling branches etc.
Then look closely for damage to the roofing felt or tiles. Is damage localised? - caused by a falling branch? Or is it extensive? - caused by a hailstorm.
How long was it since the shed had a new roof covering? Roofing materials have differing lifespans which can vary from 5 to 30 years depending on the material used. (see this article for more on how long you should expect your roof covering to last)
Finally look at the gutters and check that they are free of debris. A blocked gutter can mean water will overflow into the fabric of the shed walls.
3. Look at the walls for damage, particularly around windows
The walls are the next most exposed part of the shed after the roof. In particular look in detail at the external corners and junctions with the windows and doors. You may see gaps opening up or bits of the timber cladding that have split or become loose.
4. Inspect the area around the base
Watch for a build-up of debris, signs of animals or insects. In particular look for signs of potential water damage. The base of a shed is vulnerable to water from above and damp from the ground below.
Water from above; water draining from a roof can splash off the ground can keep the base of the shed wet for extended periods and promote rot.
Damp from ground below; a build-up of debris around the base of a shed can keep the timbers wet, again promoting rot. If you see a build-up of debris clear it away to restore natural ventilation to the base timbers.
5. Look inside the shed for signs of water leakage on any part of the roof or walls (water from above) and on the floor for signs of rotting below, saggy floor boards.
Whereas the external inspection is good for locating large scale damage, looking inside the shed you may help you to pick up signs of water leakage or localised rotting of timbers before they become widespread.
Once you have identified any damage the next step is to rectify it to stop a localised problem becoming more extensive. But that is the subject for a whole new article!
The Shed Audit only takes about 10 minutes but ignoring the warning signs can be costly.
An example of this is in the pictures below. Duncan McIntyre's shed suffered damage from a tree that was growing too close to his shed. The signs of damage could have been picked up early and involved a bit of pruning of the offending tree branch. However the problem wasn't spotted until too late - half the roof boards had to be replaced and all of the rafters!
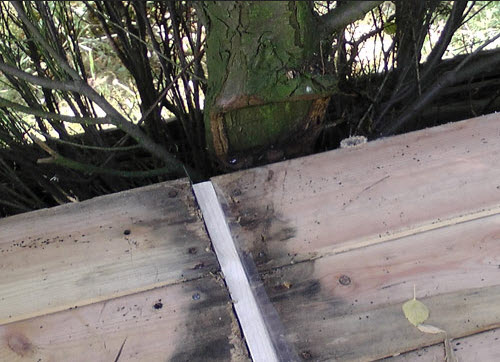 Damage to edge of shed roof caused by tree growing nearby
 Damage internal to shed caused water leakage and rotting rafters
The shed audit could have prevented this expensive and time consuming repair. Duncan should know as the inspiration for the Shed Audit came from him.
A five minute check can prevent costly repairs
By spending five minutes on the Shed Audit and looking quickly at:
- The whole shed
- The roof
- The walls
- The foundations
- The inside of the shed
You will be spending an ounce of effort on shed repairs as compared to the pound of effort that would be needed if the problem isn't spotted and dealt with at the time.
So the time to do your Shed Audit is now!
There is no time like the present and we all know that a stitch in time will save nine!
Related articles:
- How to re-cover a shed roof using epdm rubber
- How to install plastic guttering
- Which preservative to use to make your shed last longer


Keep in touch with our monthly newsletter
Shed Building Monthly